Raspberry Pi OS ① I2Cバスがたくさん使える
2020年5月27日に、いままでRaspbianと呼んでいた32ビットOSの呼び名がRaspberry Pi OSに変更されました。現時点で、64ビットRaspberry Pi OSがベータ・テスト中だそうです。
/boot/overlaysのREADMEを読むと、I2CやSPIバスが増えています。Raspberry Pi 3が発売されたときに、おおきく変更されていたようです。
●従来のままのI2C
バス1を従来から使っていました。後述しますが、/boot/config.txtに、Loadに書かれたように記述しなくてもこのバスは利用できます。
Name:   i2c1
Info:   Change i2c1 pin usage. Not all pin combinations are usable on all
        platforms - platforms other then Compute Modules can only use this
        to disable transaction combining.
Load:   dtoverlay=i2c1,<param>=<val>
Params: pins_2_3                Use pins 2 and 3 (default)
        pins_44_45              Use pins 44 and 45
        combine                 Allow transactions to be combined (default "yes")
|
●変更された用語
転送速度の指定は、従来dtparam=i2c_baudrate=50000と書きました。何も書かないと100kHzでした。dtparam=i2c_arm_baudrate=50000と書くのが正式だが、従来のままでもよいということですね。
  i2c_arm_baudrate        Set the baudrate of the ARM's i2c interface
                                (default "100000")
i2c_baudrate An alias for i2c_arm_baudrate |
●非推奨のI2C
検索すると、カーネルが4.14のときに使われていた記述のようです。無視してよいようです。
Name:   i2c0-bcm2708
Info:   Deprecated, legacy version of i2c0, from which it inherits its
        parameters, just adding the explicit individual pin specifiers.
Load:   <Deprecated>非推奨
Params: sda0_pin                GPIO pin for SDA0 (deprecated - use pins_*)
        scl0_pin                GPIO pin for SCL0 (deprecated - use pins_*)
Name:   i2c1-bcm2708
Info:   Deprecated, legacy version of i2c1, from which it inherits its
        parameters, just adding the explicit individual pin specifiers.
Load:   <Deprecated>非推奨
Params: sda1_pin                GPIO pin for SDA1 (2 or 44 - default 2)
        scl1_pin                GPIO pin for SCL1 (3 or 45 - default 3)
        pin_func                Alternative pin function (4 (alt0), 6 (alt2) - default 4)
|
●増えたI2C
バス2が抜けていますが、バス3からバス6が利用できるようです。
Name:   i2c3
Info:   Enable the i2c3 bus
Load:   dtoverlay=i2c3,<param>
Params: pins_2_3                Use GPIOs 2 and 3
        pins_4_5                Use GPIOs 4 and 5 (default)
        baudrate                Set the baudrate for the interface (default "100000")


Name:   i2c4
Info:   Enable the i2c4 bus
Load:   dtoverlay=i2c4,<param>
Params: pins_6_7                Use GPIOs 6 and 7
        pins_8_9                Use GPIOs 8 and 9 (default)
        baudrate                Set the baudrate for the interface (default "100000")


Name:   i2c5
Info:   Enable the i2c5 bus
Load:   dtoverlay=i2c5,<param>
Params: pins_10_11              Use GPIOs 10 and 11
        pins_12_13              Use GPIOs 12 and 13 (default)
        baudrate                Set the baudrate for the interface (default "100000")


Name:   i2c6
Info:   Enable the i2c6 bus
Load:   dtoverlay=i2c6,<param>
Params: pins_0_1                Use GPIOs 0 and 1
        pins_22_23              Use GPIOs 22 and 23 (default)
        baudrate                Set the baudrate for the interface (default "100000")
|
あまり見ない記述に、i2c_vcがあります。次の項目で登場しますが、HATのEEPROM用で使われています。
 i2c_vc                  Set to "on" to enable the i2c interface
                                usually reserved for the VideoCore processor
                                (default "off")
 i2c_vc_baudrate         Set the baudrate of the VideoCore i2c interface
                                (default "100000")
|
●不明なI2C
ID_SDとID_SC PINSのバス0は、
'0'のI2CはOSが立ち上がるときにEEPROMを探しに行った後、通常のI/Oピンに戻ります。利用するときは、/boot/config.txtに追加します。
※https://learn.sparkfun.com/tutorials/raspberry-pi-spi-and-i2c-tutorial 利用するときは、SDA、SCLラインはプルアップされていないので、たとえば10kΩ前後の抵抗で3.3Vへプルアップします。SO1602Aで動作を確認しました。 速度の変更は、下記のように記述します。
|
のように従来から使えていました。しかし、指定するpinsがどこにあるのかが不明です。
Name:   i2c0
Info:   Change i2c0 pin usage. Not all pin combinations are usable on all
        platforms - platforms other then Compute Modules can only use this
        to disable transaction combining.
Load:   dtoverlay=i2c0,<param>=<val>
Params: pins_0_1                Use pins 0 and 1 (default)
        pins_28_29              Use pins 28 and 29
        pins_44_45              Use pins 44 and 45
        pins_46_47              Use pins 46 and 47
        combine                 Allow transactions to be combined (default "yes")
|
回路図には、コメントが書かれています。一般のユーザは、バス0を使わないのがよいようです。
| DO NOT USE these pins for anything other than attaching an I2C ID EEPROM. Leave unconnected if ID EEPROM not required. |
●実際の記述
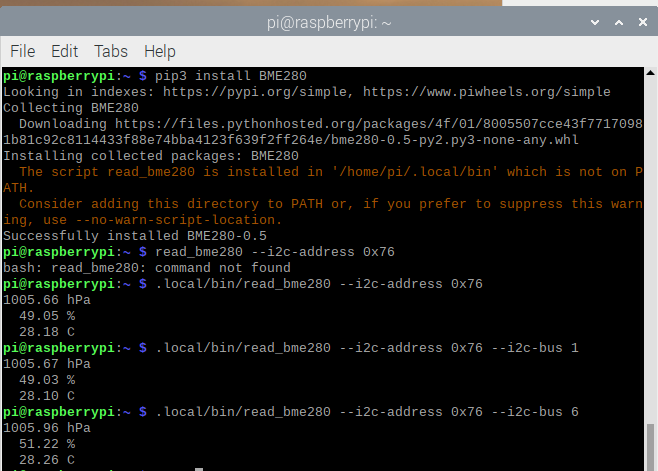
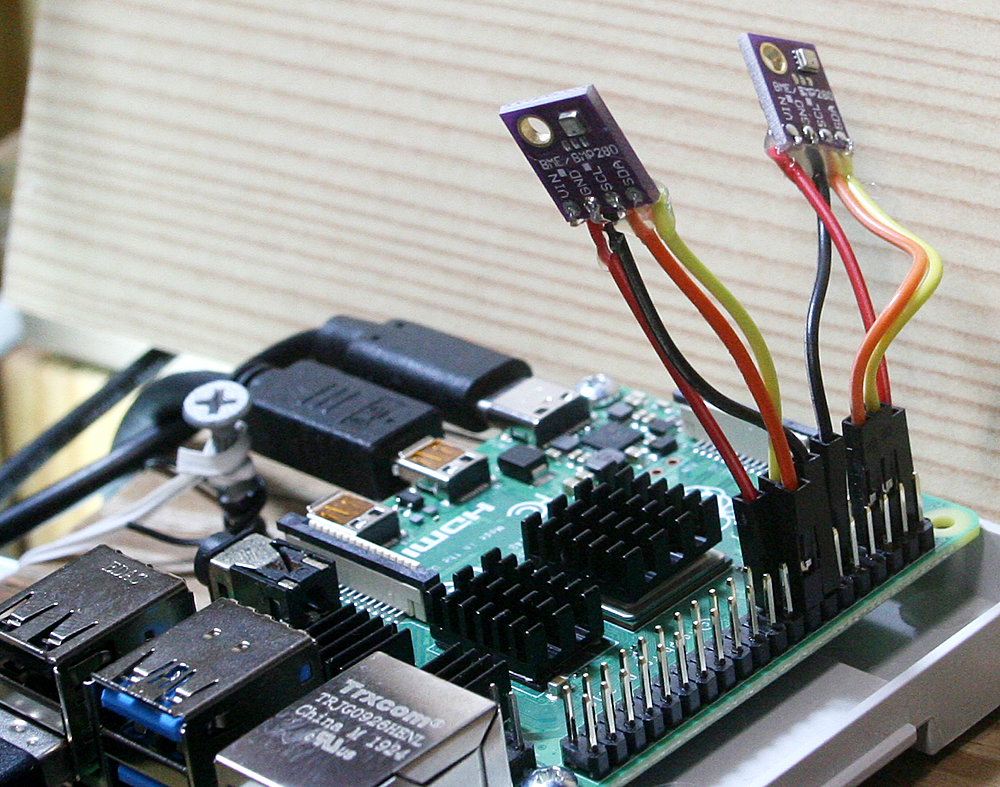
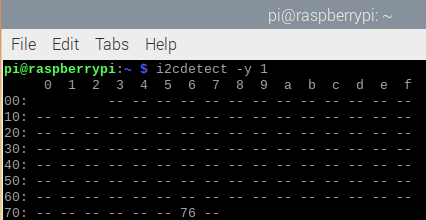
従来から使っていたバス1は、config.txtに何も記述せずに使えました。GPIO2-SDA、GPIO3-SCLにつないでいるのはMEMSセンサのBME280です。0x76に見つかりました。
>sudo nano /boot/config.txt
でエディタを立ち上げて、次の記述を追加しました。pinsはdefaultと書かれているピン番号です。pinsはpinでも通りました。
| dtoverlay=i2c3,pins_4_5 dtoverlay=i2c4,pins_8_9 dtoverlay=i2c5,pins_12_13 dtoverlay=i2c6,pins_22_23 |
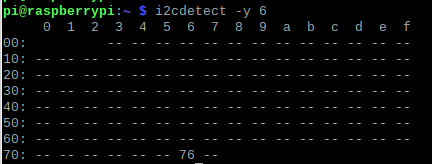
有効にするためにリブートします。GPIO22-SDA、GPIO23-SCLにBME280センサをつなぎました。バス6に見つけました。
(※)ラズパイのI2Cのバス1は、ボード内で1.8kΩの抵抗でプルアップされています(ラズパイ4では回路図にこの周辺部分が掲載されていない)。購入したBME280のボードにも10kΩの抵抗でプルアップされています。つなぐと、1.8kと10kが並列につながれます。合成抵抗は約1.5kΩです。低めですが、波形の崩れなどは未確認ですが、問題なく通信できています。
GPIO22、GPIO23にはプルアップ抵抗は入っていないと思われます。
●動作の確認
BME280のライブラリを入れます。
>pip3 install BME280
/home/pi/.local/binにインストールされたようです。bus1とbus6のどちらも温度、湿度、気圧を読み出しました。