今から始める電子工作 Step3 ⑥ Wi-Fi Webserver
このマイコン・ボードのWi-Fiに関するドキュメントは下記のWebページにあります。
サンプルで用意されているSimple Webserverを実行してみます。
●環境
- Arduino IDE;2.3.5
- Windows11;24H2
- Arduino UNO R4 WiFi
●Simple Webserverを実行
Simple Webserver.inoをコピペし、タブで、arduino_secrets.hを新規に作って、記述を追加し、保存します。

実行します。
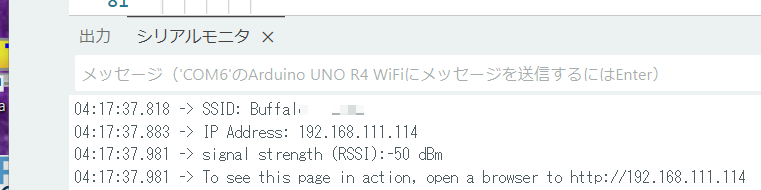
PCのWebクライアントから、http://192.168.111.114/をアクセスします。
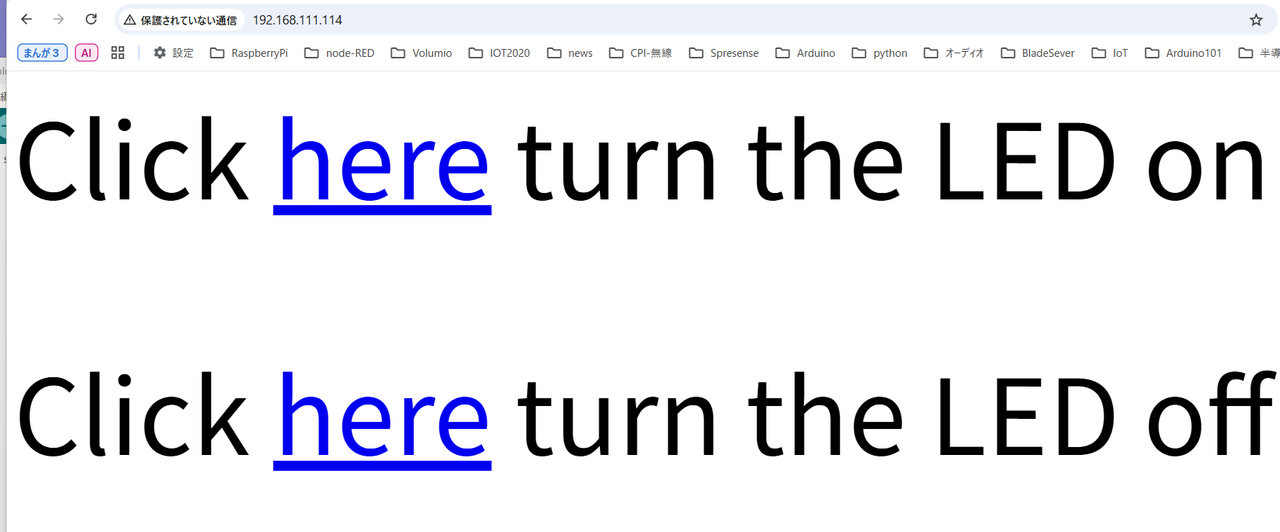
上のhereをクリックすると、D13のLEDが点灯、下のhereをクリックすると、消灯しました。
●温度と湿度を表示
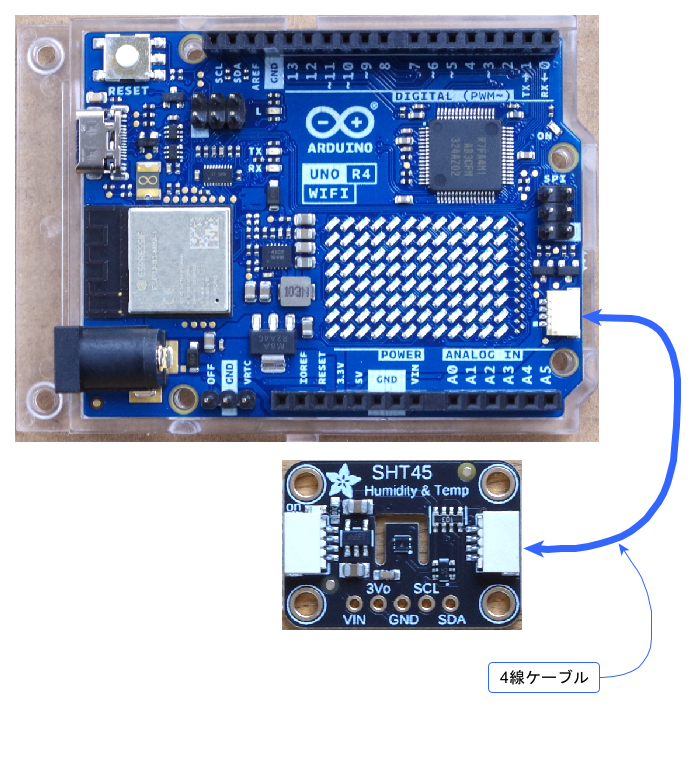
温湿度センサSHT45をI2Cバスにつないで、温度と湿度を測定します。そのデータを上記のスケッチに使います。
SHT45は下記のように配線します。
スケッチです。
下記の簡略的なアクセス方法を利用しています。
今から始める電子工作 ⑱ I2Cバス その2-2 温湿度センサSHT45、Wireライブラリ
#include "WiFiS3.h"

#include "arduino_secrets.h"
///////please enter your sensitive data in the Secret tab/arduino_secrets.h
char ssid[] = SECRET_SSID;        // your network SSID (name)
char pass[] = SECRET_PASS;    // your network password (use for WPA, or use as key for WEP)
int keyIndex = 0;                 // your network key index number (needed only for WEP)

int led =  LED_BUILTIN;
int status = WL_IDLE_STATUS;
WiFiServer server(80);

// add
#include <Wire.h>
const uint8_t SHT45_address = 0x44;
uint8_t readbuffer[6];
float temperature,humidity;

void setup() {
  Serial.begin(9600);      // initialize serial communication
  pinMode(led, OUTPUT);      // set the LED pin mode

  // add
  Wire1.begin();

  // check for the WiFi module:
  if (WiFi.status() == WL_NO_MODULE) {
    Serial.println("Communication with WiFi module failed!");
    // don't continue
    while (true);
  }

  // attempt to connect to WiFi network:
  while (status != WL_CONNECTED) {
    Serial.print("Attempting to connect to Network named: ");
    Serial.println(ssid);                   // print the network name (SSID);

    // Connect to WPA/WPA2 network. Change this line if using open or WEP network:
    status = WiFi.begin(ssid, pass);
    // wait 10 seconds for connection:
    delay(10000);
  }
  server.begin();                           // start the web server on port 80
  printWifiStatus();                        // you're connected now, so print out the status
}


void loop() {
  WiFiClient client = server.available();   // listen for incoming clients

  if (client) {                             // if you get a client,
    Serial.println("new client");           // print a message out the serial port
    String currentLine = "";                // make a String to hold incoming data from the client
    while (client.connected()) {            // loop while the client's connected
      if (client.available()) {             // if there's bytes to read from the client,
        char c = client.read();             // read a byte, then
        Serial.write(c);                    // print it out to the serial monitor
        if (c == '\n') {                    // if the byte is a newline character

          // if the current line is blank, you got two newline characters in a row.
          // that's the end of the client HTTP request, so send a response:
          if (currentLine.length() == 0) {
            // HTTP headers always start with a response code (e.g. HTTP/1.1 200 OK)
            // and a content-type so the client knows what's coming, then a blank line:
            client.println("HTTP/1.1 200 OK");
            client.println("Content-type:text/html");
            client.println("Connection: close");  // the connection will be closed after completion of the response
            client.println("Refresh: 5");  // refresh the page automatically every 5 sec
            client.println();

          // add
          client.print("<head> <meta charset='UTF-8'> </head>");

          readSHT45();
          Serial.println(" temperature= "+String(temperature,1)+"'C");
          Serial.println(" RH%= "+String(humidity,0));

          client.println("<html>");
          client.print("<p {font-family: '游ゴシック';} , style=\"font-size:5vw;\">現在の温度 ; " +String(temperature,1)+ "℃</p>");
          client.print("<p {font-family: '游ゴシック';} , style=\"font-size:5vw;\">現在の湿度 ; " +String(humidity,0)+ "%</p>");
          client.println("</html>");

          delay(3000);
          }
        }
      }
    }
  }
}

void printWifiStatus() {
  // print the SSID of the network you're attached to:
  Serial.print("SSID: ");
  Serial.println(WiFi.SSID());

  // print your board's IP address:
  IPAddress ip = WiFi.localIP();
  Serial.print("IP Address: ");
  Serial.println(ip);

  // print the received signal strength:
  long rssi = WiFi.RSSI();
  Serial.print("signal strength (RSSI):");
  Serial.print(rssi);
  Serial.println(" dBm");
  // print where to go in a browser:
  Serial.print("To see this page in action, open a browser to http://");
  Serial.println(ip);
}

// add
float readSHT45(){
    Wire1.beginTransmission(SHT45_address);
        Wire1.write(0xfd);
    Wire1.endTransmission();
    delay(10);
    Wire1.requestFrom(SHT45_address, 6);
    readbuffer[0] = Wire1.read();
    readbuffer[1] = Wire1.read();
    readbuffer[2] = Wire1.read(); // CRC
    readbuffer[3] = Wire1.read();
    readbuffer[4] = Wire1.read();
    readbuffer[5] = Wire1.read(); // CRC

    int temp = readbuffer[0] * 256 + readbuffer[1];
    int humi = readbuffer[3] * 256 + readbuffer[4];
    temperature = -45 + 175 * temp / 65535;
    humidity = -6 + 125 * humi / 65535;
    return temperature, humidity;
}
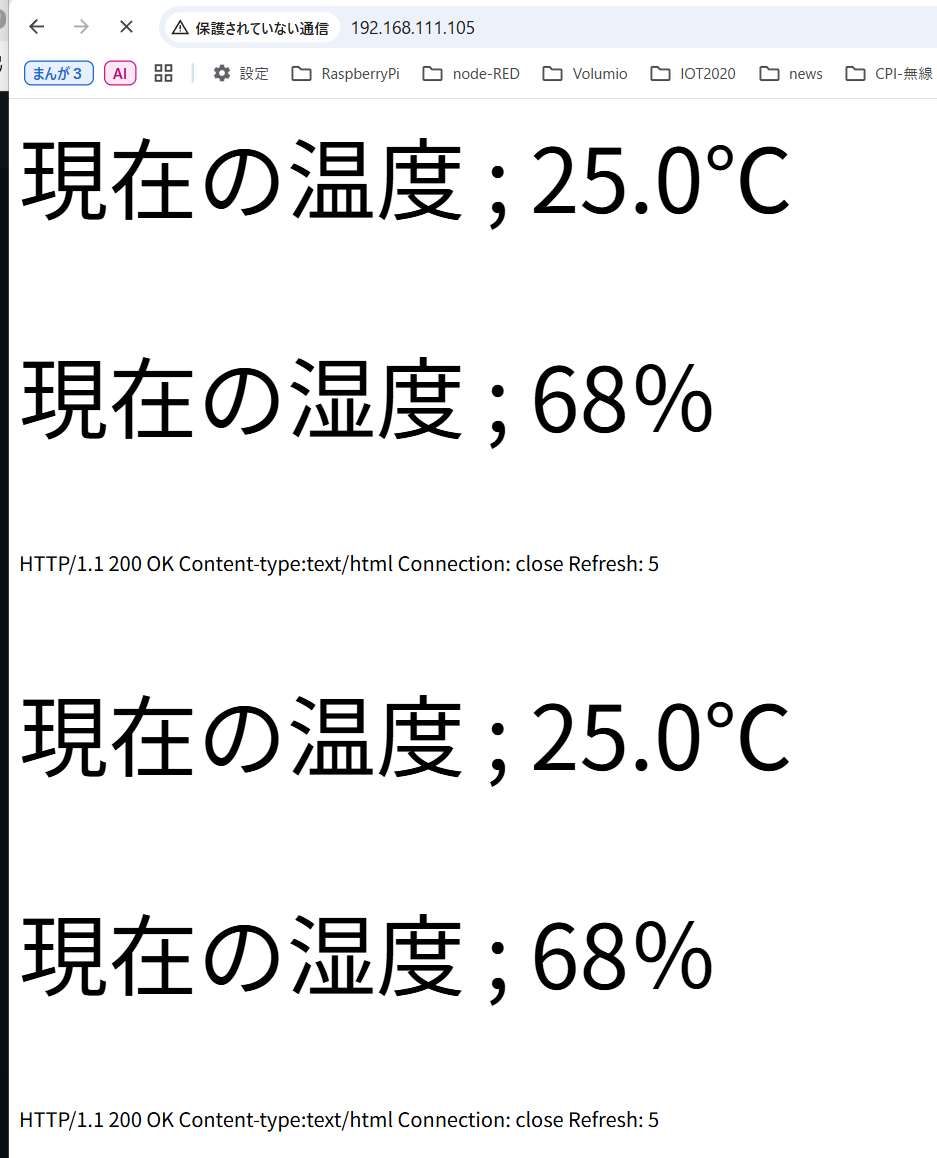
実行中の様子です。http://192.168.111.105/