初めてのBLE (19) CircuitPythonでペリフェラル③ BME280
この連載の一連の実験と同様に、MEMSセンサのBME280をマイコン・ボードFeather nRF52840 Expressに取り付けて、温度、気圧、湿度を送れるようにします。CircuitPythonのプログラムではUARTサービスを利用しているので、テキストで、三つのデータを送ることにします。
●BME280をつなぐ
今までと同様にI2Cでつなぎます。入手したボードでは、スレーブ・アドレスが0x76に設定されています。
| BME280 | Feather nRF52840 Express |
|---|---|
| Vcc | 3V(3.3V) |
| GND | GND |
| SCL | SCL |
| SDA | SDA |
●BME280の動作確認
examplesに入っているbme280_simpletest.pyを読み込みます。1か所スレーブ・アドレスを変更します。
bme280 = adafruit_bme280.Adafruit_BME280_I2C(i2c,0x76)
保存して実行します。
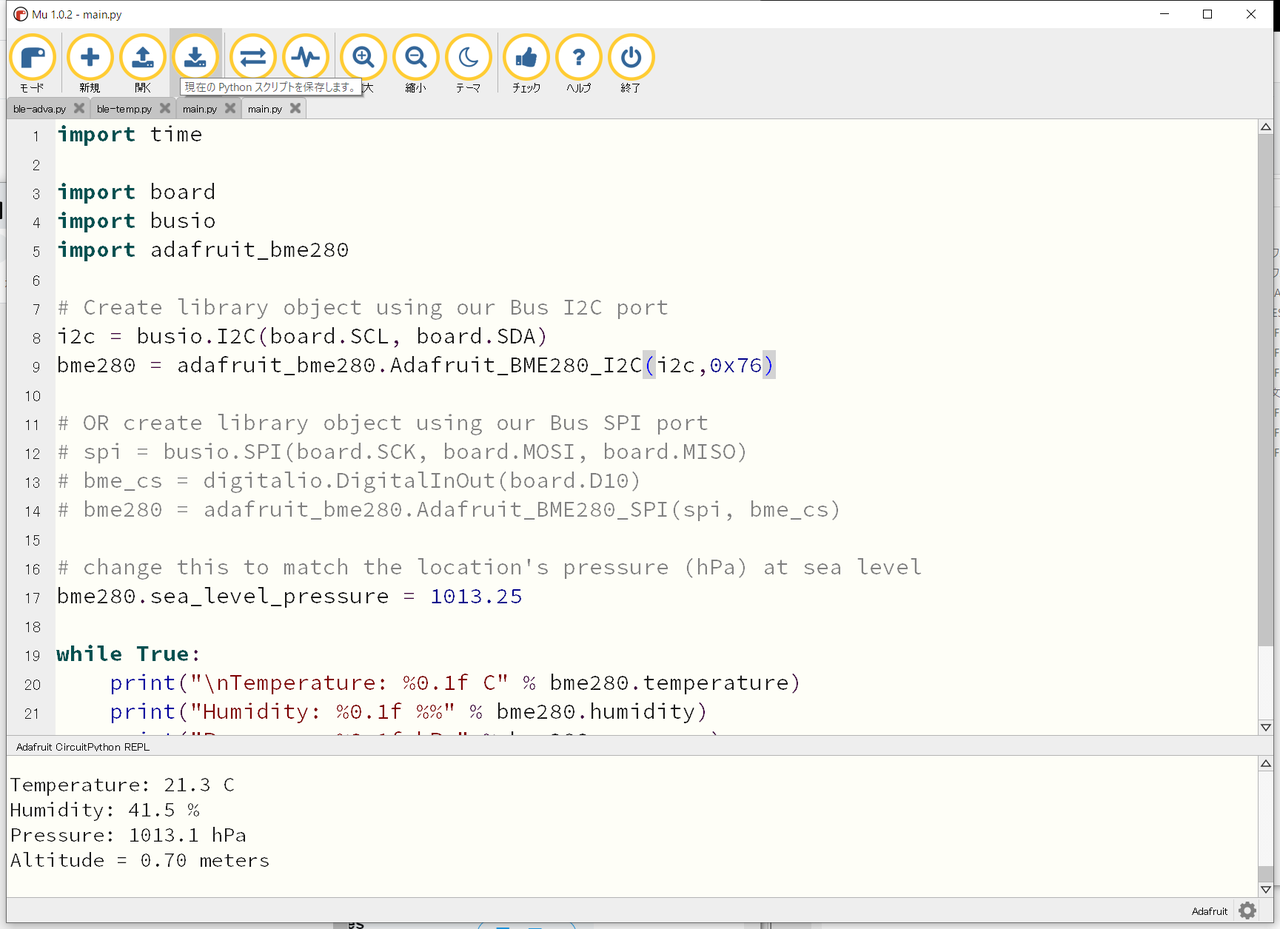
必要な場所だけ残します。
import time

import board
import busio
import adafruit_bme280

i2c = busio.I2C(board.SCL, board.SDA)
bme280 = adafruit_bme280.Adafruit_BME280_I2C(i2c,0x76)

while True:
    print(bme280.temperature, bme280.pressure, bme280.humidity)
    time.sleep(2)
●ペリフェラル
ペリフェラルは、Feather nRF52840 Expressで作ります。
第17回の温度のプログラムと上記のプログラムを合体します。write()内で'xxxx'のような文字なら長くても送れるのですが、三つの測定値をstr()で変換して送ろうとすると、エラーが出たり、送られたデータが意味不明だったりしました。
温度は小数点第一位、気圧と湿度は整数にしました。センサの確度から言えば、適正だと思います。三つの数値はカンマで区切りましたが、コロンでも、あとで分離しやすい文字であればよいです。
import time
from adafruit_ble import BLERadio
from adafruit_ble.advertising.standard import ProvideServicesAdvertisement
from adafruit_ble.services.nordic import UARTService
import board
import busio
import adafruit_bme280

ble = BLERadio()
ble.name = "Feather nRF52840 Express"
uart = UARTService()
advertisement = ProvideServicesAdvertisement(uart)

i2c = busio.I2C(board.SCL, board.SDA)
bme280 = adafruit_bme280.Adafruit_BME280_I2C(i2c, 0x76)

while True:
    ble.start_advertising(advertisement)
    while not ble.connected:
        pass
    while ble.connected:
        print('connected ')
        s0 = str(round(bme280.temperature,1)) + ','
        s1 = str(int(bme280.pressure)) + ','
        s2 = str(int(bme280.humidity))
        print(s0+s1+s2)
        uart.write(s0+s1+s2)
        time.sleep(3)
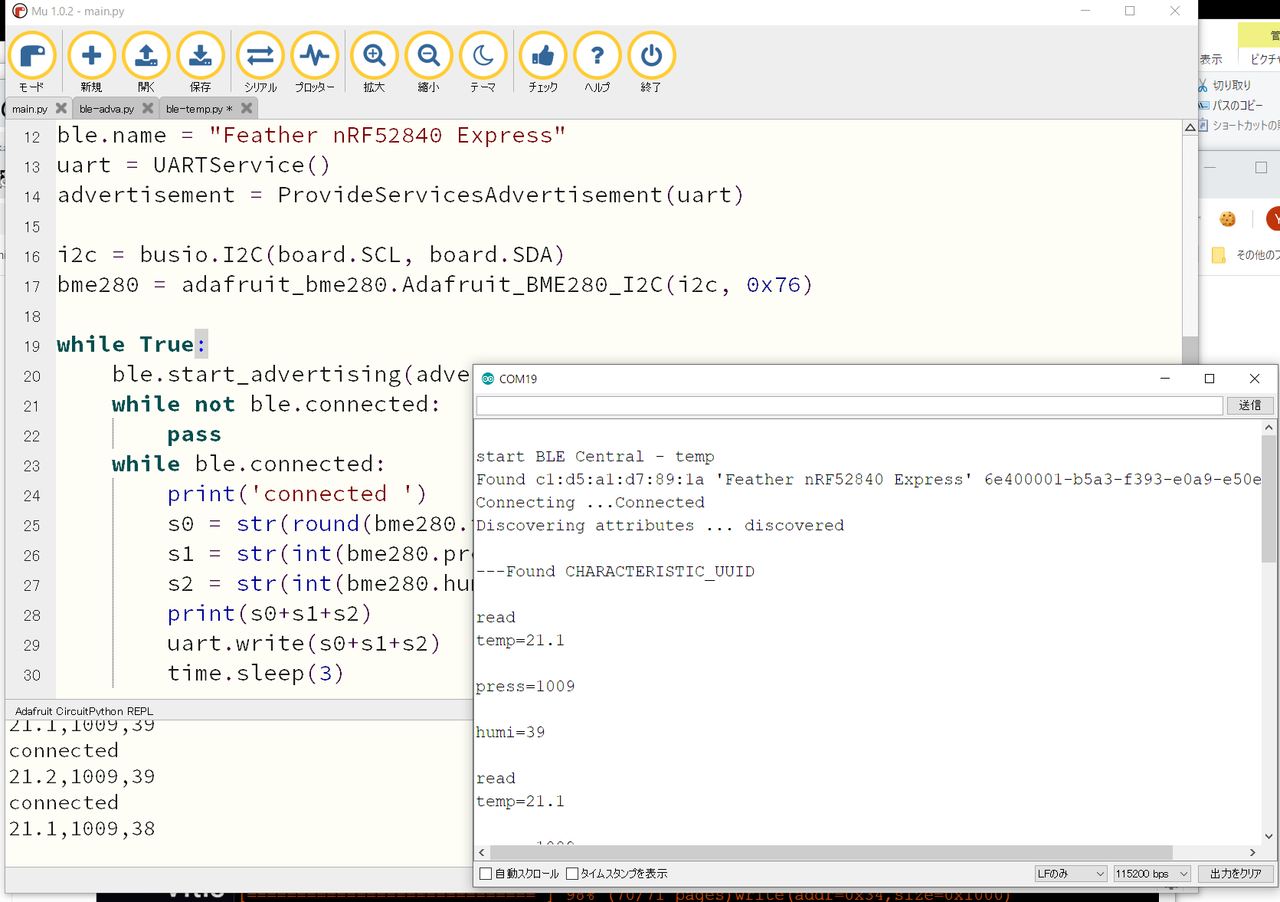
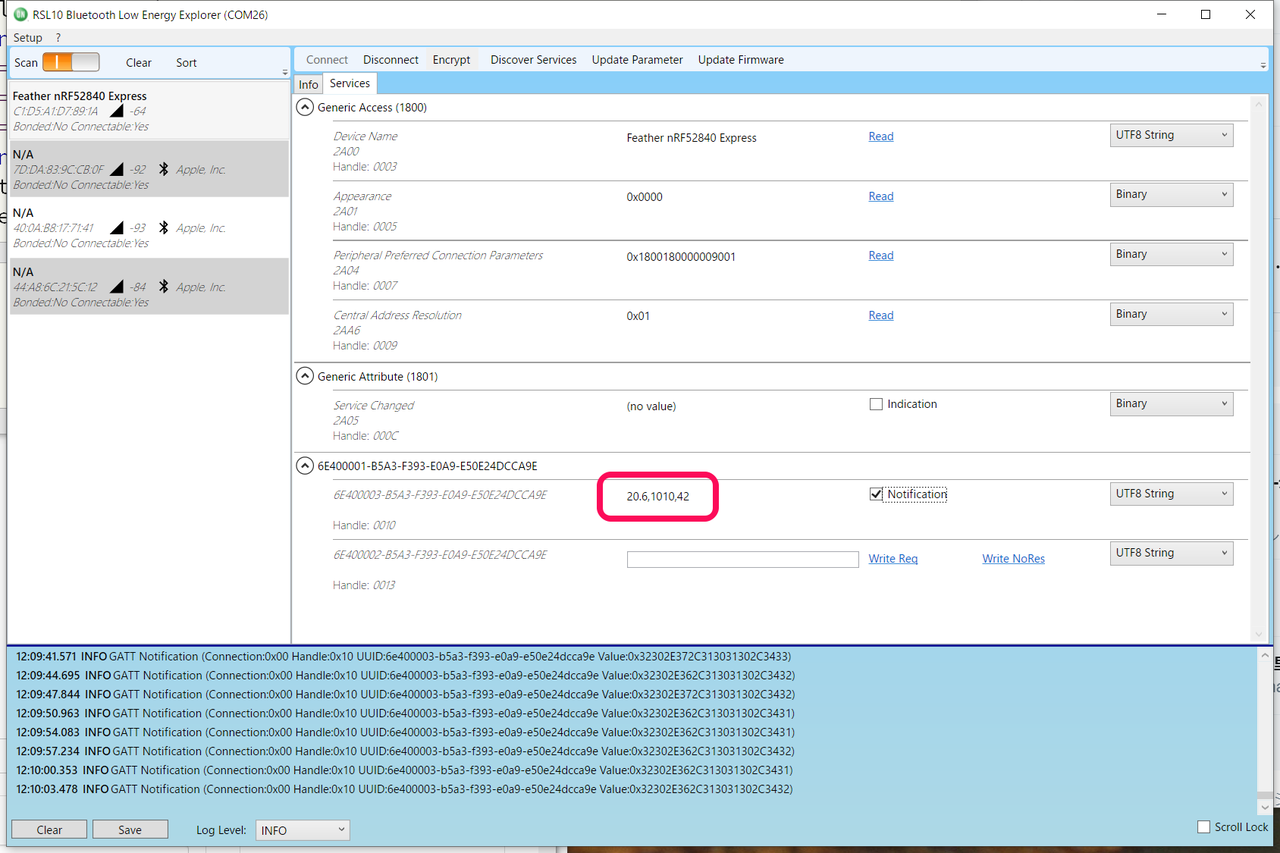
RSL10 Bluetooth Low Enaergy Exploerからつなぎました。想定通りのセンサ値が送られていることが確認できました。
●セントラル
NANO 33 BLE senseでセントラルを動かします。第16回のスケッチをベースに修正します。
93行で、変数dataにキャラUART(RX)から文字データを取り込みます。97~104行では、最初のカンマを見つけ、そこまでの文字(温度)を取り出します。106~113行では、温度の文字を削り、カンマを見つけ、気圧の文字を取り出します。最後の115~117行は、気圧の文字を削れば、残った文字が湿度になります。
#include <ArduinoBLE.h>

#define SERVICE_UUID         "6e400001-b5a3-f393-e0a9-e50e24dcca9e"  // UART
#define characteristicTxUUID "6e400002-b5a3-f393-e0a9-e50e24dcca9e"  // Tx
#define characteristicRxUUID "6e400003-b5a3-f393-e0a9-e50e24dcca9e"  // Rx
#define localNAME "Feather nRF52840 Express"

void setup() {
  Serial.begin(9600);
  while (!Serial);

  BLE.begin();
  Serial.println("\nstart BLE Central - BME280-UART");
  // start scanning for peripherals
  BLE.scanForName(localNAME);
}

void loop() {
  // check if a peripheral has been discovered
  BLEDevice peripheral = BLE.available();

  if (peripheral) {
    // discovered a peripheral, print out address, local name, and advertised service
    Serial.print("Found ");
    Serial.print(peripheral.address());
    Serial.print(" '");
    Serial.print(peripheral.localName());
    Serial.print("' ");
    Serial.print(peripheral.advertisedServiceUuid());
    Serial.println();

    if (peripheral.localName() != localNAME) {
      return;
    }

    // stop scanning
    BLE.stopScan();

    readUARTdata(peripheral);

    // peripheral disconnected, start scanning again
    BLE.scanForName(localNAME);
  }
}

void readUARTdata(BLEDevice peripheral) {
  // connect to the peripheral
  Serial.print("Connecting ...");

  if (peripheral.connect()) {
    Serial.println("Connected");
  } else {
    Serial.println("Failed to connect!");
    return;
  }

  // discover peripheral attributes
  Serial.print("Discovering attributes ...");
  if (peripheral.discoverAttributes()) {
    Serial.println(" discovered\n");
  } else {
    Serial.println("Attribute discovery failed!");
    peripheral.disconnect();
    return;
  }
  // retrieve the LED characteristic
  BLECharacteristic UARTCharacteristic  = peripheral.characteristic(characteristicRxUUID);

  if (!UARTCharacteristic) {
    Serial.println("Peripheral does not have UART characteristic!");
    peripheral.disconnect();
    return;
  }

  Serial.println("---Found CHARACTERISTIC_UUID");
  while (peripheral.connected()) {
  //  Serial.println("connected");
  if (UARTCharacteristic.canRead()) { // start Notify?
    Serial.println("canread");
  } else {
  //  Serial.println("error reading characteristic value");

    // read the characteristic value
    UARTCharacteristic.read();
    Serial.print("\nread ");
    if (UARTCharacteristic.valueLength() > 0) {
    //  Serial.print("length= ");Serial.println(UARTCharacteristic.valueLength());
      String data = "";
      int i =0;
      int l = UARTCharacteristic.valueLength();
      while (l > 0) {
        l = l -1;
        data.concat(((char)*(UARTCharacteristic.value()+i)));
  //            Serial.print("i=  ");Serial.print(i);Serial.print("  ");Serial.println((char)data);
        i += 1;
      }
      byte buf[]="";
      Serial.println(data);
      //Serial.println(data.indexOf(","));
      data.getBytes(buf, data.indexOf(",")+1);
      Serial.print("\ntemp=");
      for (int k=0; k<=(data.indexOf(",")) ; k++){
        Serial.print((char)buf[k]);
      }
      Serial.println();
      data = data.substring(data.indexOf(",")+1);
      //Serial.println(data);
      byte buf2[]="";
      data.getBytes(buf2, data.indexOf(",")+1);
      Serial.print("\npress=");
      for (int k=0; k<=(data.indexOf(",")) ; k++){
        Serial.print((char)buf2[k]);
      }
      Serial.println();
      data = data.substring(data.indexOf(",")+1);
      Serial.print("\nhumi=");
      Serial.println(data);

      delay(5000);
    }
  }
}

  Serial.println("Peripheral disconnected");
}
実行している様子です。送ったデータが、そのまま表示できました。