初めてのArduino ⑥ UNOボードで温度を測る(その1 LM35DZ)
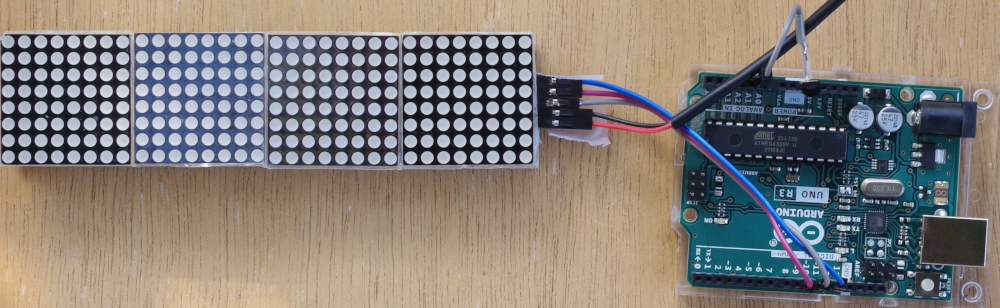
前回までで、Arduino UNOにLEDマトリクス表示器をSPIバス経由で接続し、アナログ入力端子から電圧を読み取って表示するところまでできました。
ここからは、センサを扱います。前回アナログ入力端子を使ったので、温度センサもアナログ出力のデバイスを使います。
●温度センサ
市販の温度センサを大雑把に分類します。
- 安価なサーミスタ。測定温度範囲も広く、レスポンスもよい
- 熱電対。各種素材によって測定温度範囲は異なるが、Kだと-200~+1200°Cと広範囲
- 白金測温体は悪環境でも測定でき、測定温度範囲も広い
- トランジスタの温度特性を使ったアナログ出力のデバイス
- トランジスタの温度特性を使ったディジタル出力のデバイス
- 湿度や気圧センサの温度補正用に使われるセンサのディジタル出力のデバイス
●温度センサLM35DZの特徴
小さなトランジスタと同じ形状をしています。サーミスタのように風が吹いても温度が変わるような素早いレスポンスはないが、温度変化には敏感に反応します。
0℃の時に出力は0.000Vです。温度に正比例して出力電圧が上がっていきます。20℃のときに0.020Vですから、100倍すれば、摂氏の温度になります。
| 温度℃ | 10 | 20 | 50 | 100 |
| 電圧mV | 100 | 200 | 500 | 1000 |
動作電圧は4~30Vです。消費電流は60μA未満です。
測定範囲は-55~150℃ですが、0℃(2℃)以下はマイナス電源が必要です。
25℃における確度は±0.5℃です。
●接続
Bottom View=リード線の出ている底から見た図です。
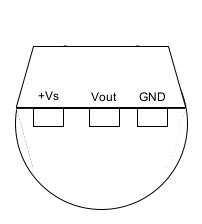
| LM35DZ | Arduino |
|---|---|
| +Vs | 5V |
| Vout | A0 |
| GND | GND |
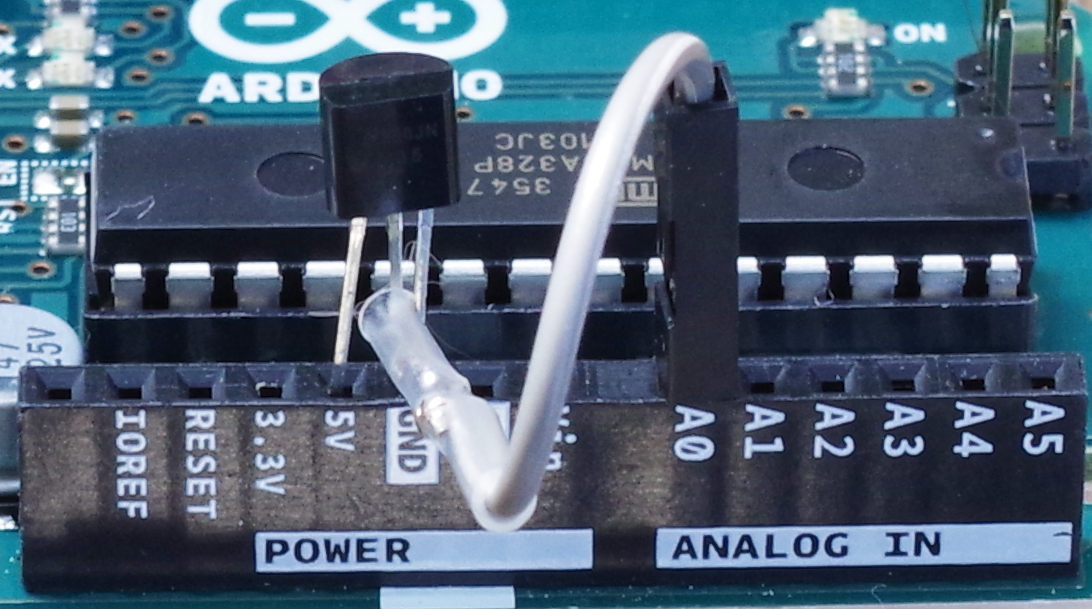
Voutにリード線をはんだ付けし、A0に差し込む。+VsとGND端子は、そのまま差し込む。
●スケッチ①
前回のスケッチの中で、電圧analogSensorDataを100倍します。
センサの確度は±0.5℃なので、小数点第1位まで表示すればよいと思いますが、とりあえず、小数点第3位まで表示しています。
A-Dコンバータは基準電圧は3.3Vを使っています。したがって、1LSBは3.2mVです。温度に換算すると0.32℃で、とても荒い分解能になります。
#include <LEDMatrixDriver.hpp>

int8_t LEDMATRIX_CS_PIN  = 10;
int8_t LEDMATRIX_SEGMENTS = 4;
int8_t LEDMATRIX_WIDTH  =  LEDMATRIX_SEGMENTS * 8;
int8_t sensorPin = A0;
float Vcc = 3.3;
int16_t sensorValue;
float analogSensorData;

LEDMatrixDriver lmd(LEDMATRIX_SEGMENTS, LEDMATRIX_CS_PIN);

void setup() {
  Serial.begin(9600);
  // init the display
  lmd.setEnabled(true);
  lmd.setIntensity(2);   // 0 = low, 10 = high
  analogReference(EXTERNAL);
}

void loop(){
  sensorValue = analogRead(sensorPin);
  analogSensorData = 100 *  Vcc * sensorValue / 1024.0;

  String sensorValueSTR = String(analogSensorData, DEC);
  char Buf[10]="20.1234";
  sensorValueSTR.toCharArray(Buf, 10);
  drawString(Buf, 6, 0, 0);
  lmd.display();
  delay(1000);
}
fonts.inoの部分です。
// This is the font definition. You can use http://gurgleapps.com/tools/matrix to create your own font or sprites.
// If you like the font feel free to use it. I created it myself and donate it to the public domain.
     byte font[95][8] = { {0,0,0,0,0,0,0,0}, // SPACE
                     {0x10,0x18,0x18,0x18,0x18,0x00,0x18,0x18}, // EXCL
                     {0x28,0x28,0x08,0x00,0x00,0x00,0x00,0x00}, // QUOT
                     {0x00,0x0a,0x7f,0x14,0x28,0xfe,0x50,0x00}, // #
                     {0x10,0x38,0x54,0x70,0x1c,0x54,0x38,0x10}, // $
                     {0x00,0x60,0x66,0x08,0x10,0x66,0x06,0x00}, // %
                     {0x60,0x60,0x1c,0x12,0x20,0x20,0x12,0x0c}, // C// &
                     {0x00,0x10,0x18,0x18,0x08,0x00,0x00,0x00}, // '
                     {0x02,0x04,0x08,0x08,0x08,0x08,0x08,0x04}, // (
                     {0x40,0x20,0x10,0x10,0x10,0x10,0x10,0x20}, // )
                     {0x00,0x10,0x54,0x38,0x10,0x38,0x54,0x10}, // *
                     {0x00,0x08,0x08,0x08,0x7f,0x08,0x08,0x08}, // +
                     {0x00,0x00,0x00,0x00,0x00,0x18,0x18,0x08}, // COMMA
                     {0x00,0x00,0x00,0x00,0x7e,0x00,0x00,0x00}, // -
                     {0x00,0x00,0x00,0x00,0x00,0x00,0x60,0x60}, // DOT
                     {0x00,0x04,0x04,0x08,0x10,0x20,0x40,0x40}, // /
                     {0x30,0x48,0x48,0x48,0x48,0x48,0x30,0x00}, // 0
                     {0x20,0x60,0x20,0x20,0x20,0x20,0x70,0x00}, // 1
                     {0x30,0x48,0x08,0x08,0x30,0x40,0x78,0x00}, // 2
                     {0x30,0x48,0x08,0x30,0x08,0x08,0x70,0x00}, // 3
                     {0x10,0x10,0x30,0x50,0x78,0x10,0x10,0x00}, // 4
                     {0x70,0x40,0x40,0x30,0x08,0x08,0x70,0x00}, // 5
                     {0x30,0x40,0x40,0x70,0x48,0x48,0x30,0x00}, // 6
                     {0x78,0x48,0x10,0x20,0x20,0x20,0x20,0x00}, // 7
                     {0x30,0x48,0x48,0x30,0x48,0x48,0x30,0x00}, // 8
                     {0x30,0x48,0x48,0x38,0x08,0x08,0x30,0x00}, // 9

                      // (the font does not contain any lower case letters. you can add your own.)
                  };    // {}, //

/**
 * This function draws a string of the given length to the given position.
 */
void drawString(char* text, int len, int x, int y ){
  //Serial.println("---");
  int flag=0;
  for( int idx = 0; idx < len; idx ++ ){
    int c = text[idx] - 32;

    // stop if char is outside visible area
    if( x + idx * 5  > LEDMATRIX_WIDTH )
      return;

    // only draw if char is visible
    if( 4 + x + idx * 4 > 0 )
      if (!flag)
        drawSprite( font[c], x+1 + idx * 5, y, 5, 8 );
      else  {
        drawSprite( font[c], x-1 + idx * 5, y, 5, 8 );
        flag = 1;}

      if (c==14) flag = 1;
  }
}

/**
 * This draws a sprite to the given position using the width and height supplied (usually 8x8)
 */
void drawSprite( byte* sprite, int x, int y, int width, int height ){
  // The mask is used to get the column bit from the sprite row
  byte mask = B10000000;
  for( int iy = 0; iy < height; iy++ ){
    for( int ix = 0; ix < width; ix++ ){
      lmd.setPixel(x + ix, y + iy, (bool)(sprite[iy] & mask ));

      // shift the mask by one pixel to the right
      mask = mask >> 1;
    }

    // reset column mask
    mask = B10000000;
  }
}
●スケッチ②
温度の最後に℃を追加します。drawSprite()で右端に直接書き込みます。℃は8×8のデータで構成しています。
A-D変換の分解能を上げるために、内部基準電源に変更します。AREFと3.3Vの接続ケーブルは外します。
float Vcc = 1.1;
fontテーブルがfonts.ino側にあるとエラーが消えないので、前に持ってきました。fontテーブル自体も、必要な部分を残してシンプルにしました。
fonts.inoの部分です。
/**
 * This function draws a string of the given length to the given position.
 */
void drawString(char* text, int len, int x, int y ){
  //Serial.println("===");
  int flag=0;
  for( int idx = 0; idx < len; idx ++ ){
    int c = text[idx] ;
    // stop if char is outside visible area
    if( x + idx * 5  > LEDMATRIX_WIDTH )
      return;

    // only draw if char is visible
    if( 4 + x + idx * 4 > 0 )
      if (!flag) {
        drawSprite( font[c-44], x+1 + idx * 5, y, 5, 8 );
      } else  {
        drawSprite( font[c-44], x-1 + idx * 5, y, 5, 8 );
        flag = 1;
      }

      if (c==46) flag = 1;
  }
}

/**
 * This draws a sprite to the given position using the width and height supplied (usually 8x8)
 */
void drawSprite( byte* sprite, int x, int y, int width, int height ){
  // The mask is used to get the column bit from the sprite row
  byte mask = B10000000;
  for( int iy = 0; iy < height; iy++ ){
    for( int ix = 0; ix < width; ix++ ){
      lmd.setPixel(x + ix, y + iy, (bool)(sprite[iy] & mask ));

      // shift the mask by one pixel to the right
      mask = mask >> 1;
    }

    // reset column mask
    mask = B10000000;
  }
}
メイン部分です。fontテーブルのドット、数値関係が変わっているので、それに伴ってスケッチの途中も比較値を変更している部分があります。
#include <LEDMatrixDriver.hpp>

int8_t LEDMATRIX_CS_PIN  = 10;
int8_t LEDMATRIX_SEGMENTS = 4;
int8_t LEDMATRIX_WIDTH  =  LEDMATRIX_SEGMENTS * 8;
int8_t sensorPin = A0;
float Vcc = 1.1;
int16_t sensorValue;
float analogSensorData;

// This is the font definition. You can use http://gurgleapps.com/tools/matrix to create your own font or sprites.
// If you like the font feel free to use it. I created it myself and donate it to the public domain.
     byte font[14][8] = { {0,0,0,0,0,0,0,0}, // SPACE
                     {0x60,0x60,0x1c,0x12,0x20,0x20,0x12,0x0c}, // `C
                     {0x00,0x00,0x00,0x00,0x00,0x00,0x60,0x60}, // DOT
                     {0,0,0,0,0,0,0,0},
                     {0x30,0x48,0x48,0x48,0x48,0x48,0x30,0x00}, // 0
                     {0x20,0x60,0x20,0x20,0x20,0x20,0x70,0x00}, // 1
                     {0x30,0x48,0x08,0x08,0x30,0x40,0x78,0x00}, // 2
                     {0x30,0x48,0x08,0x30,0x08,0x08,0x70,0x00}, // 3
                     {0x10,0x10,0x30,0x50,0x78,0x10,0x10,0x00}, // 4
                     {0x70,0x40,0x40,0x30,0x08,0x08,0x70,0x00}, // 5
                     {0x30,0x40,0x40,0x70,0x48,0x48,0x30,0x00}, // 6
                     {0x78,0x48,0x10,0x20,0x20,0x20,0x20,0x00}, // 7
                     {0x30,0x48,0x48,0x30,0x48,0x48,0x30,0x00}, // 8
                     {0x30,0x48,0x48,0x38,0x08,0x08,0x30,0x00}, // 9
                  };

LEDMatrixDriver lmd(LEDMATRIX_SEGMENTS, LEDMATRIX_CS_PIN);

void setup() {
  Serial.begin(9600);
  // init the display
  lmd.setEnabled(true);
  lmd.setIntensity(2);   // 0 = low, 10 = high
  analogReference(INTERNAL);
}

void loop(){
  sensorValue = analogRead(sensorPin);
  analogSensorData = 100.0 * Vcc * sensorValue / 1024.0;

  String sensorValueSTR = String(analogSensorData, DEC);
  char Buf[10]="11.890";
  sensorValueSTR.toCharArray(Buf, 10);
  drawString(Buf, 5, 0, 0);

  drawSprite( font[1], 24, 0, 8, 8 );
  lmd.display();
  delay(1000);
}
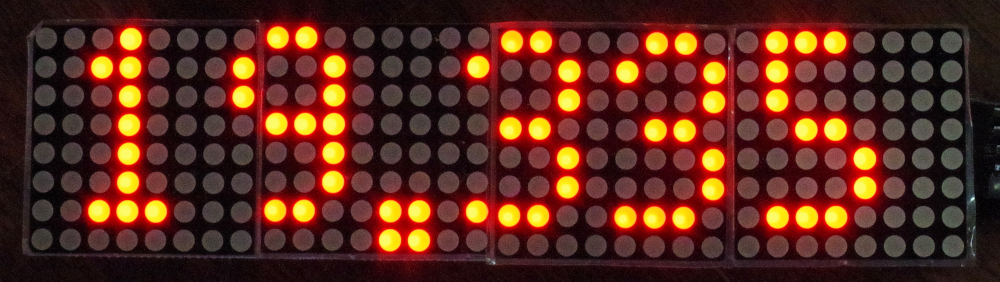
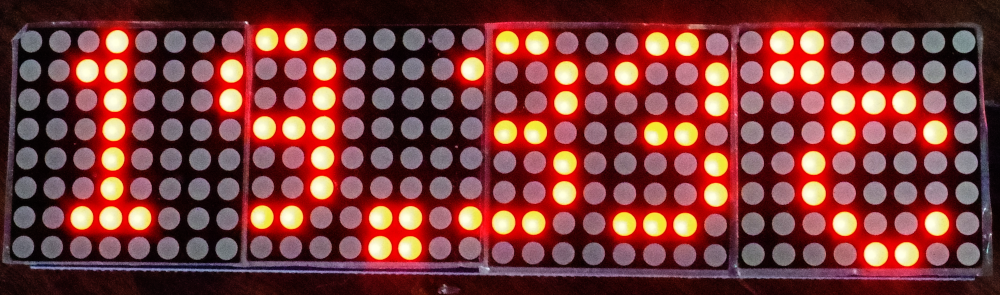
実行しました。1LSBは約1.1mV、温度に換算すると約0.11℃の分解能になります。
A-D変換の入力電圧範囲は0~1.1Vになっています。温度で換算すれば、0~110℃です。
LEDマトリクスの5V電源を、Arduino UNOの5V端子からではなく別途USBケーブルから取るように変更しています。