初めてのBLE (15) ESP32でペリフェラル③浮動小数点形式
連載の第13回では、CPUの温度を1バイトで一度だけ送るペリフェラルを作成しました。ここでは、連続してCPUの温度を浮動小数点形式で送るように改造します。また、浮動小数点形式のデータを受け取るセントラルのスケッチも作ります。
●ESP32のペリフェラル
第13回のスケッチを手直しします。
BLECharacteristic *pCharacteristic;
キャラをインスタンス化する部分をsetup()の外に持ってきました。これで、loop()内でもキャラが使えます。
setup()では、byte変数で温度データを1byte送りました。
| int temp = temperatureRead(); Serial.println(temp); pCharacteristic->setValue((uint8_t*)&temp,1); |
それを、loop()内で、
| float temp = temperatureRead(); Serial.println(temp); pCharacteristic->setValue(temp); |
float型で送るようにします。IEEE754のunsign32ビット・データになります。
/*
    Based on Neil Kolban example for IDF: https://github.com/nkolban/esp32-snippets/blob/master/cpp_utils/tests/BLE%20Tests/SampleServer.cpp
    Ported to Arduino ESP32 by Evandro Copercini
    updates by chegewara
*/

#include <BLEDevice.h>
#include <BLEUtils.h>
#include <BLEServer.h>

// See the following for generating UUIDs:
// https://www.uuidgenerator.net/

#define SERVICE_UUID        "4fafc201-1fb5-459e-8fcc-c5c9c331914b"
#define CHARACTERISTIC_UUID "beb5483e-36e1-4688-b7f5-ea07361b26a8"
BLECharacteristic *pCharacteristic;

void setup() {
  Serial.begin(115200);
  Serial.println("Starting BLE work!");

  BLEDevice::init("ESP32 peripheral");
  BLEServer *pServer = BLEDevice::createServer();
  BLEService *pService = pServer->createService(SERVICE_UUID);
  pCharacteristic = pService->createCharacteristic(
                                         CHARACTERISTIC_UUID,
                                         BLECharacteristic::PROPERTY_READ |
                                         BLECharacteristic::PROPERTY_WRITE
                                       );

  int temp = temperatureRead();
  Serial.println(temp);
  pCharacteristic->setValue((uint8_t*)&temp,1);

  pService->start();
  // BLEAdvertising *pAdvertising = pServer->getAdvertising();  // this still is working for backward compatibility
  BLEAdvertising *pAdvertising = BLEDevice::getAdvertising();
  pAdvertising->addServiceUUID(SERVICE_UUID);
  pAdvertising->setScanResponse(true);
  pAdvertising->setMinPreferred(0x06);  // functions that help with iPhone connections issue
  pAdvertising->setMinPreferred(0x12);
  BLEDevice::startAdvertising();
//  Serial.println("Characteristic defined! Now you can read it in your phone!");
}

void loop() {
  // put your main code here, to run repeatedly:
  float temp = temperatureRead();
  Serial.println(temp);
  pCharacteristic->setValue(temp);
  pCharacteristic->notify();

  delay(2000);
}
●NANO 33 BLE senseのセントラル
サンプル・スケッチPeripheralExploreを改造しています。
float型IEEE754のunsign32ビット・データは、次のような形式ですが、uint8_t四個に分割され、逆順(リトル・エンディアン)で送られてきます。
85行では、最後の桁 (uint8_t)*(ledCharacteristic.value()+3) から読み出し、四個を合成します。
87~89行では、その32ビットのデータの先頭1ビットを符号(f)で取り出し、次の8ビットを指数(s)、残りの22ビットの先頭に1を加えて仮数(k)とします。三つの結果をかけると浮動小数点の値に戻ります。
#include <ArduinoBLE.h>

#define SERVICE_UUID        "4fafc201-1fb5-459e-8fcc-c5c9c331914b"
#define CHARACTERISTIC_UUID "beb5483e-36e1-4688-b7f5-ea07361b26a8"
#define localNAME "ESP32 peripheral"

void setup() {
  Serial.begin(9600);
  while (!Serial);

  BLE.begin();
  Serial.println("\nstart BLE Central - CPU temp");
  // start scanning for peripherals
  BLE.scanForName(localNAME);
}

void loop() {
  // check if a peripheral has been discovered
  BLEDevice peripheral = BLE.available();

  if (peripheral) {
    // discovered a peripheral, print out address, local name, and advertised service
    Serial.print("Found ");
    Serial.print(peripheral.address());
    Serial.print(" '");
    Serial.print(peripheral.localName());
    Serial.print("' ");
    Serial.print(peripheral.advertisedServiceUuid());
    Serial.println();

    if (peripheral.localName() != localNAME) {
      return;
    }

    // stop scanning
    BLE.stopScan();

    controlLed(peripheral);

    // peripheral disconnected, start scanning again
    BLE.scanForName(localNAME);
  }
}

void controlLed(BLEDevice peripheral) {
  // connect to the peripheral
  Serial.print("Connecting ...");

  if (peripheral.connect()) {
    Serial.println("Connected");
  } else {
    Serial.println("Failed to connect!");
    return;
  }

  // discover peripheral attributes
  Serial.print("Discovering attributes ...");
  if (peripheral.discoverAttributes()) {
    Serial.println("Attributes discovered\n");
  } else {
    Serial.println("Attribute discovery failed!");
    peripheral.disconnect();
    return;
  }
  // retrieve the LED characteristic
  BLECharacteristic ledCharacteristic = peripheral.characteristic(CHARACTERISTIC_UUID);

  if (!ledCharacteristic) {
    Serial.println("Peripheral does not have LED characteristic!");
    peripheral.disconnect();
    return;
  } else if (!ledCharacteristic.canWrite()) {
    Serial.println("Peripheral does not have a writable LED characteristic!");
    peripheral.disconnect();
    return;
  }

  Serial.println("---Found CHARACTERISTIC_UUID");
  while (peripheral.connected()) {
  if (ledCharacteristic.canRead()) {
    // read the characteristic value
    ledCharacteristic.read();
    if (ledCharacteristic.valueLength() > 0) {

        uint32_t  data = ((uint8_t)*(ledCharacteristic.value()+3) << 24) + ((uint8_t)*(ledCharacteristic.value()+2) << 16) + ((uint8_t)*(ledCharacteristic.value()+1) << 8)  +  ((uint8_t)*ledCharacteristic.value());
//       Serial.println();Serial.println(data,HEX);
int32_t f = pow(-1, int(bitRead(data,31)));
double k =1 + ((((data<<1)<<8)>>9))/pow(2,23);
int32_t s = pow(2,((((data<<1)>>24))-127));
Serial.println();
Serial.println(f*k*s);


      // print out the value of the characteristic
      Serial.print("\nvalue 0x");
      printData(ledCharacteristic.value(), ledCharacteristic.valueLength());

      delay(5000);
    }
  }
}

  Serial.println("Peripheral disconnected");
}


void printData(const unsigned char data[], int length) {
  for (int i = 0; i < length; i++) {
    unsigned char b = data[i];
    if (b < 16) {
      Serial.print("0");
    }
    Serial.print(b, HEX);Serial.print("(");Serial.print(b);Serial.print(")");
  }

}
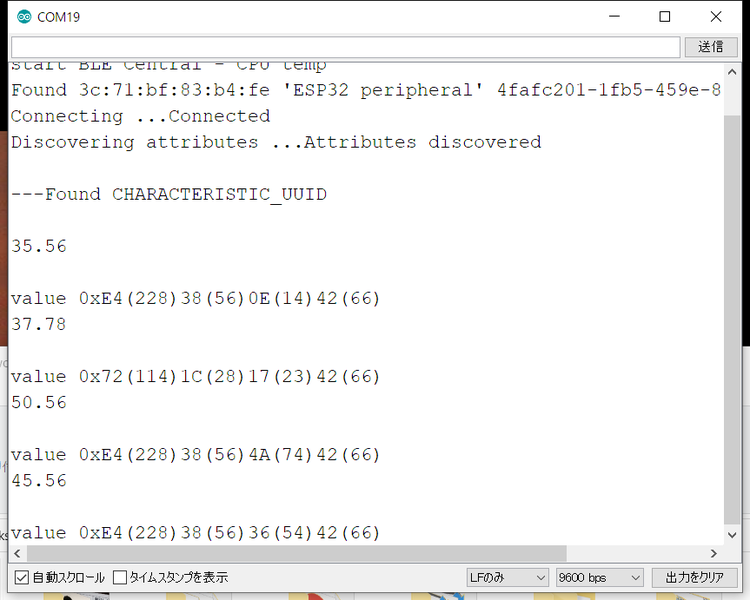
実行中の様子です。
(役立つサイト)Floating Point to Hex Converter
(2021/12/19 追加 文字列で送信) 本文中では、pCharacteristic->setValue(temp);とfloartのデータを送信しています。このCharacteristicはいろいろな型に対応していて、Arduino IDE-BLEライブラリのように文字型とか整数型の指定は不要です。
文字型にした事例です。電圧を読み取ってきます。
  float Volts = read_Voltsdata();
  String s = String(Volts,6);
  char  sVolts[16];
  s.toCharArray(sVolts,s.length());

  Serial.println(&sVolts[0]);

  pCharacteristic->setValue(&sVolts[0]);
  pCharacteristic->notify();

