Arduino UNO R4 Minimaでセンサ・インターフェーシング ⑰ 気圧センサ BMP390
Adafruitから入手したMEMS気圧センサ BMP390(ボッシュ)を利用します。
気圧と温度が測定できます。
ボッシュの気圧センサの一覧です。BMP3xxはBMP2xxの改良型という位置づけのようです。
| 型名 | 電源電圧 [V] |
測定範囲 |
絶対確度圧力 [hPa] |
相対確度圧力 [hPa] |
その他の機能 |
| BMP280 | 1.71~3.6 | 300~1100 | ±1 | ±0.12 | 温度 |
|---|---|---|---|---|---|
| BME280 | 1.71~3.6 | 300~1100 | ±1 | ±0.12 | 温度、湿度 |
| BMP388 | 1.65~3.6 | 300~1250 | ±0.40 | ±0.08 | 温度 |
| BMP390 | 1.65~3.6 | 300~1250 | ±0.50 | ±0.03 | 温度 |
| BME680 | 1.71~3.6 | 300~1100 | ±0.6 | ±0.12 | 温度、湿度、空気の汚れ |
| BME688 | 1.7~3.6 | 300~1100 | ±0.6 | ±0.12 | 温度、湿度、空気の汚れ |
●AdafruitのStemma QT/Qwiicボード
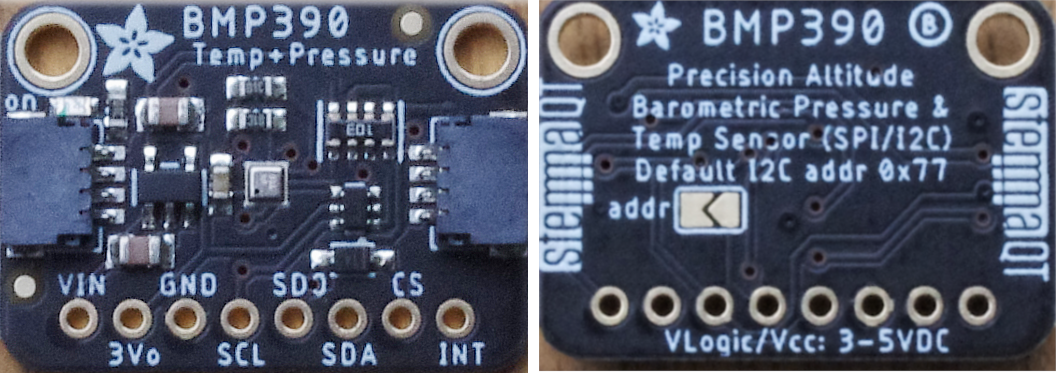
Stemma QT/Qwiic(JST SH 4ピン)コネクタは2か所に装着されていて、どちらにつないでもかまいません。このコネクタを使ってI2Cで制御する場合、特に、ジャンパ線をつなぐなどは不要です。
コネクタは、表と裏のどちらも差し込めそうですが、ピンが内部の上部に並んでいるので、差し込める方向は一意です。ロック機構はないですが、すぐに抜けるということはありません。
●気圧センサBMP390のおもなスペック
- 電源電圧 1.65~3.6V
- 動作温度範囲 -40~85℃
- 温度測定範囲 不明、解像度;0.00015℃
- 気圧測定範囲 300~1250hPa、確度;±0.50hPa、分解能;±0.03hPa( ±25cm)
- インターフェース I2C(最大3.4MHz)、SPI(最大10MHz)
- スレーブ・アドレス 0x77。裏面のADDRをショートして0x76に設定できる
●使用環境
- Arduino UNO R4 Minima
- Arduino IDE 2.2.1
- Windows10 22H2
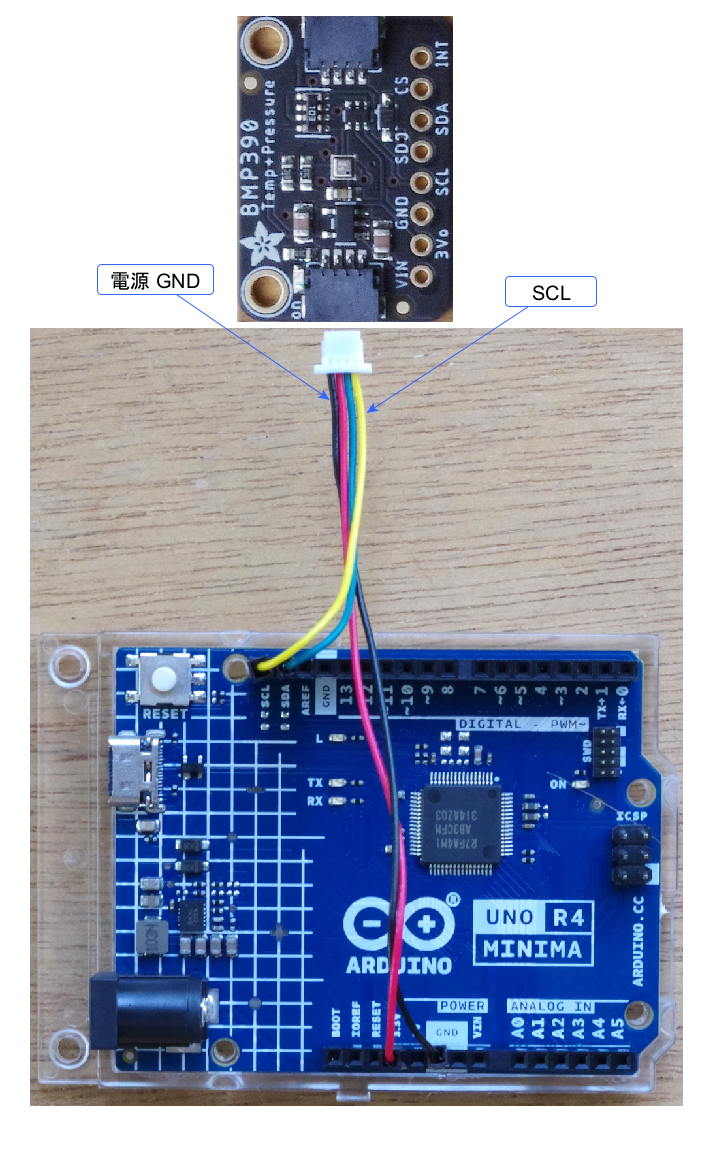
●接続
Arduino UNO R4 MinimaのI2C信号とセンサ・ボードをJSTコネクタでつなぎます(Stemma QT/Qwiicボードの写真の比率は異なる)。
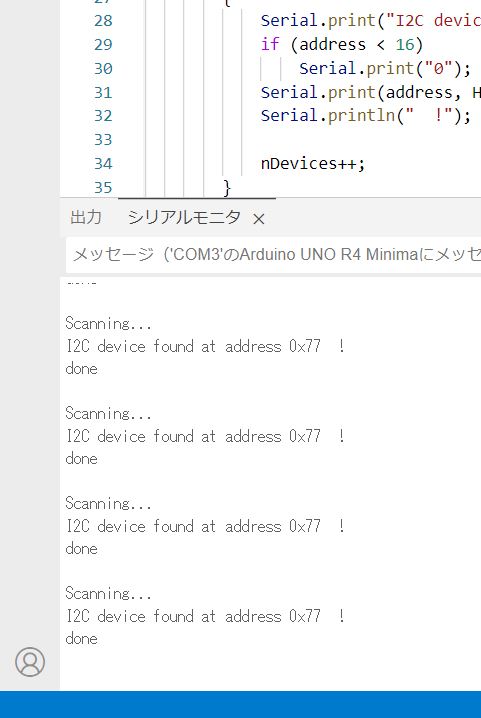
●スレーブ・アドレスを確認
従来からよく使われているi2cScanner.inoを動かしてスレーブ・アドレスを確認します。電源は3.3Vです。
0x77を見つけてきました。
●ライブラリの用意
BMP3で検索して、見つかったAdafruit BMP3XXライブラリをインストールします。
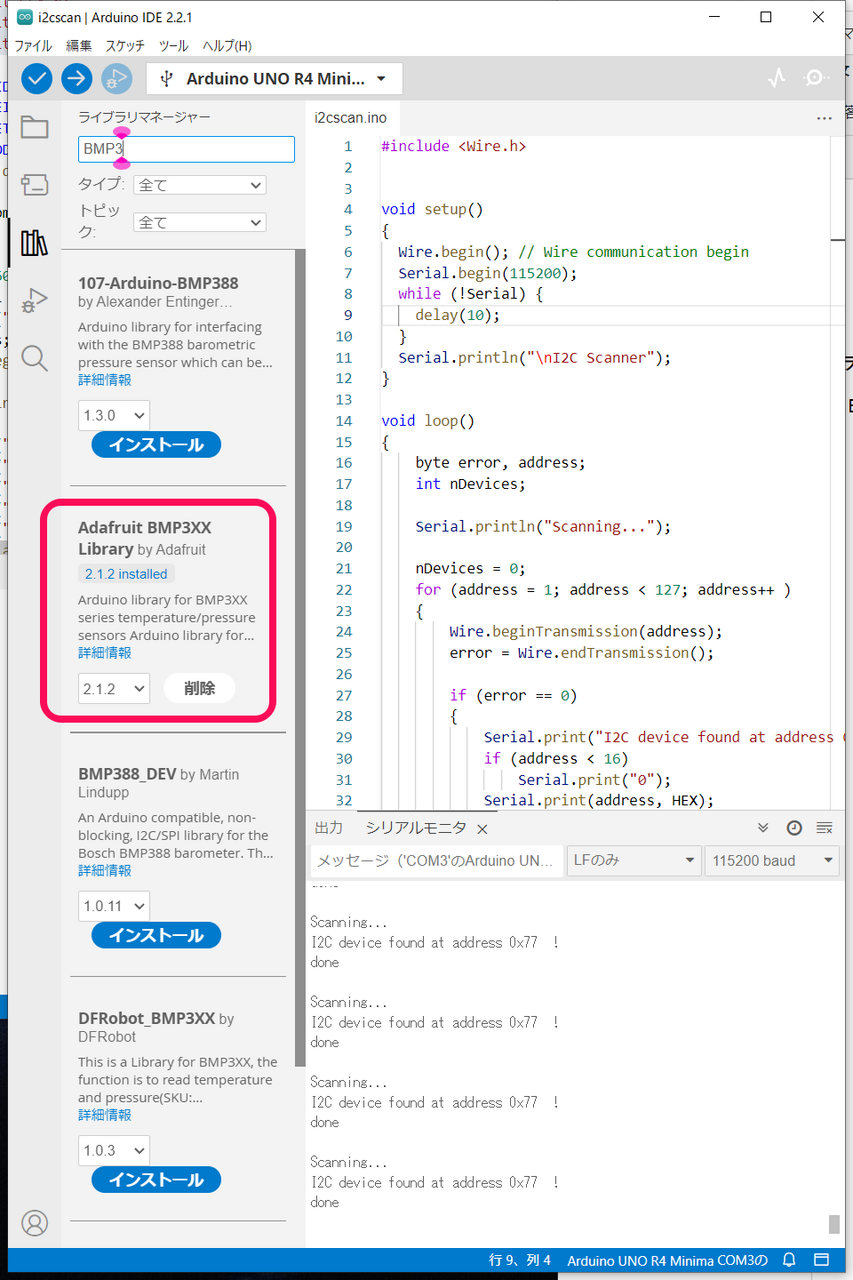
インストールを始めたとき、関連のライブラリや依存関係をインストールするかというパネルが出た場合は、全てをインストールを選びます。
●サンプル・スケッチ
メニューのファイル->スケッチ例から、Adafruit BMP3XX からbmp3xx_simpletest.inoを選択し、コンパイル、実行します。
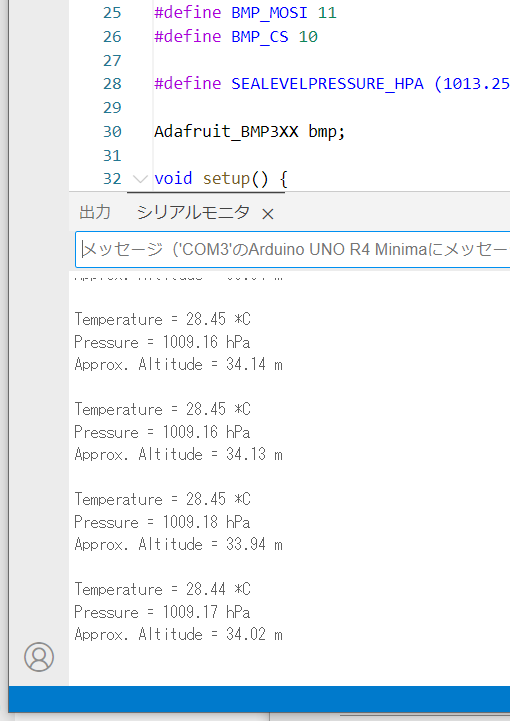
SPI関連を取り除き、I2Cの記述だけ残したスケッチです。
// Designed specifically to work with the Adafruit BMP388 Breakout
//  ----> http://www.adafruit.com/products/3966
//  Written by Limor Fried & Kevin Townsend for Adafruit Industries.

#include <Wire.h>
#include <Adafruit_Sensor.h>
#include "Adafruit_BMP3XX.h"

Adafruit_BMP3XX bmp;

void setup() {
  Serial.begin(115200);
  while (!Serial);
  Serial.println("Adafruit BMP388 / BMP390 test");

  if (!bmp.begin_I2C()) {   // hardware I2C mode, can pass in address & alt Wire
    Serial.println("Could not find a valid BMP3 sensor, check wiring!");
    while (1);
  }

  // Set up oversampling and filter initialization
  bmp.setTemperatureOversampling(BMP3_OVERSAMPLING_8X);
  bmp.setPressureOversampling(BMP3_OVERSAMPLING_4X);
  bmp.setIIRFilterCoeff(BMP3_IIR_FILTER_COEFF_3);
  bmp.setOutputDataRate(BMP3_ODR_50_HZ);
}

void loop() {
  if (! bmp.performReading()) {
    Serial.println("Failed to perform reading :(");
    return;
  }

  float tempC = bmp.temperature;
  float press = bmp.pressure / 100.0;

  Serial.print("Temperature = ");
  Serial.print(tempC); Serial.println(" *C");

  Serial.print("Pressure = ");
  Serial.print(press); Serial.println(" hPa");

  Serial.println();
  delay(5000);
}
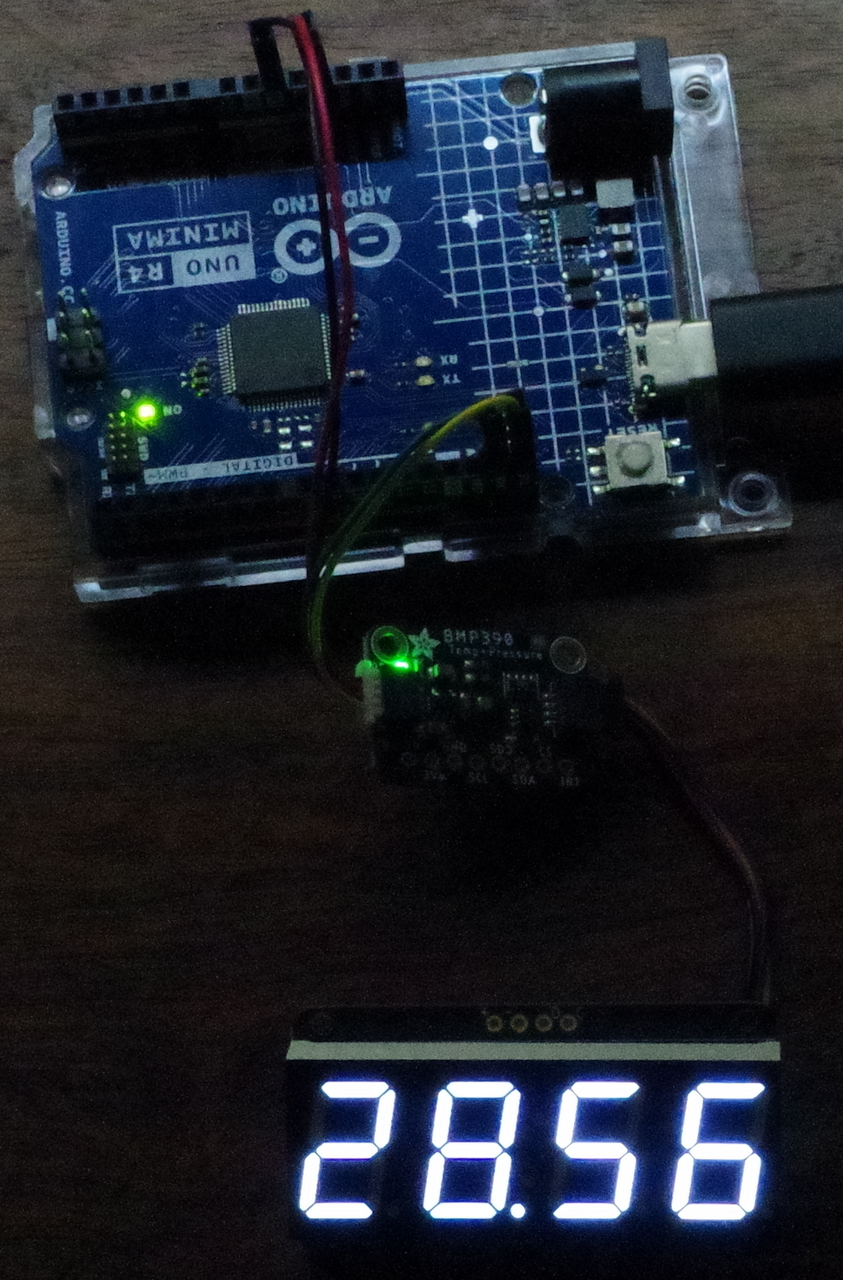
●4桁の7セグメントLED表示器をつないで測定結果を表示する
連載の第4回目の記事を参照しながら表示器を接続します。
Arduino UNO R4 Minimaでセンサ・インターフェーシング ④ 温湿度センサSi7021の測定結果を7セグメントLEDに表示
スケッチです。
7セグメントLED表示器は、第12回 温湿度センサ SHTC3でスレーブ・アドレスが重なったので、デフォルトの0x70から、ジャンパのA0をショートして0x71に変更してあります。デフォルトのまま使うときは0x70で使ってください。
// Designed specifically to work with the Adafruit BMP388 Breakout
//  ----> http://www.adafruit.com/products/3966
//  Written by Limor Fried & Kevin Townsend for Adafruit Industries.

#include <Wire.h>
#include <Adafruit_GFX.h>
#include "Adafruit_LEDBackpack.h"
#include <Adafruit_Sensor.h>
#include "Adafruit_BMP3XX.h"

Adafruit_7segment matrix = Adafruit_7segment();
Adafruit_BMP3XX bmp;

void setup() {
  Serial.begin(115200);
  while ( !Serial ) delay(100);   // wait for native usb
  Serial.println("BMP390 + 7segment LED");

  if (!bmp.begin_I2C()) {   // hardware I2C mode, can pass in address & alt Wire
    Serial.println("Could not find a valid BMP3 sensor, check wiring!");
    while (1);
  }

  // Set up oversampling and filter initialization
  bmp.setTemperatureOversampling(BMP3_OVERSAMPLING_8X);
  bmp.setPressureOversampling(BMP3_OVERSAMPLING_4X);
  bmp.setIIRFilterCoeff(BMP3_IIR_FILTER_COEFF_3);
  bmp.setOutputDataRate(BMP3_ODR_50_HZ);

  matrix.begin(0x71);
  matrix.setBrightness(0x05);  // default 0x0E
}

void loop() {
  if (! bmp.performReading()) {
    Serial.println("Failed to perform reading :(");
    return;
  }

  float tempC = bmp.temperature;
  float press = bmp.pressure / 100.0;

  Serial.print("\nTemperature = ");
  Serial.print(tempC); Serial.println(" *C");

  Serial.print("Pressure = ");
  Serial.print(press); Serial.println(" hPa");

  matrix.print(tempC, DEC);
  matrix.writeDisplay();
  delay(2000);

  matrix.print(press, DEC);
  matrix.writeDisplay();
  delay(3000);
}
実行例です。
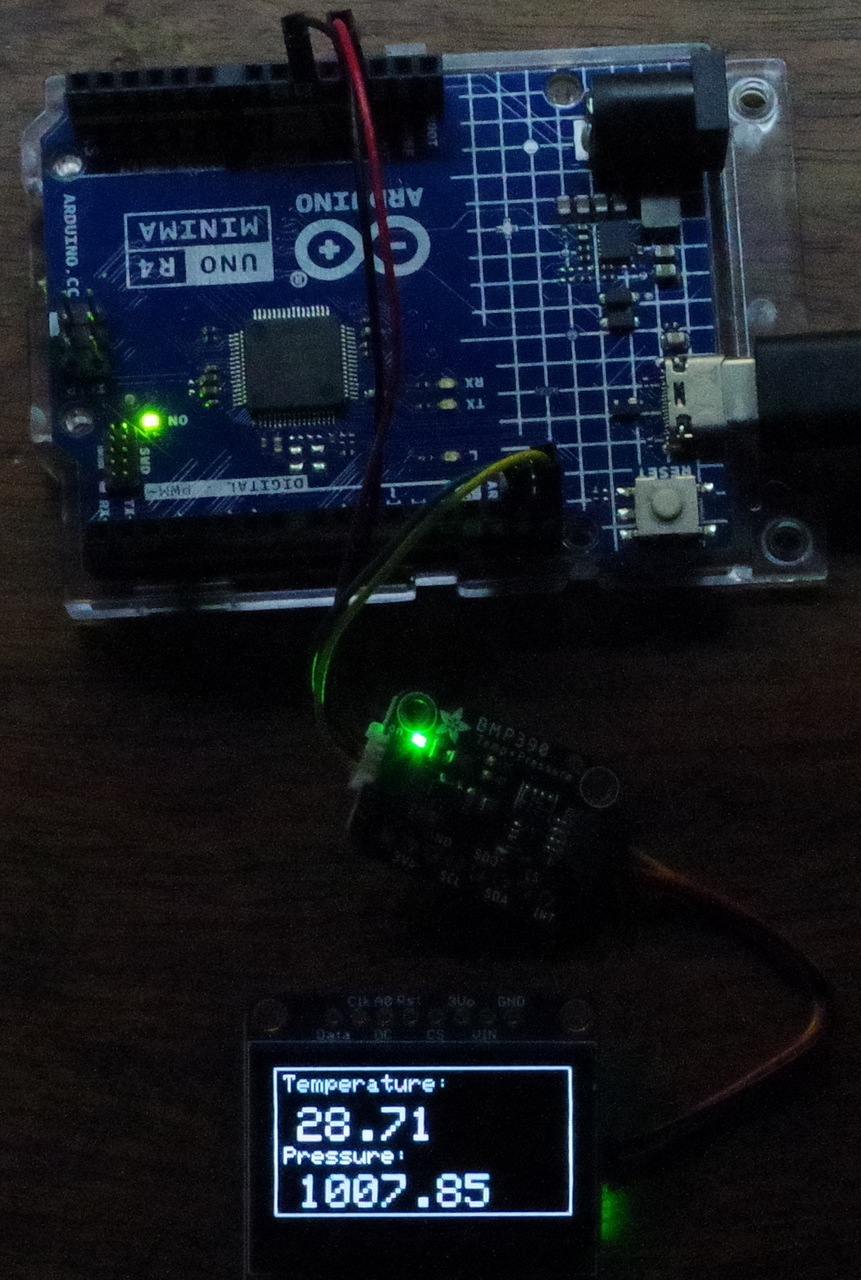
●グラフィック・ディスプレイに測定結果を表示
次の記事を参考に、グラフィック・ディスプレイに測定した気圧、温度を表示します。
Arduino UNO R4 Minimaでセンサ・インターフェーシング ⑤ 温湿度センサSi7021の測定結果をグラフィック・ディスプレイに表示
スケッチです。
// Designed specifically to work with the Adafruit BMP388 Breakout
//  ----> http://www.adafruit.com/products/3966
//  Written by Limor Fried & Kevin Townsend for Adafruit Industries.

#include <Wire.h>
#include <Adafruit_GFX.h>
#include <Adafruit_SSD1306.h>
#include <Adafruit_Sensor.h>
#include "Adafruit_BMP3XX.h"

#define SCREEN_WIDTH 128 // OLED display width, in pixels
#define SCREEN_HEIGHT 64 // OLED display height, in pixels
#define OLED_RESET    -1 // Reset pin # (or -1 if sharing Arduino reset pin)
#define SCREEN_ADDRESS 0x3D ///< See datasheet for Address; 0x3D for 128x64, 0x3C for 128x32
Adafruit_SSD1306 display(SCREEN_WIDTH, SCREEN_HEIGHT, &Wire, OLED_RESET);

Adafruit_BMP3XX bmp;

void setup() {
  Serial.begin(115200);
  while ( !Serial ) delay(100);   // wait for native usb
  Serial.println("BMP390 + OLED SSD1306");

  if (!bmp.begin_I2C()) {   // hardware I2C mode, can pass in address & alt Wire
    Serial.println("Could not find a valid BMP3 sensor, check wiring!");
    while (1);
  }

  // Set up oversampling and filter initialization
  bmp.setTemperatureOversampling(BMP3_OVERSAMPLING_8X);
  bmp.setPressureOversampling(BMP3_OVERSAMPLING_4X);
  bmp.setIIRFilterCoeff(BMP3_IIR_FILTER_COEFF_3);
  bmp.setOutputDataRate(BMP3_ODR_50_HZ);

  display.begin(SSD1306_SWITCHCAPVCC, SCREEN_ADDRESS);
  display.clearDisplay();
  display.drawRect(0, 0, display.width(), display.height(), SSD1306_WHITE);
  display.setTextSize(1);                // Normal 1:1 pixel scale
  display.setTextColor(SSD1306_WHITE);   // Draw white text
  display.setCursor(4,3);
  display.println("Temperature:");
  display.setTextSize(1);
  display.setTextColor(SSD1306_WHITE);
  display.setCursor(4,34);
  display.println("Pressure:");
  display.display();
  delay(200);
}

void loop() {
  if (! bmp.performReading()) {
    Serial.println("Failed to perform reading :(");
    return;
  }

  float tempC = bmp.temperature;
  float press = bmp.pressure / 100.0;

  Serial.print("\nTemperature = ");
  Serial.print(tempC); Serial.println(" *C");

  Serial.print("Pressure = ");
  Serial.print(press); Serial.println(" hPa");

  display.setTextSize(2);   // Draw 2X-scale text
  display.setCursor(10,17);
  display.fillRect(10, 17, 70, 16, SSD1306_BLACK);
  display.println(tempC);

  display.setCursor(10, 46);
  display.fillRect(10, 46, 100, 16, SSD1306_BLACK);
  display.println(press);
  display.display();

  delay(5000);
}
実行例です。