M5Stackで始めるセンサ・インターフェーシング (5) 重量センサとHX711
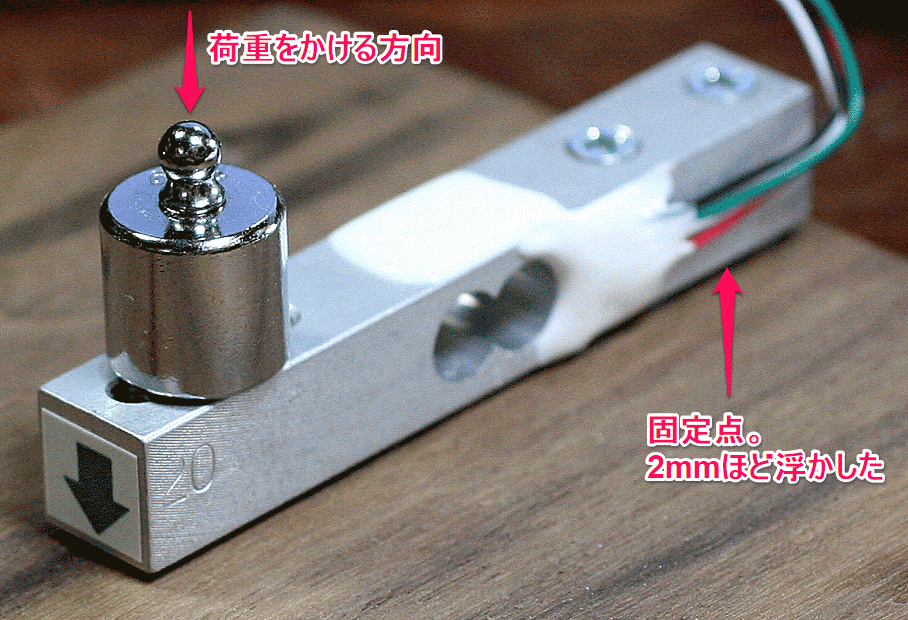
数十年前に比べると、料理で材料を量るはかりはコンパクトで安価になりました。上皿はかりのように大きい形状を使っているのは見かけなくなりました。最近ではポピュラになったロードセルを利用します。こちらの記事では、Arduino UNOを利用しています。ここで用いるロードセルは、この記事と同じ20kg用「 ロードセル シングルポイント( ビーム型) SC133 20kG [P-12034]」です。
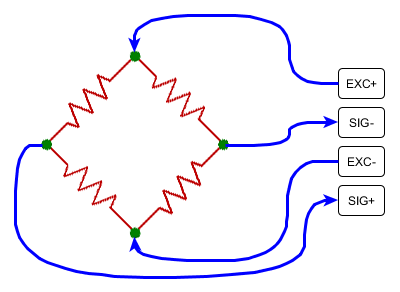
ロードセルの本体はアルミニウムの棒で、その横にひずみセンサが取り付けられています。センサはブリッジを構成していて、EXC+/-に電圧をかけ、アルミニウムの棒に荷重がかけられてゆがむと、SIG+/-に微小な電圧が現れます。
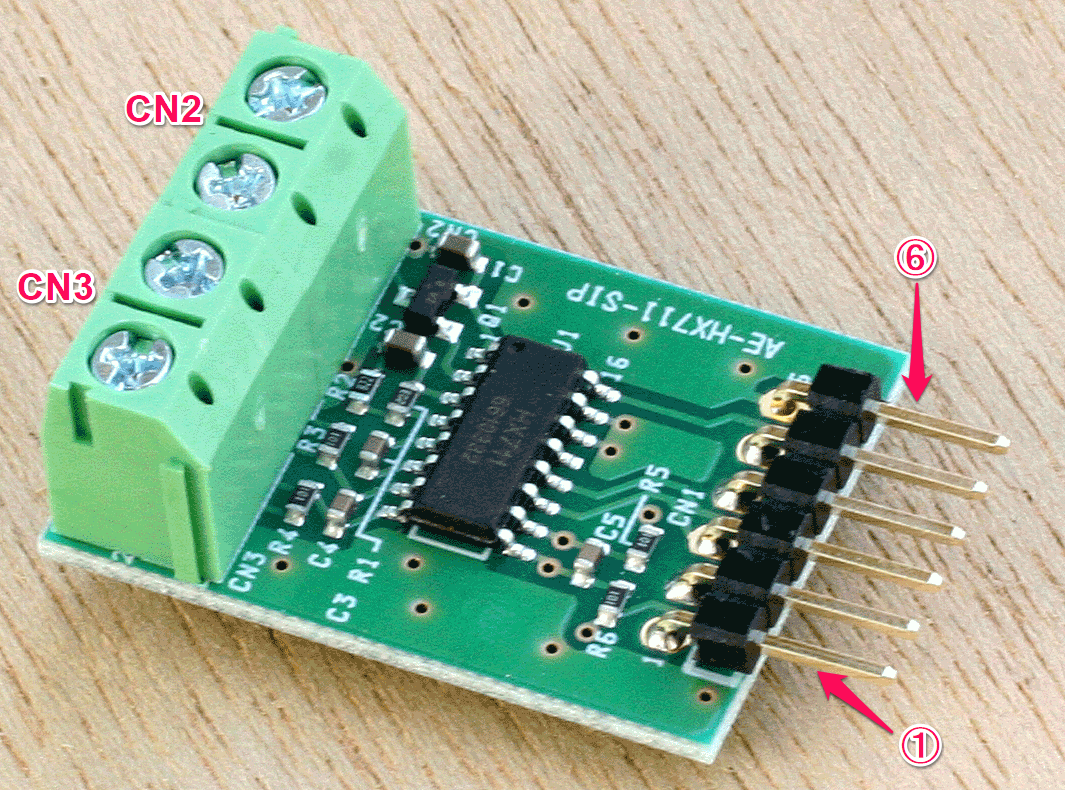
この電圧を増幅し、A-Dコンバータでディジタル値に変化するのがHX711です。使いやすいボードに実装した秋月電子通商の「HX711使用 ロードセル用ADコンバータ モジュール基板[AE-HX711-SIP]」を利用します。Arduino用のコードをダウンロードできます。
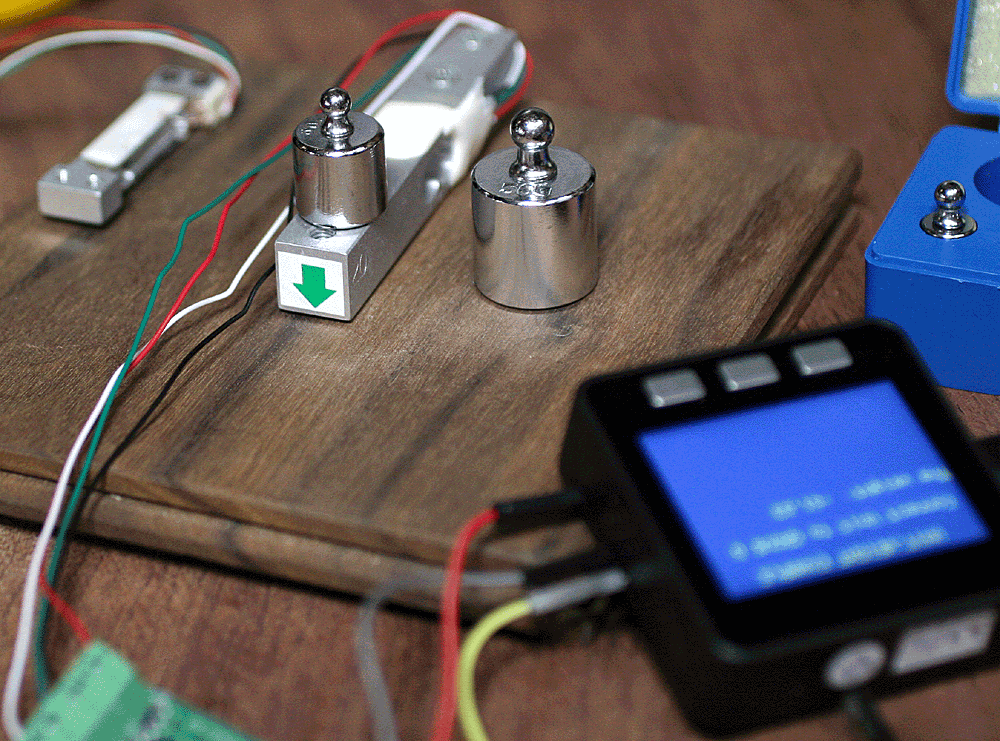
ロードセルは、写真のように、木の板に金属ワッシャを数枚重ね、ねじ留めしました。
●M5Stack用のHX711のライブラリ
https://github.com/m5stack/M5-ProductExampleCodesからソースをZIPファイルでダウンロードします。
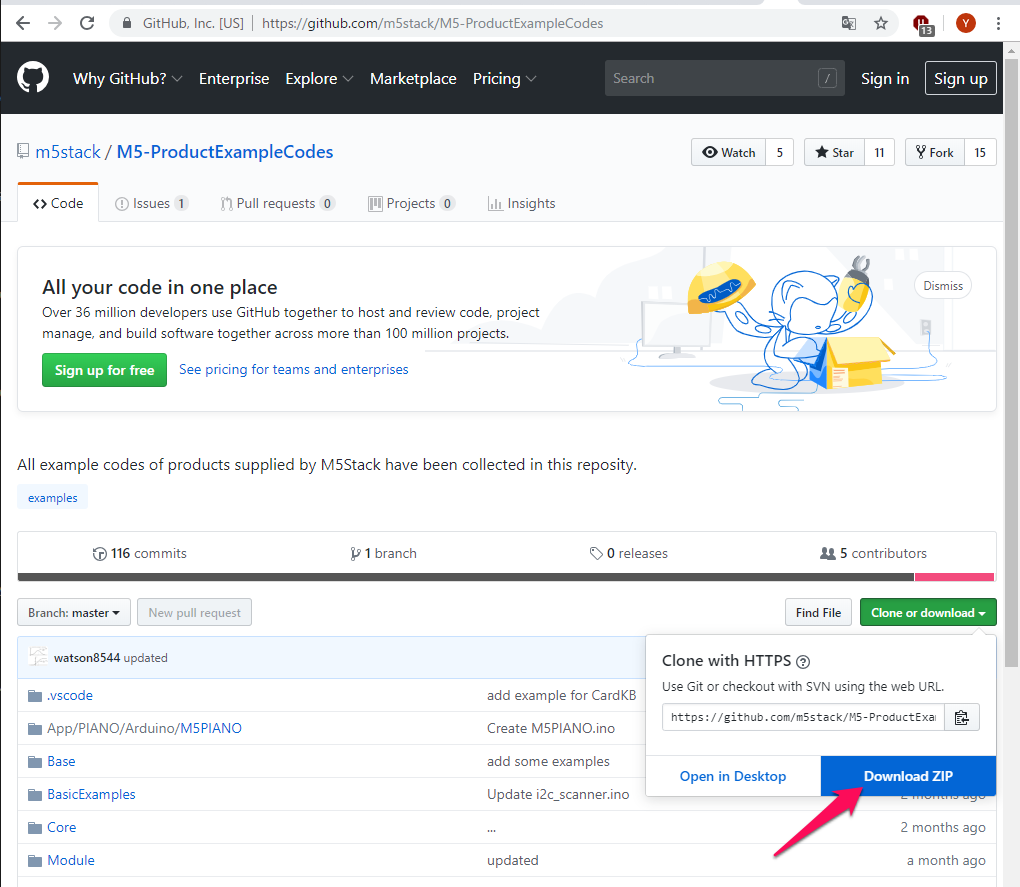
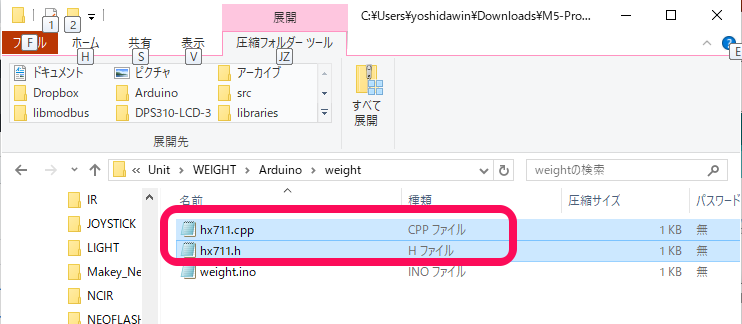
ダウンロードしたファイルを展開します。必要なのは、
C:\Users\ユーザ名\Downloads\M5-ProductExampleCodes-master.zip\M5-ProductExampleCodes-master\Unit\WEIGHT\Arduino
フォルダに入っているhx711.cppとhx711.hです。この二つを、
C:\Users\ユーザ名\Documents\Arduino\librariesへコピー(解凍される)します。
次に、weight.inoをメモ帳で開き、全選択し、コピーして、Arduino IDEの新規ファイルのエディタ画面に貼り付けます。現在Arduino IDE 1.8.9を使っています。以前のバージョンならArduino IDEをいったん終了し再起動が必要でしたが、このバージョンではそのままコンパイルができます。
●接続
スケッチweight.inoには、次のように接続が書かれています。
HX711 scale(36, 26);// GROVE B
とはいえ、HX711の出力であるクロックCLKとデータDATがM5Stackのどちらのピンが該当するのか不明なので、次のようにつなぎ、スケッチが正しく動くことを確認しました。
ロードセルの接続ケーブルの色分けは統一されていないようです。CN2/CN3のターミナルに接続します。
- 赤色;AVdd(CN2)
- 黒色;GND(CN2)
- 緑色;A-(CN3)
- 白色;A+(CN3)
M5Stackと基板の接続です。
|
HX711モジュール |
M5Stack |
|---|---|
| 6番GND | GND |
| 3番CLK | 26番 |
| 2番DAT | 36番 |
| 1番Vdd | 5V |
●スケッチ
weight.inoをコンパイル、実行すると、シリアルモニタにはマイナスの大きな値が表示されます。このままでは正しく重量が測れません。分銅を用意します。
最初に、オフセットを修正します。おもりは載せていない状態です。
scale.setOffset(125184);
「125184」の数字を変更して、なるべく重量の表示が0になるようにします。筆者の環境では7610になりました。
次にスケールを変更します。スケッチは10kg用ロードセルなので、とりあえず、2で割りました。
scale.setScale(67.4/2);
ここで50gを載せると約150gと3倍、そしてマイナスの値だったので、-3で割りました。
Serial.print(weight/-3.0);
20gや5gを分銅を載せたときにもほぼ正しい表示になるよう、オフセットを細かく修正します。
LCDの表示も修正します。
M5.Lcd.print(weight/-3.0);
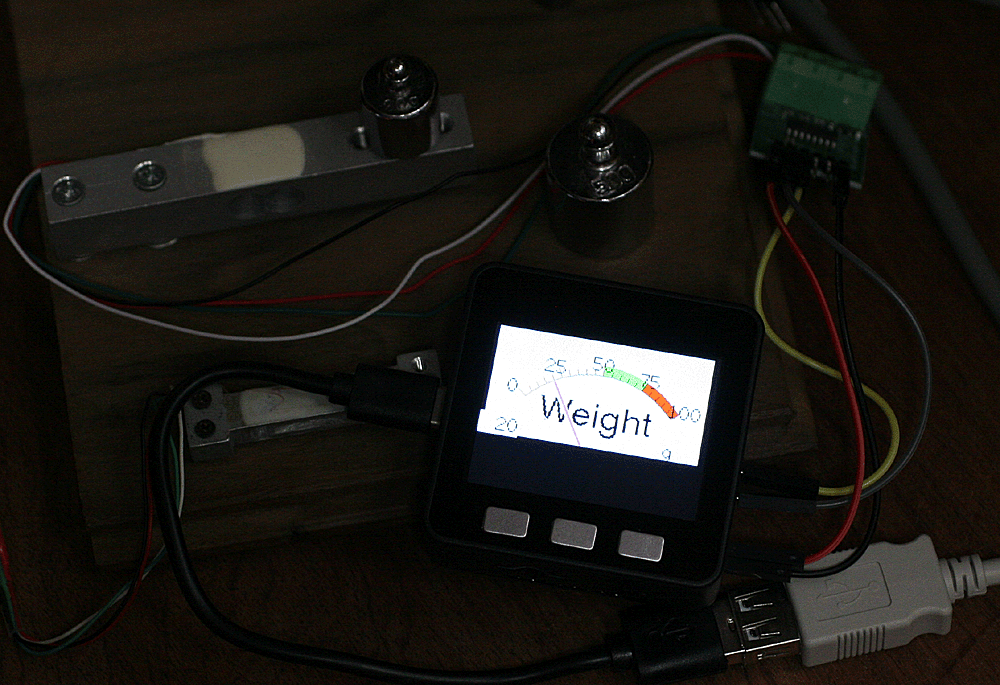
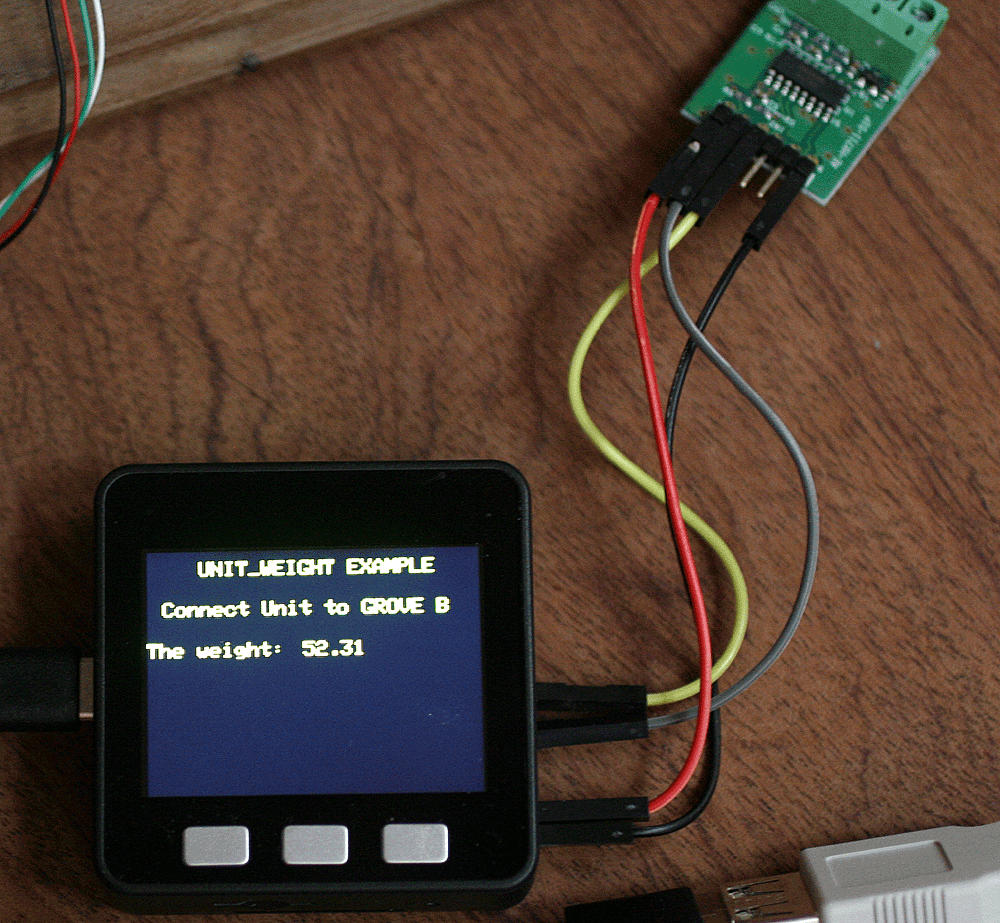
実行中の様子です。
weight = ((float)((int)((scale.getGram()+0.005)*100)))/100;
0.005が何を補正しているか不明だったので、取り去りました。
●GUI対応スケッチ
家庭にある料理用のはかりでは、小麦粉などの分量を量るときに入れ物をはかりの上に置き、風袋の重量を引き算し、0に表示をします。同じように、何もおもりを載せない状態で、setup()内で一度空読みをし、二度目に読んだ値をfirstReadDataに代入しておき、loop()の中の実際の計測時に引き算します。これで、使用開始時の微小なオフセットをキャンセルします。
サンプル・スケッチのTFT_Meter_linearを読み込み、一度コンパイルをし、実行します。0~100の目盛りが振られ、相対湿度を表示する内容です。必要な部分を前記のスケッチに合体させます。
100g専用にしました。サンプルではsin曲線のピーク値を描画していましたが、ここでは重量weight に変更します。
/*
  This Unit connects to GRVOE B on M5Core.
  hx711 library fork from https://github.com/aguegu/ardulibs/tree/master/hx711
*/

#include <M5Stack.h>
#include "hx711.h"
float firstReadData;
float weight;
#define M_SIZE 1.3333
#define TFT_GREY 0x5AEB
float ltx = 0; // Saved x coord of bottom of needle
uint16_t osx = M_SIZE*120, osy = M_SIZE*120; // Saved x & y coords
int old_analog = -999; // Value last displayed

HX711 scale(36, 26); // 36:DAT 26:CLK

void setup() {
    M5.begin();
    M5.Lcd.clear(BLACK);
    M5.Lcd.setTextSize(2);
    M5.Lcd.setTextColor(YELLOW);
    Serial.begin(115200);

    scale.setOffset(7610);
    scale.setScale(67.4/2);

    scale.getGram();
    delay(100);
    firstReadData = scale.getGram();

    M5.Lcd.setCursor(0, 10);
    M5.Lcd.print("start HX7100 ");
    delay(1000);
    analogMeter(); // Draw analogue meter
}

void loop(){
    Serial.println(scale.averageValue());
    weight = (scale.getGram() - firstReadData) / -3.0;
    Serial.print("weight: ");
    Serial.println(weight);
    plotNeedle((int)weight, 0); // It takes between 2 and 12ms to replot the needle with zero delay

    delay(100);
}

void analogMeter(){
    // Meter outline
    M5.Lcd.fillRect(0, 0, M_SIZE*239, M_SIZE*126, TFT_GREY);
    M5.Lcd.fillRect(5, 3, M_SIZE*230, M_SIZE*119, TFT_WHITE);
    M5.Lcd.setTextColor(TFT_BLACK); // Text colour

    // Draw ticks every 5 degrees from -50 to +50 degrees (100 deg. FSD swing)
    for (int i = -50; i < 51; i += 5) {
        // Long scale tick length
        int tl = 15;
        // Coodinates of tick to draw
        float sx = cos((i - 90) * 0.0174532925);
        float sy = sin((i - 90) * 0.0174532925);
        uint16_t x0 = sx * (M_SIZE*100 + tl) + M_SIZE*120;
        uint16_t y0 = sy * (M_SIZE*100 + tl) + M_SIZE*140;
        uint16_t x1 = sx * M_SIZE*100 + M_SIZE*120;
        uint16_t y1 = sy * M_SIZE*100 + M_SIZE*140;
        // Coordinates of next tick for zone fill
        float sx2 = cos((i + 5 - 90) * 0.0174532925);
        float sy2 = sin((i + 5 - 90) * 0.0174532925);
        int x2 = sx2 * (M_SIZE*100 + tl) + M_SIZE*120;
        int y2 = sy2 * (M_SIZE*100 + tl) + M_SIZE*140;
        int x3 = sx2 * M_SIZE*100 + M_SIZE*120;
        int y3 = sy2 * M_SIZE*100 + M_SIZE*140;

        // Yellow zone limits
        //if (i >= -50 && i < 0) {
        // M5.Lcd.fillTriangle(x0, y0, x1, y1, x2, y2, TFT_YELLOW);
        // M5.Lcd.fillTriangle(x1, y1, x2, y2, x3, y3, TFT_YELLOW);
        //}

        // Green zone limits
        if (i >= 0 && i < 25) {
            M5.Lcd.fillTriangle(x0, y0, x1, y1, x2, y2, TFT_GREEN);
            M5.Lcd.fillTriangle(x1, y1, x2, y2, x3, y3, TFT_GREEN);
        }

        // Orange zone limits
        if (i >= 25 && i < 50) {
            M5.Lcd.fillTriangle(x0, y0, x1, y1, x2, y2, TFT_ORANGE);
            M5.Lcd.fillTriangle(x1, y1, x2, y2, x3, y3, TFT_ORANGE);
        }

        // Short scale tick length
        if (i % 25 != 0) tl = 8;

        // Recalculate coords incase tick lenght changed
        x0 = sx * (M_SIZE*100 + tl) + M_SIZE*120;
        y0 = sy * (M_SIZE*100 + tl) + M_SIZE*140;
        x1 = sx * M_SIZE*100 + M_SIZE*120;
        y1 = sy * M_SIZE*100 + M_SIZE*140;

        // Draw tick
        M5.Lcd.drawLine(x0, y0, x1, y1, TFT_BLACK);

        // Check if labels should be drawn, with position tweaks
         if (i % 25 == 0) {
            // Calculate label positions
            x0 = sx * (M_SIZE*100 + tl + 10) + M_SIZE*120;
            y0 = sy * (M_SIZE*100 + tl + 10) + M_SIZE*140;
            switch (i / 25) {
                 case -2: M5.Lcd.drawCentreString("0", x0, y0 - 12, 2); break;
                 case -1: M5.Lcd.drawCentreString("25", x0, y0 - 9, 2); break;
                 case 0: M5.Lcd.drawCentreString("50", x0, y0 - 7, 2); break;
                 case 1: M5.Lcd.drawCentreString("75", x0, y0 - 9, 2); break;
                 case 2: M5.Lcd.drawCentreString("100", x0, y0 - 12, 2); break;
            }
        }

        // Now draw the arc of the scale
        sx = cos((i + 5 - 90) * 0.0174532925);
        sy = sin((i + 5 - 90) * 0.0174532925);
        x0 = sx * M_SIZE*100 + M_SIZE*120;
        y0 = sy * M_SIZE*100 + M_SIZE*140;
        // Draw scale arc, don't draw the last part
        if (i < 50) M5.Lcd.drawLine(x0, y0, x1, y1, TFT_BLACK);
    }

    M5.Lcd.drawString(" g", M_SIZE*(5 + 230 - 40), M_SIZE*(119 - 22), 2); // Units at bottom right
    M5.Lcd.drawCentreString("Weight", M_SIZE*120, M_SIZE*70, 4); // Comment out to avoid font 4

    plotNeedle(0, 0); // Put meter needle at 0
    M5.Lcd.drawRect(5, 3, M_SIZE*230, M_SIZE*119, TFT_BLUE); // Draw bezel line
}

// #########################################################################
// Update needle position
// This function is blocking while needle moves, time depends on ms_delay
// 10ms minimises needle flicker if text is drawn within needle sweep area
// Smaller values OK if text not in sweep area, zero for instant movement but
// does not look realistic... (note: 100 increments for full scale deflection)
// #########################################################################
void plotNeedle(int value, byte ms_delay){
    M5.Lcd.setTextColor(TFT_BLACK, TFT_WHITE);
    char buf[8]; dtostrf(value, 4, 0, buf);
    M5.Lcd.drawRightString(buf, M_SIZE*40+10, M_SIZE*(119 - 23), 2);

    if (value < -10) value = -10; // Limit value to emulate needle end stops
    if (value > 110) value = 110;

    // Move the needle until new value reached
    while (!(value == old_analog)) {
        if (old_analog < value) old_analog++;
        else old_analog--;
        if (ms_delay == 0) old_analog = value; // Update immediately if delay is 0
        float sdeg = map(old_analog, -10, 110, -150, -30); // Map value to angle
        // Calcualte tip of needle coords
        float sx = cos(sdeg * 0.0174532925);
        float sy = sin(sdeg * 0.0174532925);
        // Calculate x delta of needle start (does not start at pivot point)
        float tx = tan((sdeg + 90) * 0.0174532925);
        // Erase old needle image
        M5.Lcd.drawLine(M_SIZE*(120 + 20 * ltx - 1), M_SIZE*(140 - 20), osx - 1, osy, TFT_WHITE);
        M5.Lcd.drawLine(M_SIZE*(120 + 20 * ltx), M_SIZE*(140 - 20), osx, osy, TFT_WHITE);
        M5.Lcd.drawLine(M_SIZE*(120 + 20 * ltx + 1), M_SIZE*(140 - 20), osx + 1, osy, TFT_WHITE);

        // Re-plot text under needle
        M5.Lcd.setTextColor(TFT_BLACK);
        M5.Lcd.drawCentreString("Weight", M_SIZE*120, M_SIZE*70, 4); // // Comment out to avoid font 4

        // Store new needle end coords for next erase
        ltx = tx;
        osx = M_SIZE*(sx * 98 + 120);
        osy = M_SIZE*(sy * 98 + 140);
        // Draw the needle in the new postion, magenta makes needle a bit bolder
        // draws 3 lines to thicken needle
        M5.Lcd.drawLine(M_SIZE*(120 + 20 * ltx - 1), M_SIZE*(140 - 20), osx - 1, osy, TFT_RED);
        M5.Lcd.drawLine(M_SIZE*(120 + 20 * ltx), M_SIZE*(140 - 20), osx, osy, TFT_MAGENTA);
        M5.Lcd.drawLine(M_SIZE*(120 + 20 * ltx + 1), M_SIZE*(140 - 20), osx + 1, osy, TFT_RED);
        // Slow needle down slightly as it approaches new postion
        if (abs(old_analog - value) < 10) ms_delay += ms_delay / 5;
        // Wait before next update
        delay(ms_delay);
    }
}
実行している様子です。