Arduino UNO R4 Minimaでセンサ・インターフェーシング ㉙ 光センサ TSL2591
Adafruitから周辺光センサ TSL2591(ams)を利用します。
●AdafruitのStemma QT/Qwiicボード
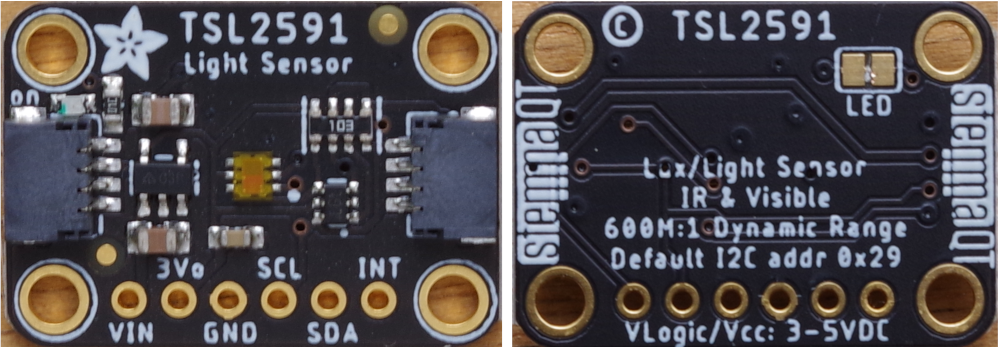
Stemma QT/Qwiic(JST SH 4ピン)コネクタは2か所に装着されていて、どちらにつないでもかまいません。このコネクタを使ってI2Cで制御する場合、特に、ジャンパ線をつなぐなどは不要です。
コネクタは、表と裏のどちらも差し込めそうですが、ピンが内部の上部に並んでいるので、差し込める方向は一意です。ロック機構はないですが、すぐに抜けるということはありません。
●光センサTSL2591のおもなスペック
- 動作電圧 2.7~3.6V
- 動作温度範囲 -30~70°C
- 測定可能範囲 188μ~88000Lux
- ダイナミック・レンジ 600000000:1
- インターフェース I2C(0~400kHz)
- スレーブ・アドレス 0x29
●使用環境
- Arduino UNO R4 Minima
- Arduino IDE 2.2.1
- Windows10 22H2
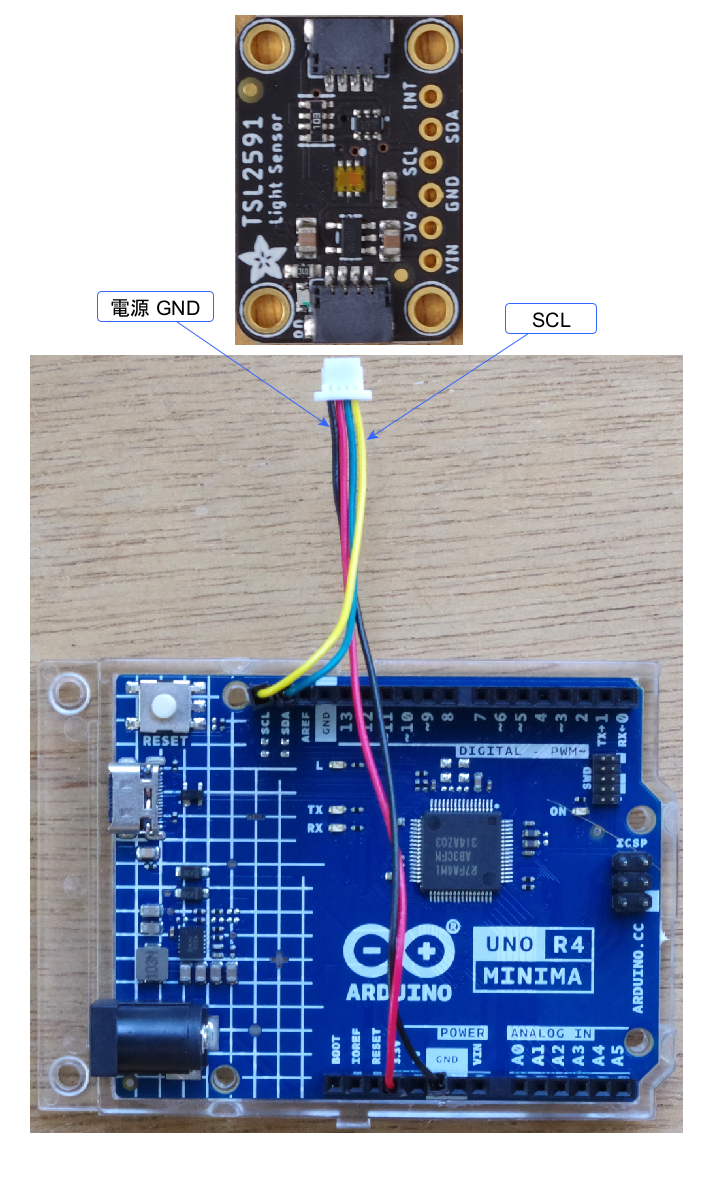
●接続
Arduino UNO R4 MinimaのI2C信号とセンサ・ボードをJSTコネクタでつなぎます(Stemma QT/Qwiicボードの写真の比率は異なる)。
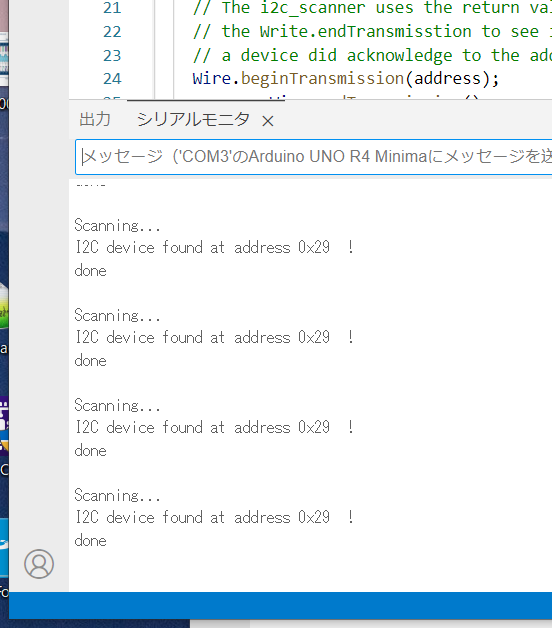
●スレーブ・アドレスを確認
従来からよく使われているi2cScanner.inoを動かしてスレーブ・アドレスを確認します。電源は3.3Vです。
0x29を見つけてきました。
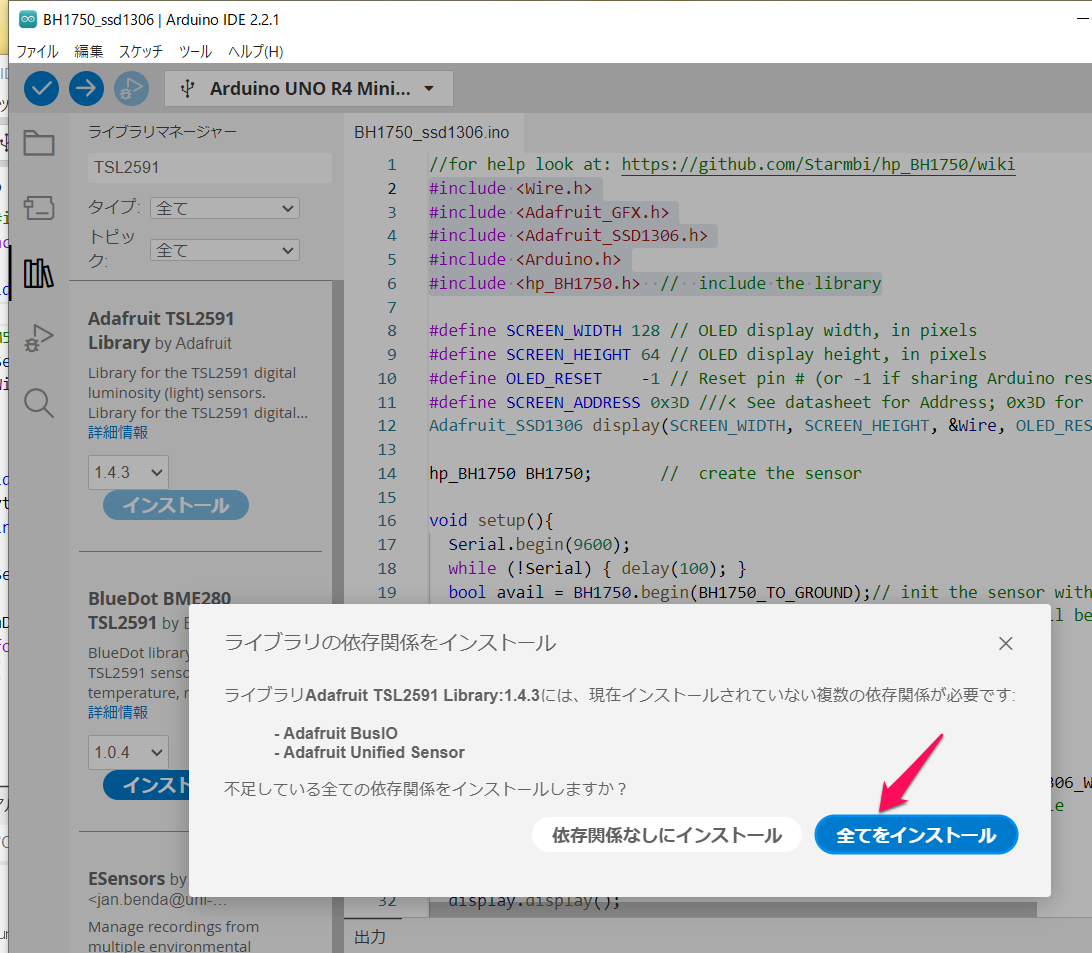
●ライブラリの用意
TSL2591で検索して、見つかった Adafruit TSL2591ライブラリをインストールします。
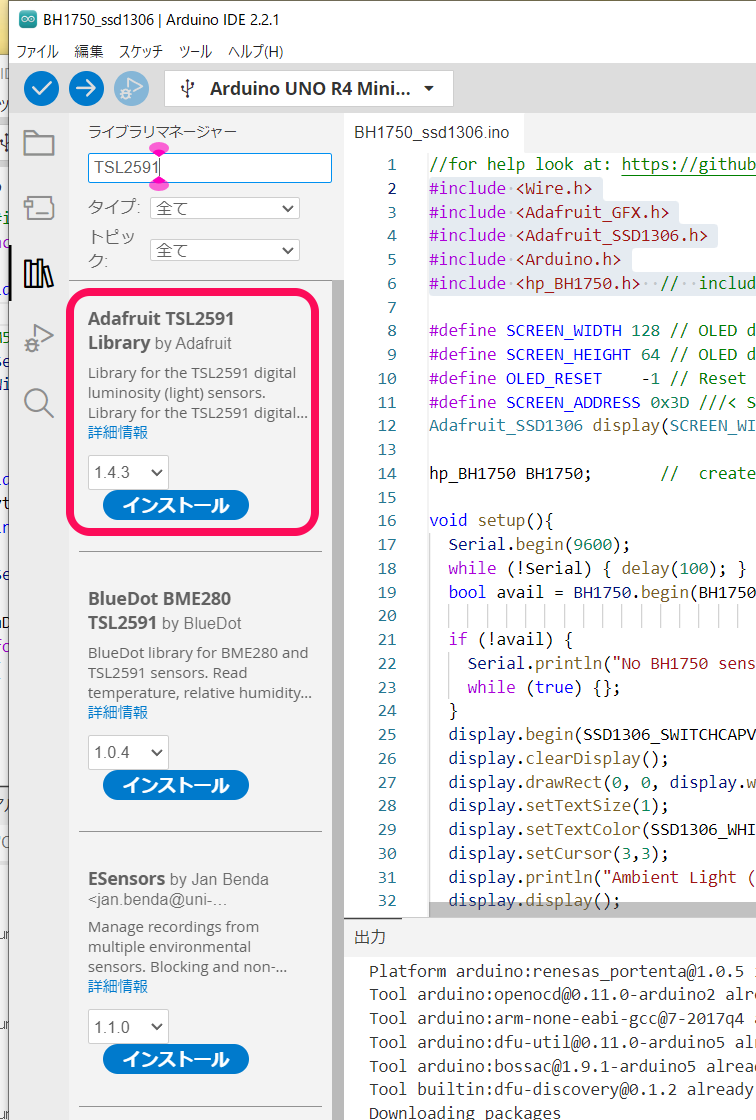
インストールを始めたとき、関連のライブラリや依存関係をインストールするかというパネルが出た場合は、全てをインストールを選びます。
●サンプル・スケッチ
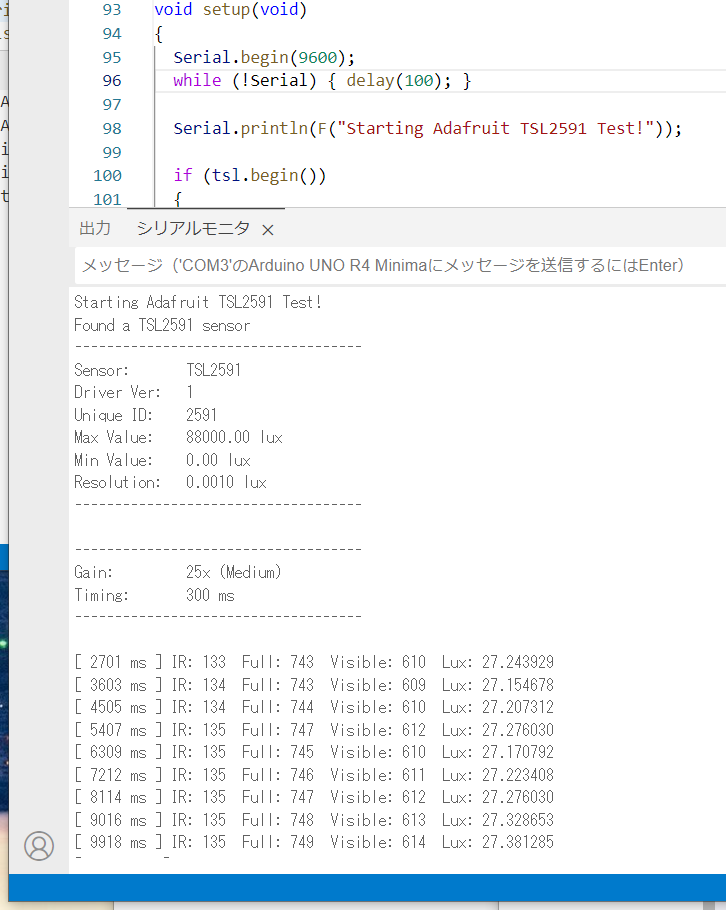
メニューのファイル->スケッチ例から、Adafruit TSL2591 Libraryのtsl2591.inoを選択します。
setup{}の最初の部分に1行追加します。
void setup(void)
{
Serial.begin(9600);
while (!Serial) { delay(100); }
コンパイル、実行します。
●4桁の7セグメントLED表示器をつないで測定結果を表示する
連載の第4回目の記事を参照しながら表示器を接続します。
Arduino UNO R4 Minimaでセンサ・インターフェーシング ④ 温湿度センサSi7021の測定結果を7セグメントLEDに表示
スケッチです。
7セグメントLED表示器は、第12回 温湿度センサ SHTC3でスレーブ・アドレスが重なったので、デフォルトの0x70から、ジャンパのA0をショートして0x71に変更してあります。デフォルトのまま使うときは0x70で使ってください。
#include <Wire.h>
#include <Adafruit_GFX.h>
#include "Adafruit_LEDBackpack.h"
#include <Adafruit_Sensor.h>
#include "Adafruit_TSL2591.h"

Adafruit_7segment matrix = Adafruit_7segment();
Adafruit_TSL2591 tsl = Adafruit_TSL2591(2591); // pass in a number for the sensor identifier (for your use later)

/**************************************************************************/
/*
    Displays some basic information on this sensor from the unified
    sensor API sensor_t type (see Adafruit_Sensor for more information)
*/
/**************************************************************************/
void displaySensorDetails(void)
{
  sensor_t sensor;
  tsl.getSensor(&sensor);
  Serial.println(F("------------------------------------"));
  Serial.print  (F("Sensor:       ")); Serial.println(sensor.name);
  Serial.print  (F("Driver Ver:   ")); Serial.println(sensor.version);
  Serial.print  (F("Unique ID:    ")); Serial.println(sensor.sensor_id);
  Serial.print  (F("Max Value:    ")); Serial.print(sensor.max_value); Serial.println(F(" lux"));
  Serial.print  (F("Min Value:    ")); Serial.print(sensor.min_value); Serial.println(F(" lux"));
  Serial.print  (F("Resolution:   ")); Serial.print(sensor.resolution, 4); Serial.println(F(" lux"));
  Serial.println(F("------------------------------------"));
  Serial.println(F(""));
  delay(500);
}

/**************************************************************************/
/*
    Configures the gain and integration time for the TSL2591
*/
/**************************************************************************/
void configureSensor(void)
{
  // You can change the gain on the fly, to adapt to brighter/dimmer light situations
  //tsl.setGain(TSL2591_GAIN_LOW);    // 1x gain (bright light)
  tsl.setGain(TSL2591_GAIN_MED);      // 25x gain
  //tsl.setGain(TSL2591_GAIN_HIGH);   // 428x gain

  // Changing the integration time gives you a longer time over which to sense light
  // longer timelines are slower, but are good in very low light situtations!
  //tsl.setTiming(TSL2591_INTEGRATIONTIME_100MS);  // shortest integration time (bright light)
  // tsl.setTiming(TSL2591_INTEGRATIONTIME_200MS);
  tsl.setTiming(TSL2591_INTEGRATIONTIME_300MS);
  // tsl.setTiming(TSL2591_INTEGRATIONTIME_400MS);
  // tsl.setTiming(TSL2591_INTEGRATIONTIME_500MS);
  // tsl.setTiming(TSL2591_INTEGRATIONTIME_600MS);  // longest integration time (dim light)

  /* Display the gain and integration time for reference sake */
  Serial.println(F("------------------------------------"));
  Serial.print  (F("Gain:         "));
  tsl2591Gain_t gain = tsl.getGain();
  switch(gain)
  {
    case TSL2591_GAIN_LOW:
      Serial.println(F("1x (Low)"));
      break;
    case TSL2591_GAIN_MED:
      Serial.println(F("25x (Medium)"));
      break;
    case TSL2591_GAIN_HIGH:
      Serial.println(F("428x (High)"));
      break;
    case TSL2591_GAIN_MAX:
      Serial.println(F("9876x (Max)"));
      break;
  }
  Serial.print  (F("Timing:       "));
  Serial.print((tsl.getTiming() + 1) * 100, DEC);
  Serial.println(F(" ms"));
  Serial.println(F("------------------------------------"));
  Serial.println(F(""));
}


/**************************************************************************/
/*
    Program entry point for the Arduino sketch
*/
/**************************************************************************/
void setup(void)
{
  Serial.begin(9600);
  while (!Serial) { delay(100); }

  Serial.println(F("Starting Adafruit TSL2591 + 7segmentLED"));

  if (tsl.begin())
  {
    Serial.println(F("Found a TSL2591 sensor"));
  }
  else
  {
    Serial.println(F("No sensor found ... check your wiring?"));
    while (1);
  }

  /* Display some basic information on this sensor */
  displaySensorDetails();

  /* Configure the sensor */
  configureSensor();

  // Now we're ready to get readings ... move on to loop()!

  matrix.begin(0x71);
  matrix.setBrightness(0x05);  // default 0x0E
}

/**************************************************************************/
/*
    Shows how to perform a basic read on visible, full spectrum or
    infrared light (returns raw 16-bit ADC values)
*/
/**************************************************************************/
void simpleRead(void)
{
  // Simple data read example. Just read the infrared, fullspecrtrum diode
  // or 'visible' (difference between the two) channels.
  // This can take 100-600 milliseconds! Uncomment whichever of the following you want to read
  uint16_t x = tsl.getLuminosity(TSL2591_VISIBLE);
  //uint16_t x = tsl.getLuminosity(TSL2591_FULLSPECTRUM);
  //uint16_t x = tsl.getLuminosity(TSL2591_INFRARED);

  Serial.print(F("[ ")); Serial.print(millis()); Serial.print(F(" ms ] "));
  Serial.print(F("Luminosity: "));
  Serial.println(x, DEC);
}

/**************************************************************************/
/*
    Show how to read IR and Full Spectrum at once and convert to lux
*/
/**************************************************************************/
void advancedRead(void)
{
  // More advanced data read example. Read 32 bits with top 16 bits IR, bottom 16 bits full spectrum
  // That way you can do whatever math and comparisons you want!
  uint32_t lum = tsl.getFullLuminosity();
  uint16_t ir, full;
  ir = lum >> 16;
  full = lum & 0xFFFF;
  Serial.print(F("[ ")); Serial.print(millis()); Serial.print(F(" ms ] "));
  Serial.print(F("IR: ")); Serial.print(ir);  Serial.print(F("  "));
  Serial.print(F("Full: ")); Serial.print(full); Serial.print(F("  "));
  Serial.print(F("Visible: ")); Serial.print(full - ir); Serial.print(F("  "));
  Serial.print(F("Lux: ")); Serial.println(tsl.calculateLux(full, ir), 6);

  matrix.print(tsl.calculateLux(full, ir), DEC);
  matrix.writeDisplay();
  delay(1000);
}

/**************************************************************************/
/*
    Performs a read using the Adafruit Unified Sensor API.
*/
/**************************************************************************/
void unifiedSensorAPIRead(void)
{
  /* Get a new sensor event */
  sensors_event_t event;
  tsl.getEvent(&event);

  /* Display the results (light is measured in lux) */
  Serial.print(F("[ ")); Serial.print(event.timestamp); Serial.print(F(" ms ] "));
  if ((event.light == 0) |
      (event.light > 4294966000.0) |
      (event.light <-4294966000.0))
  {
    /* If event.light = 0 lux the sensor is probably saturated */
    /* and no reliable data could be generated! */
    /* if event.light is +/- 4294967040 there was a float over/underflow */
    Serial.println(F("Invalid data (adjust gain or timing)"));
  }
  else
  {
    Serial.print(event.light); Serial.println(F(" lux"));
  }
}


/**************************************************************************/
/*
    Arduino loop function, called once 'setup' is complete (your own code
    should go here)
*/
/**************************************************************************/
void loop(void)
{
  //simpleRead();
  advancedRead();
  // unifiedSensorAPIRead();

  delay(500);
}
実行例です。

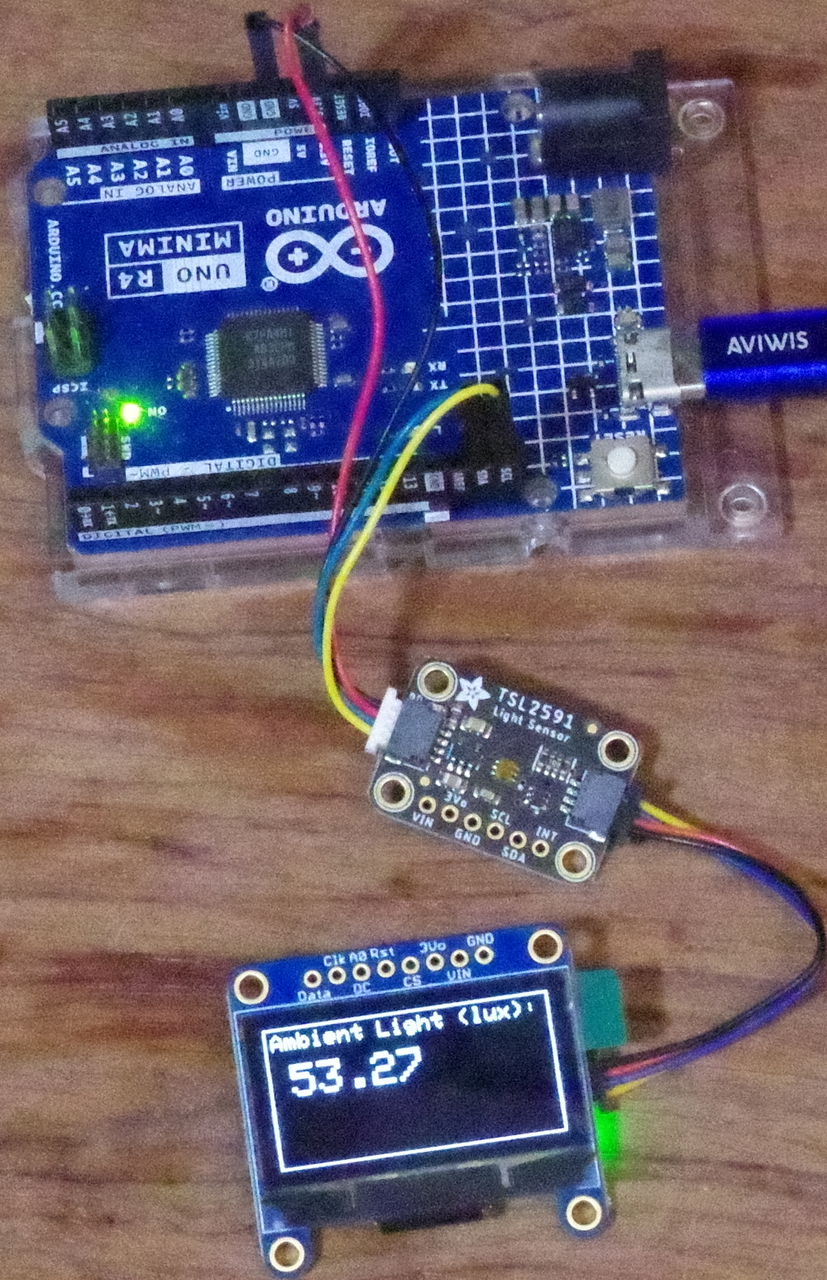
●グラフィック・ディスプレイに測定結果を表示
次の記事を参考に、グラフィック・ディスプレイに測定した明るさを表示します。
Arduino UNO R4 Minimaでセンサ・インターフェーシング ⑤ 温湿度センサSi7021の測定結果をグラフィック・ディスプレイに表示
スケッチです。
#include <Wire.h>
#include <Adafruit_GFX.h>
#include <Adafruit_SSD1306.h>
#include <Adafruit_Sensor.h>
#include "Adafruit_TSL2591.h"

#define SCREEN_WIDTH 128 // OLED display width, in pixels
#define SCREEN_HEIGHT 64 // OLED display height, in pixels
#define OLED_RESET    -1 // Reset pin # (or -1 if sharing Arduino reset pin)
#define SCREEN_ADDRESS 0x3D ///< See datasheet for Address; 0x3D for 128x64, 0x3C for 128x32
Adafruit_SSD1306 display(SCREEN_WIDTH, SCREEN_HEIGHT, &Wire, OLED_RESET);

Adafruit_TSL2591 tsl = Adafruit_TSL2591(2591); // pass in a number for the sensor identifier (for your use later)

/**************************************************************************/
/*
    Displays some basic information on this sensor from the unified
    sensor API sensor_t type (see Adafruit_Sensor for more information)
*/
/**************************************************************************/
void displaySensorDetails(void)
{
  sensor_t sensor;
  tsl.getSensor(&sensor);
  Serial.println(F("------------------------------------"));
  Serial.print  (F("Sensor:       ")); Serial.println(sensor.name);
  Serial.print  (F("Driver Ver:   ")); Serial.println(sensor.version);
  Serial.print  (F("Unique ID:    ")); Serial.println(sensor.sensor_id);
  Serial.print  (F("Max Value:    ")); Serial.print(sensor.max_value); Serial.println(F(" lux"));
  Serial.print  (F("Min Value:    ")); Serial.print(sensor.min_value); Serial.println(F(" lux"));
  Serial.print  (F("Resolution:   ")); Serial.print(sensor.resolution, 4); Serial.println(F(" lux"));
  Serial.println(F("------------------------------------"));
  Serial.println(F(""));
  delay(500);
}

/**************************************************************************/
/*
    Configures the gain and integration time for the TSL2591
*/
/**************************************************************************/
void configureSensor(void)
{
  // You can change the gain on the fly, to adapt to brighter/dimmer light situations
  //tsl.setGain(TSL2591_GAIN_LOW);    // 1x gain (bright light)
  tsl.setGain(TSL2591_GAIN_MED);      // 25x gain
  //tsl.setGain(TSL2591_GAIN_HIGH);   // 428x gain

  // Changing the integration time gives you a longer time over which to sense light
  // longer timelines are slower, but are good in very low light situtations!
  //tsl.setTiming(TSL2591_INTEGRATIONTIME_100MS);  // shortest integration time (bright light)
  // tsl.setTiming(TSL2591_INTEGRATIONTIME_200MS);
  tsl.setTiming(TSL2591_INTEGRATIONTIME_300MS);
  // tsl.setTiming(TSL2591_INTEGRATIONTIME_400MS);
  // tsl.setTiming(TSL2591_INTEGRATIONTIME_500MS);
  // tsl.setTiming(TSL2591_INTEGRATIONTIME_600MS);  // longest integration time (dim light)

  /* Display the gain and integration time for reference sake */
  Serial.println(F("------------------------------------"));
  Serial.print  (F("Gain:         "));
  tsl2591Gain_t gain = tsl.getGain();
  switch(gain)
  {
    case TSL2591_GAIN_LOW:
      Serial.println(F("1x (Low)"));
      break;
    case TSL2591_GAIN_MED:
      Serial.println(F("25x (Medium)"));
      break;
    case TSL2591_GAIN_HIGH:
      Serial.println(F("428x (High)"));
      break;
    case TSL2591_GAIN_MAX:
      Serial.println(F("9876x (Max)"));
      break;
  }
  Serial.print  (F("Timing:       "));
  Serial.print((tsl.getTiming() + 1) * 100, DEC);
  Serial.println(F(" ms"));
  Serial.println(F("------------------------------------"));
  Serial.println(F(""));
}


/**************************************************************************/
/*
    Program entry point for the Arduino sketch
*/
/**************************************************************************/
void setup(void)
{
  Serial.begin(9600);
  while (!Serial) { delay(100); }

  Serial.println(F("Starting Adafruit TSL2591 +  SSD1306"));

  if (tsl.begin())
  {
    Serial.println(F("Found a TSL2591 sensor"));
  }
  else
  {
    Serial.println(F("No sensor found ... check your wiring?"));
    while (1);
  }

  /* Display some basic information on this sensor */
  displaySensorDetails();

  /* Configure the sensor */
  configureSensor();

  // Now we're ready to get readings ... move on to loop()!

  display.begin(SSD1306_SWITCHCAPVCC, SCREEN_ADDRESS);
  display.clearDisplay();
  display.drawRect(0, 0, display.width(), display.height(), SSD1306_WHITE);
  display.setTextSize(1);                // Normal 1:1 pixel scale
  display.setTextColor(SSD1306_WHITE);   // Draw white text
  display.setCursor(3,3);
  display.println("Ambient Light (lux): ");
  display.display();
  delay(200);
}

/**************************************************************************/
/*
    Shows how to perform a basic read on visible, full spectrum or
    infrared light (returns raw 16-bit ADC values)
*/
/**************************************************************************/
void simpleRead(void)
{
  // Simple data read example. Just read the infrared, fullspecrtrum diode
  // or 'visible' (difference between the two) channels.
  // This can take 100-600 milliseconds! Uncomment whichever of the following you want to read
  uint16_t x = tsl.getLuminosity(TSL2591_VISIBLE);
  //uint16_t x = tsl.getLuminosity(TSL2591_FULLSPECTRUM);
  //uint16_t x = tsl.getLuminosity(TSL2591_INFRARED);

  Serial.print(F("[ ")); Serial.print(millis()); Serial.print(F(" ms ] "));
  Serial.print(F("Luminosity: "));
  Serial.println(x, DEC);
}

/**************************************************************************/
/*
    Show how to read IR and Full Spectrum at once and convert to lux
*/
/**************************************************************************/
void advancedRead(void)
{
  // More advanced data read example. Read 32 bits with top 16 bits IR, bottom 16 bits full spectrum
  // That way you can do whatever math and comparisons you want!
  uint32_t lum = tsl.getFullLuminosity();
  uint16_t ir, full;
  ir = lum >> 16;
  full = lum & 0xFFFF;
  Serial.print(F("[ ")); Serial.print(millis()); Serial.print(F(" ms ] "));
  Serial.print(F("IR: ")); Serial.print(ir);  Serial.print(F("  "));
  Serial.print(F("Full: ")); Serial.print(full); Serial.print(F("  "));
  Serial.print(F("Visible: ")); Serial.print(full - ir); Serial.print(F("  "));
  Serial.print(F("Lux: ")); Serial.println(tsl.calculateLux(full, ir), 6);

      display.setTextSize(2);   // Draw 2X-scale text
      display.setTextColor(SSD1306_WHITE);
      display.setCursor(10,17);
      display.fillRect(1, 17, 116, 44, SSD1306_BLACK);
      display.println(tsl.calculateLux(full, ir));
      display.display();
}

/**************************************************************************/
/*
    Performs a read using the Adafruit Unified Sensor API.
*/
/**************************************************************************/
void unifiedSensorAPIRead(void)
{
  /* Get a new sensor event */
  sensors_event_t event;
  tsl.getEvent(&event);

  /* Display the results (light is measured in lux) */
  Serial.print(F("[ ")); Serial.print(event.timestamp); Serial.print(F(" ms ] "));
  if ((event.light == 0) |
      (event.light > 4294966000.0) |
      (event.light <-4294966000.0))
  {
    /* If event.light = 0 lux the sensor is probably saturated */
    /* and no reliable data could be generated! */
    /* if event.light is +/- 4294967040 there was a float over/underflow */
    Serial.println(F("Invalid data (adjust gain or timing)"));
  }
  else
  {
    Serial.print(event.light); Serial.println(F(" lux"));
  }
}


/**************************************************************************/
/*
    Arduino loop function, called once 'setup' is complete (your own code
    should go here)
*/
/**************************************************************************/
void loop(void)
{
  //simpleRead();
  advancedRead();
  // unifiedSensorAPIRead();

  delay(500);
}