Arduino UNO R4 WiFi で外気温を測る ② Webサーバに温度、湿度、気圧を表示
Arduino UNO R4 WiFiモデルを利用し、外気の気温や湿度を測り、Wi-Fi経由で、室内側のPCやArduinoで読み込みます。
前回、センサBME280で温度、湿度、気圧を測定しました。これら測定データをWebサーバで表示し、別のPCなどから読みます。
●環境
- Arduino IDE;2.3.8
- Windows11;25H2
- Arduino UNO R4 WiFi 1.5.3 PCはマザーボードのUSBポートから直接つなぐ。
●利用するセンサはBME280
温度、湿度、気圧を測定できるボッシュのBME280を利用します。インターフェースはQWIICの4ピン・コネクタで、マイコン・ボードは室内に置いてセンサを室外に出したいので、ケーブルは約2mと長めです。長いとノイズが乗りやすいです。BME280のI2Cデータのやり取りではCRCチェックなどの機能はありません。
もともと車載用途などを考えて作られているセンサなので、耐ノイズ性能はあると思われ、ツイストペア線を使っているので、眺めているだけではおかしなデータは見られません。I2Cバスがエラー出ないときに読み込むという記述を追加すると、めったに起こらない読み取り値のエラーを低下させられるかもしれません。
簡易的には、短時間にほとんど変化しない気圧データを前回読んだ値と比較して、大きく異なると破棄するという記述を追加すると信頼性が上がるかもしれません。
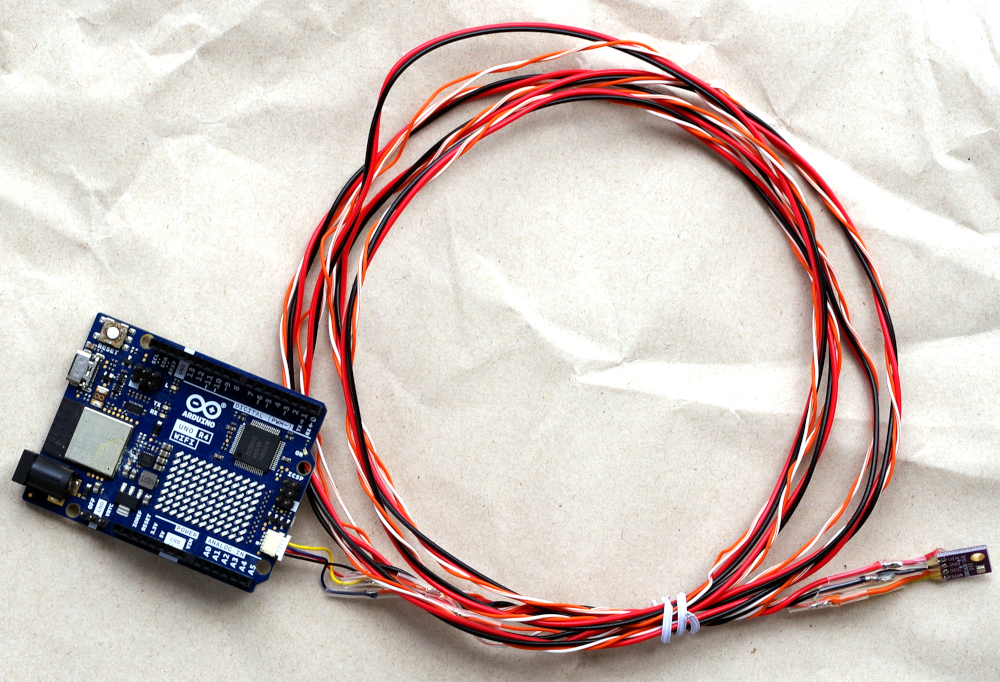
●PCへ三つのデータをテキストで送るスケッチ
スケッチは、二つあります。bme280_1_web.inoを作成した後、Wi-Fiルータへのアクセス情報を、IDEエディタで新しいタブで作成し、ファイル名arduino_secrets.hにしました。このように二つに分ける方法は、Arduinoのサイトにあるサンプルでは一般的です。
メインのスケッチbme280_1_web.inoはAdfruitのBMEサンプルスケッチをベースにしているので、冗長なところが残っています。使っていないSPIの記述は削除しました。
WiFiサーバ部分はArduino UNO R4 WiFiのサンプルなので、includeするのは"WiFiS3.h"です。
setup()内は、BME280の初期化とWi-FIの初期化の記述です。最後でWiFi.begin(ssid, pass);でルータに接続し、つながったら、 server.begin(); でWebサーバを立ち上げます。
loop()の最初では、クライアントが接続してきたらif (client) {、
client.println("HTTP/1.1 200 OK");
client.println("Content-type:text/html");
で、httpプロトコルの最初のやり取りをします。
readValues();
でセンサのデータを読みに行き、
client.print("<p>"+String(Temperature,2) + "," + String(Pressure,1) + "," + String(Humidity,0)+ "</p>");
温度、気圧、湿度をカンマで区切りながらテキストで送ります。
delay(3000);
で3秒待って、繰り返します。
arduino_secrets.h
#define SECRET_SSID "Buffalo-G-20EA"
#define SECRET_PASS "XXXXXXXX"
bme280_1_web.ino
#include "WiFiS3.h"
#include "arduino_secrets.h"
///////please enter your sensitive data in the Secret tab/arduino_secrets.h
char ssid[] = SECRET_SSID;        // your network SSID (name)
char pass[] = SECRET_PASS;    // your network password (use for WPA, or use as key for WEP)
int keyIndex = 0;                 // your network key index number (needed only for WEP)

#include <Wire.h>
#include <Adafruit_Sensor.h>
#include <Adafruit_BME280.h>
float Temperature, Pressure, Humidity;

int status = WL_IDLE_STATUS;
WiFiServer server(80);

Adafruit_BME280 bme; // I2C

void setup() {
    Serial.begin(9600);
    delay(3000);
    Serial.println("BME280 WiFi test");

    unsigned status;
    // default settings
    status = bme.begin(0x76,&Wire1);
    if (!status) {
        Serial.println("Could not find a valid BME280 sensor, check wiring, address, sensor ID!");
        Serial.print("SensorID was: 0x"); Serial.println(bme.sensorID(),16);
        Serial.print("        ID of 0xFF probably means a bad address, a BMP 180 or BMP 085\n");
        Serial.print("   ID of 0x56-0x58 represents a BMP 280,\n");
        Serial.print("        ID of 0x60 represents a BME 280.\n");
        Serial.print("        ID of 0x61 represents a BME 680.\n");
        while (1) delay(10);
    }

  // check for the WiFi module:
  if (WiFi.status() == WL_NO_MODULE) {
    Serial.println("Communication with WiFi module failed!");
    // don't continue
    while (true);
  }

  // attempt to connect to WiFi network:
  while (status != WL_CONNECTED) {
    Serial.print("Attempting to connect to Network named: ");
    Serial.println(ssid);                   // print the network name (SSID);

    // Connect to WPA/WPA2 network. Change this line if using open or WEP network:
    status = WiFi.begin(ssid, pass);
    // wait 10 seconds for connection:
    delay(10000);
  }
  server.begin();                           // start the web server on port 80
  printWifiStatus();                        // you're connected now, so print out the status
    Serial.println();
}


void loop() {
  WiFiClient client = server.available();   // listen for incoming clients

  if (client) {                             // if you get a client,
    Serial.println("new client");           // print a message out the serial port
    String currentLine = "";                // make a String to hold incoming data from the client
    while (client.connected()) {            // loop while the client's connected
      if (client.available()) {             // if there's bytes to read from the client,
        char c = client.read();             // read a byte, then
        Serial.write(c);                    // print it out to the serial monitor
        if (c == '\n') {                    // if the byte is a newline character

          // if the current line is blank, you got two newline characters in a row.
          // that's the end of the client HTTP request, so send a response:
          if (currentLine.length() == 0) {
            // HTTP headers always start with a response code (e.g. HTTP/1.1 200 OK)
            // and a content-type so the client knows what's coming, then a blank line:
            client.println("HTTP/1.1 200 OK");
            client.println("Content-type:text/html");
            //client.println("Connection: close");  // the connection will be closed after completion of the response
            //client.println("Refresh: 5");  // refresh the page automatically every 5 sec
            client.println();

          // add
          client.print("  ");
    readValues();
        Serial.println(" temperature= "+String(Temperature,1)+"'C");
        Serial.println(" Press= "+String(Pressure,1)+"'C");
        Serial.println(" RH%= "+String(Humidity,0));

          client.println("");
          client.print("<p>"+String(Temperature,2) + "," + String(Pressure,1) + "," + String(Humidity,0)+ "</p>");
          client.println("");

          delay(3000);
          }
        }
      }
    }
  }
}

void readValues() {
  Temperature = bme.readTemperature();
  Pressure = bme.readPressure() / 100.0;
  Humidity = bme.readHumidity();
}

void printWifiStatus() {
  // print the SSID of the network you're attached to:
  Serial.print("SSID: ");
  Serial.println(WiFi.SSID());

  // print your board's IP address:
  IPAddress ip = WiFi.localIP();
  Serial.print("IP Address: ");
  Serial.println(ip);

  // print the received signal strength:
  long rssi = WiFi.RSSI();
  Serial.print("signal strength (RSSI):");
  Serial.print(rssi);
  Serial.println(" dBm");
  // print where to go in a browser:
  Serial.print("To see this page in action, open a browser to http://");
  Serial.println(ip);
}
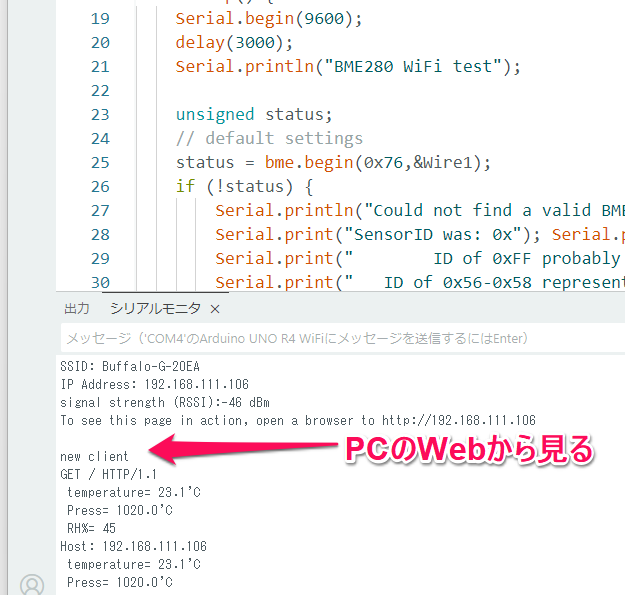
Arduinoの実行中です。
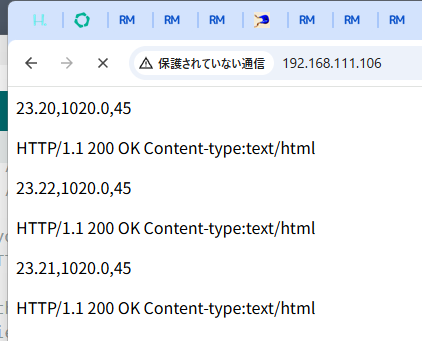
PCのWeb(http://192.168.111.106/)の画面です。
●PCへ三つのデータをJSON形式で送るスケッチ
同じテキストですが、JSONデータ形式で送ってみます。JSONは、主に「キー」と「値」のペアを波括弧 { } で囲んで表現するので、受け取った側が処理しやすいです。
「キー」は複数記述できます。
// JSONデータ送信
client.print("{\"temperature\":");
client.print(Temperature);
client.print(",\"humidity\":");
client.print(Humidity);
client.print(",\"pressure\":");
client.print(Pressure);
client.println("}");
arduino_secrets.h
#define SECRET_SSID "Buffalo-G-20EA"
#define SECRET_PASS "XXXXXXXX"
bme280_1_web_JSON.ino
#include "WiFiS3.h"
#include "arduino_secrets.h"
///////please enter your sensitive data in the Secret tab/arduino_secrets.h
char ssid[] = SECRET_SSID;        // your network SSID (name)
char pass[] = SECRET_PASS;    // your network password (use for WPA, or use as key for WEP)
int keyIndex = 0;                 // your network key index number (needed only for WEP)

#include <Wire.h>
#include <Adafruit_Sensor.h>
#include <Adafruit_BME280.h>
float Temperature, Pressure, Humidity;

int status = WL_IDLE_STATUS;
WiFiServer server(80);

Adafruit_BME280 bme; // I2C

void setup() {
    Serial.begin(9600);
    delay(3000);
    Serial.println("BME280 WiFi test JSON");

    unsigned status;
    // default settings
    status = bme.begin(0x76,&Wire1);
    if (!status) {
        Serial.println("Could not find a valid BME280 sensor, check wiring, address, sensor ID!");
        Serial.print("SensorID was: 0x"); Serial.println(bme.sensorID(),16);
        Serial.print("        ID of 0xFF probably means a bad address, a BMP 180 or BMP 085\n");
        Serial.print("   ID of 0x56-0x58 represents a BMP 280,\n");
        Serial.print("        ID of 0x60 represents a BME 280.\n");
        Serial.print("        ID of 0x61 represents a BME 680.\n");
        while (1) delay(10);
    }

  // check for the WiFi module:
  if (WiFi.status() == WL_NO_MODULE) {
    Serial.println("Communication with WiFi module failed!");
    // don't continue
    while (true);
  }

  // attempt to connect to WiFi network:
  while (status != WL_CONNECTED) {
    Serial.print("Attempting to connect to Network named: ");
    Serial.println(ssid);                   // print the network name (SSID);

    // Connect to WPA/WPA2 network. Change this line if using open or WEP network:
    status = WiFi.begin(ssid, pass);
    // wait 10 seconds for connection:
    delay(10000);
  }
  server.begin();                           // start the web server on port 80
  printWifiStatus();                        // you're connected now, so print out the status
  Serial.println();
}


void loop() {
  WiFiClient client = server.available();   // listen for incoming clients

  if (client) {                             // if you get a client,
    Serial.println("new client");           // print a message out the serial port
    String currentLine = "";                // make a String to hold incoming data from the client
    while (client.connected()) {            // loop while the client's connected
      if (client.available()) {             // if there's bytes to read from the client,
        char c = client.read();             // read a byte, then
        //Serial.write(c);                    // print it out to the serial monitor
        if (c == '\n') {                    // if the byte is a newline character

          // if the current line is blank, you got two newline characters in a row.
          // that's the end of the client HTTP request, so send a response:
          if (currentLine.length() == 0) {
            // HTTP headers always start with a response code (e.g. HTTP/1.1 200 OK)
            // and a content-type so the client knows what's coming, then a blank line:
            client.println("HTTP/1.1 200 OK");
            //client.println("Content-type:text/html");
            client.println("Content-Type: application/json");
          client.println("Connection: close");
          client.println();

          // add
        readValues();
        Serial.println(" temperature= "+String(Temperature,1)+"'C");
        Serial.println(" Press= "+String(Pressure,1)+"'C");
        Serial.println(" RH%= "+String(Humidity,0));

          // JSONデータ送信
          client.print("{\"temperature\":");
          client.print(Temperature);
          client.print(",\"humidity\":");
          client.print(Humidity);
          client.print(",\"pressure\":");
          client.print(Pressure);
          client.println("}");
          delay(1000);
          break;
          }
        }
      }
    }
     delay(10);
    client.stop();
  }
}

void readValues() {
  Temperature = bme.readTemperature();
  Pressure = bme.readPressure() / 100.0;
  Humidity = bme.readHumidity();
}

void printWifiStatus() {
  // print the SSID of the network you're attached to:
  Serial.print("SSID: ");
  Serial.println(WiFi.SSID());

  // print your board's IP address:
  IPAddress ip = WiFi.localIP();
  Serial.print("IP Address: ");
  Serial.println(ip);

  // print the received signal strength:
  long rssi = WiFi.RSSI();
  Serial.print("signal strength (RSSI):");
  Serial.print(rssi);
  Serial.println(" dBm");
  // print where to go in a browser:
  Serial.print("To see this page in action, open a browser to http://");
  Serial.println(ip);
}
Arduinoのモニタ画面です。
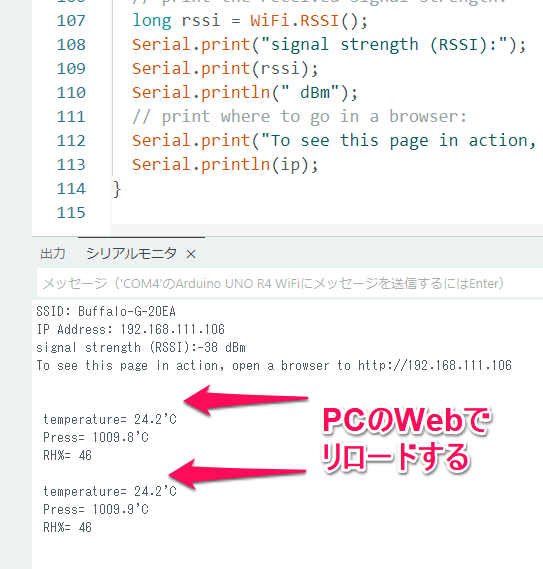
PCのWebブラウザをリロードするたびに、データを送ってきます。リロードしているPCのWeb画面には何も表示されません。
//client.println("Content-type:text/html");
コメントアウトを外すと、JSONの文字列が表示されるので、JSONも文字データを送っていることが確認できます。
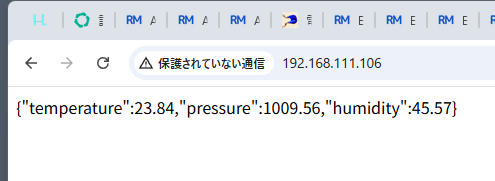
●WebClientのスケッチ
先ほどのコメントを有効にしておきます。送るのはJSONの文字列だけになります。
//client.println("Content-type:text/html");
PCのUSBからマイコン。ボードArduino UNO R4 WiFi を外し、別途電源をつなげておきます。
いままでPCをクライアントとしていましたが、Arduino UNO R4 WiFi をもう1台用意します。
サンプルにあるWi-Fi Web Clientを修正します。www.google.comではなく、IPアドレス192.168.111.106にアクセスします。
/*
  Web client

  This sketch connects to a website (http://www.google.com)
  using the WiFi module.

  This example is written for a network using WPA encryption. For
  WEP or WPA, change the WiFi.begin() call accordingly.

  This example is written for a network using WPA encryption. For
  WEP or WPA, change the WiFi.begin() call accordingly.


  created 13 July 2010
  by dlf (Metodo2 srl)
  modified 31 May 2012
  by Tom Igoe

  Find the full UNO R4 WiFi Network documentation here:
  https://docs.arduino.cc/tutorials/uno-r4-wifi/wifi-examples#wi-fi-web-client
 */


#include "WiFiS3.h"


#include "arduino_secrets.h"

///////please enter your sensitive data in the Secret tab/arduino_secrets.h
char ssid[] = SECRET_SSID;        // your network SSID (name)
char pass[] = SECRET_PASS;    // your network password (use for WPA, or use as key for WEP)
int keyIndex = 0;            // your network key index number (needed only for WEP)

int status = WL_IDLE_STATUS;
// if you don't want to use DNS (and reduce your sketch size)
// use the numeric IP instead of the name for the server:
IPAddress server(192,168,111,106);  // numeric IP for Google (no DNS)
//char server[] = "www.google.com";    // name address for Google (using DNS)

// Initialize the Ethernet client library
// with the IP address and port of the server
// that you want to connect to (port 80 is default for HTTP):
WiFiClient client;

/* -------------------------------------------------------------------------- */
void setup() {
/* -------------------------------------------------------------------------- */
  //Initialize serial and wait for port to open:
  Serial.begin(9600);
  while (!Serial) {
    ; // wait for serial port to connect. Needed for native USB port only
  }

  // check for the WiFi module:
  if (WiFi.status() == WL_NO_MODULE) {
    Serial.println("Communication with WiFi module failed!");
    // don't continue
    while (true);
  }

  String fv = WiFi.firmwareVersion();
  if (fv < WIFI_FIRMWARE_LATEST_VERSION) {
    Serial.println("Please upgrade the firmware");
  }

  // attempt to connect to WiFi network:
  while (status != WL_CONNECTED) {
    Serial.print("Attempting to connect to SSID: ");
    Serial.println(ssid);
    // Connect to WPA/WPA2 network. Change this line if using open or WEP network:
    status = WiFi.begin(ssid, pass);

    // wait 10 seconds for connection:
    delay(10000);
  }

  printWifiStatus();

  Serial.println("\nStarting connection to server...");
  // if you get a connection, report back via serial:
  if (client.connect(server, 80)) {
    Serial.println("connected to server");
    // Make a HTTP request:
    client.println("GET /search?q=arduino HTTP/1.1");
    client.println("Host: www.google.com");
    client.println("Connection: close");
    client.println();
  }
}

/* just wrap the received data up to 80 columns in the serial print*/
/* -------------------------------------------------------------------------- */
void read_response() {
/* -------------------------------------------------------------------------- */
  uint32_t received_data_num = 0;
  while (client.available()) {
    /* actual data reception */
    char c = client.read();
    /* print data to serial port */
    Serial.print(c);
    /* wrap data to 80 columns*/
    received_data_num++;
    if(received_data_num % 80 == 0) {
      Serial.println();
    }
  }
}

/* -------------------------------------------------------------------------- */
void loop() {
/* -------------------------------------------------------------------------- */
  read_response();

  // if the server's disconnected, stop the client:
  if (!client.connected()) {
    Serial.println();
    Serial.println("disconnecting from server.");
    client.stop();

    // do nothing forevermore:
    while (true);
  }
}

/* -------------------------------------------------------------------------- */
void printWifiStatus() {
/* -------------------------------------------------------------------------- */
  // print the SSID of the network you're attached to:
  Serial.print("SSID: ");
  Serial.println(WiFi.SSID());

  // print your board's IP address:
  IPAddress ip = WiFi.localIP();
  Serial.print("IP Address: ");
  Serial.println(ip);

  // print the received signal strength:
  long rssi = WiFi.RSSI();
  Serial.print("signal strength (RSSI):");
  Serial.print(rssi);
  Serial.println(" dBm");
}
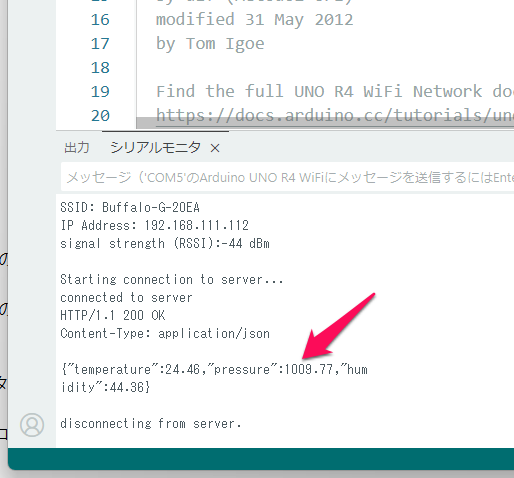
上記のWebClientのスケッチを実行します。
JSONデータを一度受信して接続を切りました。
●WebClientでJSONデータを解読する
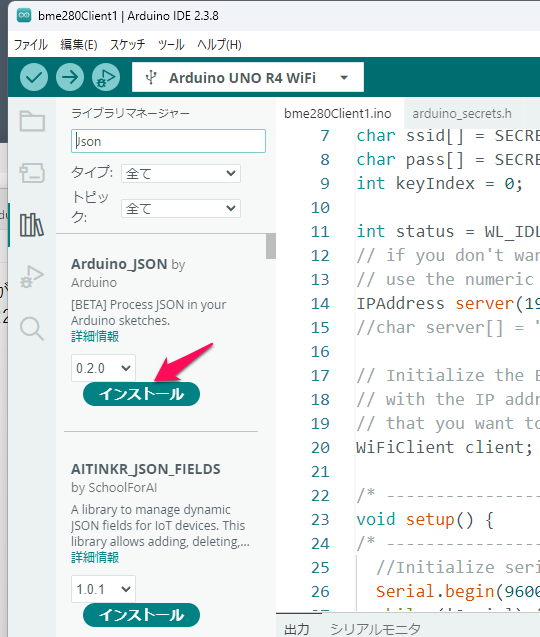
ライブラリの検索でjsonと入力し、最初に見つかったをArduino_JSONライブラリをインストールしました。
Arduino_JSONでは、JSON文字列を解読するパースが、constの文字列でなければなりません。ファイルやWebから読み込んだ文字列をいったんconstに変更してからパース(JSON.parse)を使います。
読み込んだ文字列の中に{ があることを確認してパースします。
実験中、停電があって、サーバーのIPアドレスが変更になったので、192.168.111.103に修正しています。
#include <math.h>
#include "WiFiS3.h"
#include <Arduino_JSON.h>
JSONVar temperature, pressure, humidity;
uint8_t  buf[256] ;

#include "arduino_secrets.h"

char ssid[] = SECRET_SSID;        // your network SSID (name)
char pass[] = SECRET_PASS;    // your network password (use for WPA, or use as key for WEP)
//int keyIndex = 0;            // your network key index number (needed only for WEP)

int status = WL_IDLE_STATUS;
IPAddress server(192,168,111,103);  // numeric IP for Google (no DNS)

WiFiClient client;

/* -------------------------------------------------------------------------- */
void setup() {
/* -------------------------------------------------------------------------- */
  //Initialize serial and wait for port to open:
  Serial.begin(9600);
  delay(3000);
  Serial.println("\nstart WebClient received JSON");

  // check for the WiFi module:
  if (WiFi.status() == WL_NO_MODULE) {
    Serial.println("Communication with WiFi module failed!");
    // don't continue
    while (true);
  }

  String fv = WiFi.firmwareVersion();
  if (fv < WIFI_FIRMWARE_LATEST_VERSION) {
    Serial.println("Please upgrade the firmware");
  }

  // attempt to connect to WiFi network:
  while (status != WL_CONNECTED) {
    Serial.print("Attempting to connect to SSID: ");
    Serial.println(ssid);
    // Connect to WPA/WPA2 network. Change this line if using open or WEP network:
    status = WiFi.begin(ssid, pass);

    // wait 10 seconds for connection:
    delay(10000);
  }

  printWifiStatus();

  Serial.println("\nStarting connection to server...");
  // if you get a connection, report back via serial:
  if (client.connect(server, 80)) {
    Serial.println("connected to server");
    // Make a HTTP request:
    client.println("GET /search?q=arduino HTTP/1.1");
    client.println("Host: www.google.com");
    client.println("Connection: close");
    client.println();
  }
}

String strbuf;
void read_response() {

  while (client.available()) {
    while (true){
      client.read(buf, sizeof(buf));
      // Serial.print("read 1line: ");Serial.println((char*)buf);  // 1line read

      strbuf = String((char*)buf);
      int kakko = strbuf.indexOf("{");
      //Serial.println("find {  ");Serial.println(kakko);
      if (kakko != -1){
        break;
      }
    }
    String kakkoikou = strbuf.substring(strbuf.indexOf("{"));
    //Serial.println(kakkoikou);
    //Serial.println(kakkoikou.length());
    kakkoikou.toCharArray((char*)buf, kakkoikou.length());

    JSONVar senserObject = JSON.parse((const char*)buf);

    Serial.print("senserObject: ");Serial.println(senserObject);
      if  (isnan((double) senserObject["temperature"])) {
        break;
      }
    Serial.print("\nTemperature = ");
    Serial.println((double) senserObject["temperature"]);
    Serial.print("Pressure = ");
    Serial.println((double) senserObject["pressure"]);
    Serial.print("Humidity = ");
    Serial.println((double) senserObject["humidity"]);
  }

}

void loop() {
  read_response();

  // if the server's disconnected, stop the client:
  if (!client.connected()) {
    Serial.println();
    Serial.println("disconnecting from server.");
    client.stop();

    // do nothing forevermore:
    while (true);
  }
}

void printWifiStatus() {
  // print the SSID of the network you're attached to:
  Serial.print("connected SSID: ");
  Serial.println(WiFi.SSID());

  // print your board's IP address:
  IPAddress ip = WiFi.localIP();
  //Serial.print("IP Address: ");
  //Serial.println(ip);

  // print the received signal strength:
  long rssi = WiFi.RSSI();
  //Serial.print("signal strength (RSSI):");
  //Serial.print(rssi);
  //Serial.println(" dBm");
}
実行中の様子です。
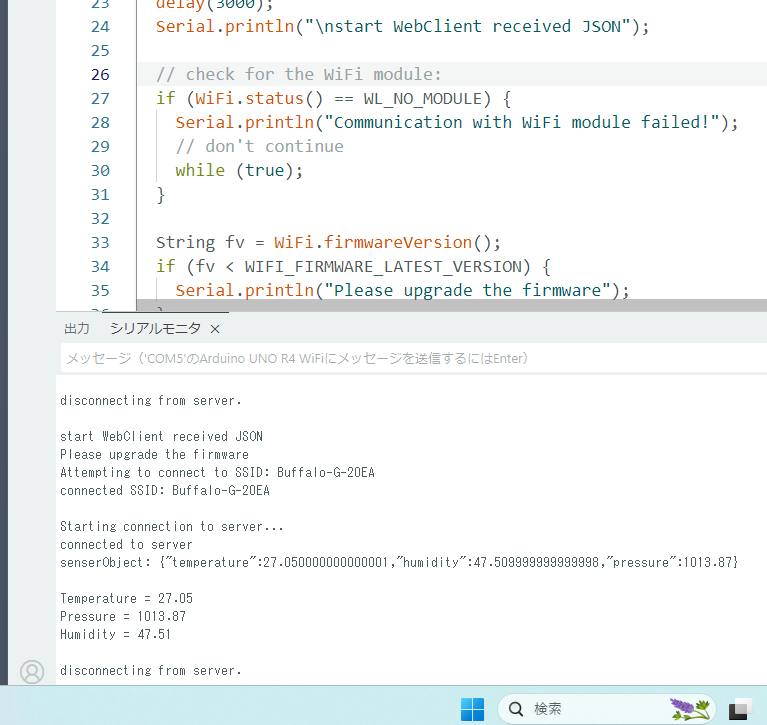
いくつかのエラー処理を入れていますが、完ぺきではありません。
このスケッチでは、接続して一度データを読み込んだら、接続を切ります。
●WebサーバーのIPアドレス
家庭内LANのルータがDHCPサーバーを兼任していることが多いです。192.168.xxx.yyyのプライベート・アドレスのどこかを、クライアントが接続してきたらIPアドレスを振る動作をします。
今回のように、地域の電源が長時間落ちた時などは、マイコン・ボードやPCに振られるIPアドレスが変更になっていることがあります。
Windowsで、検索にCMDと入れると、コマンドプロンプトが立ち上がります。
arp -a
を実行すると、DHCPサーバで振られたアドレスとMACアドレスが表示されます。MACアドレスの最初の部分はメーカ名のコードだと思いますが、マイコン・ボードのMACアドレスをメモしておきます。
筆者のDHCPサーバーは、192.168.111.100からIPアドレスを振る設定にしています。
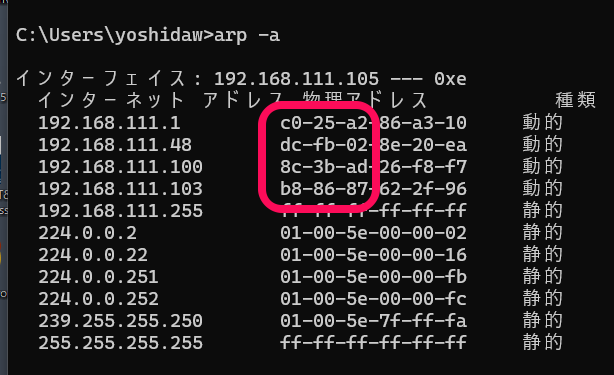
もし停電などで、マイコン・ボードのIPアドレスが変更されていた時は、pingを撃ちます。筆者の場合は、192.168.111.100から表示されていない隙間のIPアドレスをして指定します。4,5個のpingを撃った後に、arp -aを実行すると、マイコン・ボードのIPアドレスとMACアドレスが表示されて、新しいIPアドレスを知ることができます。
