ラズパイ2023年10月更新 bookworm ④ 気圧センサBME280をデバイス・ドライバで利用
第2回目は、気圧センサLPS22HBを利用し、I2Cバスのアクセスは、smbus2ライブラリを利用してpythonで記述しました。
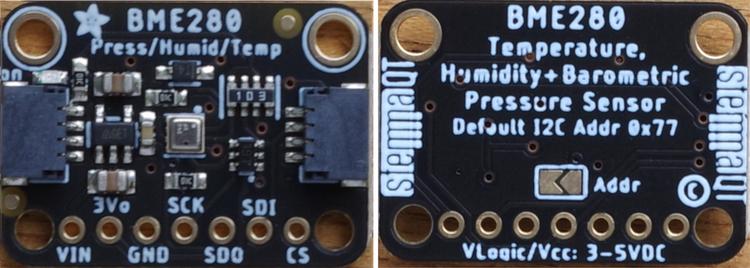
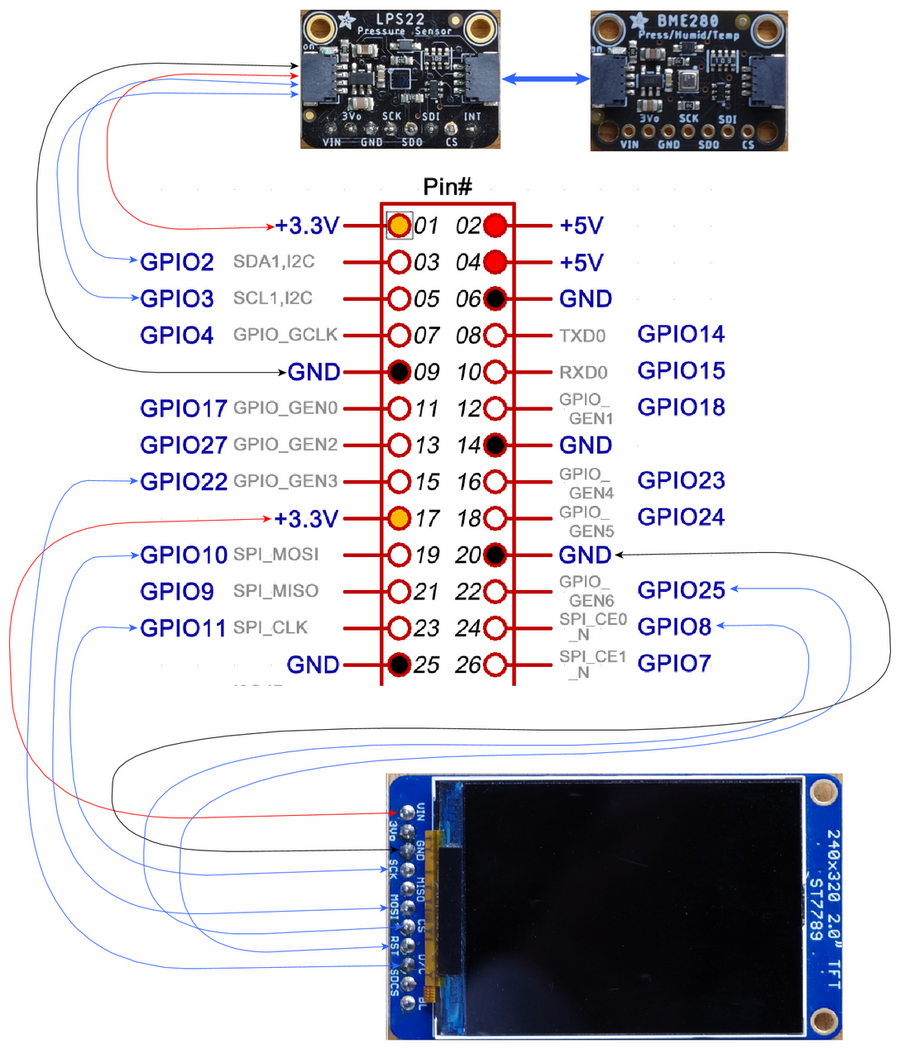
ここでは、気圧センサBME280を利用します。温度、気圧、湿度が読み出せます。LPS22HBのつながっているI2CバスにStemma QT/Qwiicコネクタで増設します。
BME280は、ラズパイにはデバイス・ドライバが用意されているので、組み込んで、温度、気圧、湿度が読み出します。/boot/overlaysのREADMEによると、I2Cバス用のセンサは、各種利用できるようです。
|
Name: i2c-sensor aht10 Select the Aosong AHT10 temperature and humidity bh1750 Select the Rohm BH1750 ambient light sensor bme280 Select the Bosch Sensortronic BME280 bme680 Select the Bosch Sensortronic BME680 bmp085 Select the Bosch Sensortronic BMP085 bmp180 Select the Bosch Sensortronic BMP180 bmp280 Select the Bosch Sensortronic BMP280 bno055 Select the Bosch Sensortronic BNO055 IMU ccs811 Select the AMS CCS811 digital gas sensor ds1621 Select the Dallas Semiconductors DS1621 temp hdc100x Select the Texas Instruments HDC100x temp sensor htu21 Select the HTU21 temperature and humidity sensor int_pin Set the GPIO to use for interrupts (max30102, jc42 Select any of the many JEDEC JC42.4-compliant lm75 Select the Maxim LM75 temperature sensor lm75addr Deprecated - use addr parameter instead max17040 Select the Maxim Integrated MAX17040 battery max30102 Select the Maxim Integrated MAX30102 heart-rate mcp980x Select the Maxim MCP980x range of temperature mpu6050 Select the InvenSense MPU6050 IMU. Valid mpu9250 Select the InvenSense MPU9250 IMU. Valid ms5637 Select the Measurement Specialities MS5637 ms5803 Select the Measurement Specialities MS5803 ms5805 Select the Measurement Specialities MS5805 ms5837 Select the Measurement Specialities MS5837 ms8607 Select the Measurement Specialities MS8607 no_timeout Disable the SMBUS timeout. N.B. Only supported reset_pin GPIO to be used to reset the device (bno055 sht3x Select the Sensirion SHT3x temperature and sht4x Select the Sensirion SHT4x temperature and si7020 Select the Silicon Labs Si7013/20/21 humidity/ sps30 Select the Sensirion SPS30 particulate matter sgp30 Select the Sensirion SGP30 VOC sensor. tmp102 Select the Texas Instruments TMP102 temp sensor tsl4531 Select the AMS TSL4531 digital ambient light veml6070 Select the Vishay VEML6070 ultraviolet light i2c0 Choose the I2C0 bus on GPIOs 0&1 i2c_csi_dsi Choose the I2C0 bus on GPIOs 44&45 i2c3 Choose the I2C3 bus (configure with the i2c3 i2c4 Choose the I2C3 bus (configure with the i2c3 i2c5 Choose the I2C5 bus (configure with the i2c4 i2c6 Choose the I2C6 bus (configure with the i2c6 |
●接続
●BME280のデバイス・ドライバを組み込む
sudo nano /boot/config.txtを立ち上げ、最後の行に、次の1行を追加します。
dtoverlay = i2c-sensor,bme280,addr=0x77
スレーブ・アドレスはデフォルトが0x76なので、その場合は、addr=の記述は不要です。利用しているAdafruitのStemma QT/Qwiicボードはデフォルトが0x77なので、上記の記述になります。
デバイス・ドライバの組み込みのログをとるためには、そのあとに、つまり、最後の行にdtdebug=1を追加します。
CTRL-Oで上書き保存をし、CTRL-Xでnanoを抜けます。rebootします。
デバイス・ドライバの組み込み時のメッセージは、 sudo vcdbg log msgで読み出せます。 vcdbg はapt-getでinstallします。
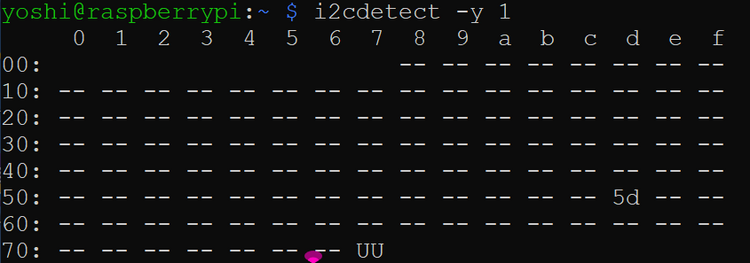
リブート後システムが立ち上がったら、I2Cバスにつながっているセンサを表示します。
0x5dはLPS22HBです。0x77のところはUUと表示され、BME280のデバイス・ドライバが組み込まれたことを示しています。
デバイス・ドライバが組み込まれると次のディレクトリができているので、テキスト・ファイルを表示します。1-0077は、1-0076かもしれません。
$ ls /sys/bus/i2c/devices/1-0077/iio:device0/
in_humidityrelative_input in_pressure_oversampling_ratio name subsystem
in_humidityrelative_oversampling_ratio in_temp_input of_node uevent
in_pressure_input in_temp_oversampling_ratio power waiting_for_supplier
温度、気圧、湿度を読み出します。
$ cat /sys/bus/i2c/devices/i2c-1/1-0077/iio:device0/in_temp_input
20750
$ cat /sys/bus/i2c/devices/i2c-1/1-0077/iio:device0/in_pressure_input
101.522187500
$ cat /sys/bus/i2c/devices/i2c-1/1-0077/iio:device0/in_humidityrelative_input
36620
温度は千倍になっているので、20.75℃、気圧はPaなので、1015.22187500hPa、湿度は千倍になっているので、36.62%です。
読み出しのプログラムです。
| import time while 1: f = open('/sys/bus/i2c/devices/1-0077/iio:device0/in_temp_input') Temp = round(int(f.read()) / 1000.0, 1) f.close f = open('/sys/bus/i2c/devices/1-0077/iio:device0/in_humidityrelative_input') Humi = round(int(f.read()) / 1000.0, 0) f.close f = open('/sys/bus/i2c/devices/1-0077/iio:device0/in_pressure_input') Press = round(float(f.read()) * 10.0, 1) f.close message = "Temp : %sC, Humi : %sRH, Press : %shPa" print(message % (Temp, Humi, Press)) time.sleep(2) |
●測定値をグラフィック・ディスプレイに表示
第3回目のコントローラST7789を使用したAdafruit 2.0" 320x240 Color IPS TFT Displayに、測定結果を表示します。
st7789のライブラリは入ったままです。
$ pip list | grep ST7*
ST7789 0.0.4
プログラムです。
|
import time import ST7789 disp = ST7789.ST7789(height=240,width=320,rotation=0, disp.begin() while 1: draw.rectangle((20, 50, 200,210), (32,32,32)) |
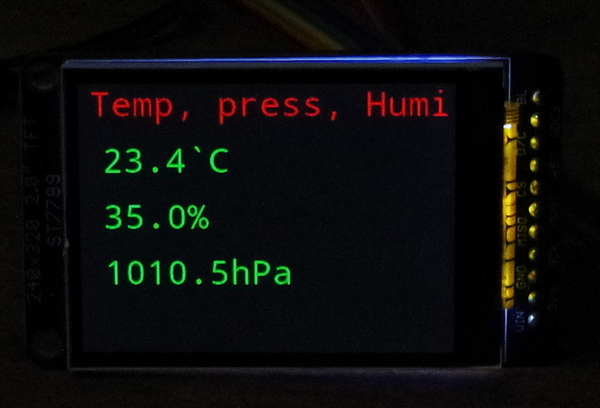
実行結果です。


