CircuitPython 10行プログラミング Step9 (4) SPIとグラフィック・ディスプレイ <その1>
ここでは、マイコン・ボードESP32-S3-DevKitC-1-N8のSPIバスを使います。CircuitPython は8.0.0-beta.4です。
●ピン番号
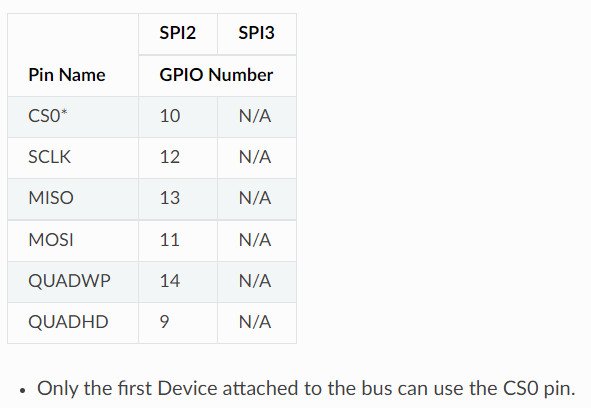
ピン配置図にはSPIバスの信号らしきものは見られますが、MOSIなどの一般的な名称は見つかりません。
データの中に、次のピン番号を見つけました。
●TFTディスプレイ
グラフィック三昧 ② ST7789とMKR WiFi 1010
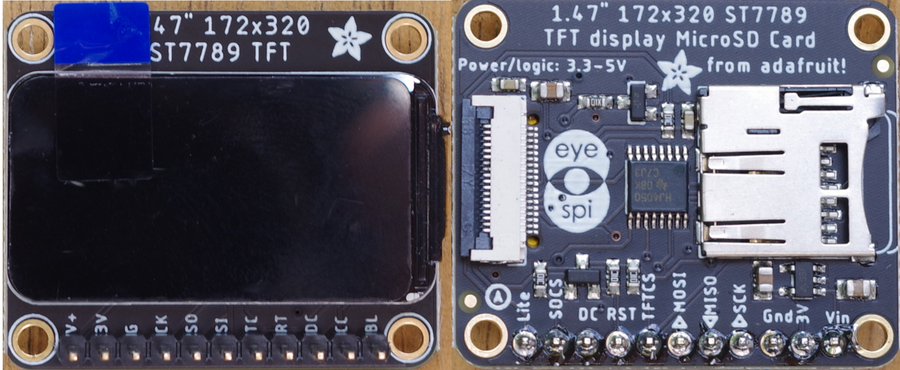
で用いた172×320 TFTディスプレイをつなぎます。インターフェースはSPIで、コントローラはST7789です。
接続です。
| ST7789TFTディスプレイ | ESP32-S3 |
|---|---|
| V+ Vin | 3.3V |
| 3V 3V | - |
| G Gnd | GND |
| CK SCK | 12 |
| SO MISO | - |
| SI MOSI | 11 |
| TC TFTCS | 10 |
| RT RST | 9 |
| DC DC | 46 |
| CC SDCS | - |
| BL Lite | - |
CK SCKのクロック12番ピンを13番に変更しましたが、問題なく動きました。14番に変更しましたが、問題なく動きました。
●サンプルを動かす
ダウンロードしたexamplesの中にあるst7789_170x320_1.9_simpletest.pyを読み込んで、ピンの名称を修正します。
# SPDX-FileCopyrightText: 2021 ladyada for Adafruit Industries
# SPDX-License-Identifier: MIT

"""
This test will initialize the display using displayio and draw a solid green
background, a smaller purple rectangle, and some yellow text.
"""
import board
import terminalio
import displayio
from busio import SPI
from adafruit_display_text import label
from adafruit_st7789 import ST7789

BORDER_WIDTH = 20
TEXT_SCALE = 3

# Release any resources currently in use for the displays
displayio.release_displays()

spi = SPI(clock=board.IO12, MOSI=board.IO11)
tft_cs = board.IO10
tft_dc = board.IO46
tft_rst = board.IO9

display_bus = displayio.FourWire(spi, command=tft_dc, chip_select=tft_cs, reset=tft_rst)

display = ST7789(display_bus, width=320, height=170, colstart=35, rotation=90)

# Make the display context
splash = displayio.Group()
display.show(splash)

color_bitmap = displayio.Bitmap(display.width, display.height, 1)
color_palette = displayio.Palette(1)
color_palette[0] = 0x00FF00  # Bright Green
bg_sprite = displayio.TileGrid(color_bitmap, pixel_shader=color_palette, x=0, y=0)
splash.append(bg_sprite)

# Draw a smaller inner rectangle
inner_bitmap = displayio.Bitmap(
    display.width - (BORDER_WIDTH * 2), display.height - (BORDER_WIDTH * 2), 1
)
inner_palette = displayio.Palette(1)
inner_palette[0] = 0xAA0088  # Purple
inner_sprite = displayio.TileGrid(
    inner_bitmap, pixel_shader=inner_palette, x=BORDER_WIDTH, y=BORDER_WIDTH
)
splash.append(inner_sprite)

# Draw a label
text_area = label.Label(
    terminalio.FONT,
    text="Hello World!",
    color=0xFFFF00,
    scale=TEXT_SCALE,
    anchor_point=(0.5, 0.5),
    anchored_position=(display.width // 2, display.height // 2),
)
splash.append(text_area)

while True:
    pass
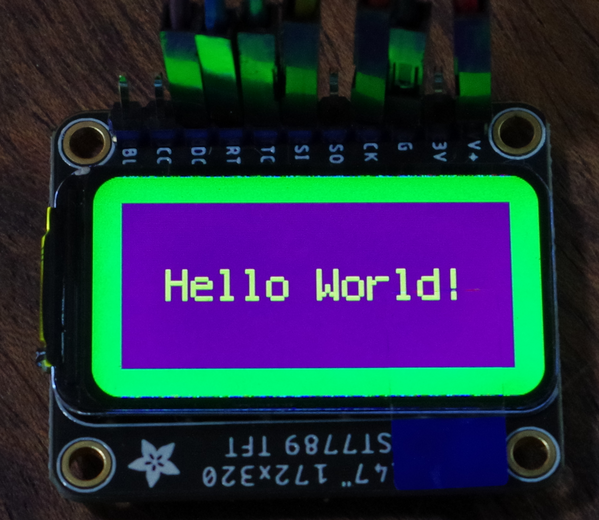
実行例です。
●メモ
◆テキスト関連のコマンド
- fill(0) 黒色で塗りつぶす
- text('World', 0, 10) 文字列を、x,y座標から描画する。四つ目の「1=白色」は省略可
- invert(True) 白黒を反転する。Falseで戻す
- show() 表示
◆図形関連のコマンド
- pixel(0, 0, 1) x,y座標(左上が原点)と色(1は白色)でドットを描く
- rect(0,0,120,60,1) 左上の座標x,y、右下の座標x,y、色で四角形を描画する
- fill_rect() 塗りつぶす
- line(100,40,110,50,1) xの始点、yの始点、xの終点、yの終点、色で直線を描画する
- circle(24,40,20,1) 中心点のx、y、半径、色で円を描画する
>>> import adafruit_display_text
>>> dir(adafruit_display_text)
['__class__', '__name__', '__file__', '__path__', '__version__', 'Group', 'Palette', '__repo__', 'wrap_text_to_pixels', 'wrap_text_to_lines', 'LabelBase']
>>> from adafruit_display_text import *
>>> dir(Group)
['__class__', '__name__', 'append', 'index', 'insert', 'pop', 'remove', 'sort', '__bases__', '__dict__', 'hidden', 'scale', 'x', 'y']
>>> dir(Palette)
['__class__', '__name__', '__bases__', '__dict__', 'is_transparent', 'make_opaque', 'make_transparent']
>>> dir(wrap_text_to_pixels)
['__class__']
>>> dir(wrap_text_to_pixels)
['__class__']
>>> dir(LabelBase)
['__class__', '__init__', '__module__', '__name__', '__qualname__', 'append', 'index', 'insert', 'pop', 'remove', 'sort', '__bases__', '__dict__', 'color', 'font', 'height', 'hidden', 'scale', 'width', 'x', 'y', 'text', '_get_ascent_descent', '_set_font', 'background_color', '_set_background_color', 'anchor_point', 'anchored_position', '_set_text', 'bounding_box', 'line_spacing', '_set_line_spacing', 'label_direction', '_set_label_direction', '_get_valid_label_directions', '_replace_tabs']
>>> from adafruit_display_text import label
>>> dir(label)
['__class__', '__name__', '__file__', '__version__', 'Bitmap', 'Palette', 'TileGrid', '__repo__', 'LabelBase', 'Label']


