ラズパイ5 +Python+CANopenでモータを回す ⑫ モーション CiA 402の規格<Profile Position Mode (PPM)-中編> caninfo2.py canppm.py
前回、Profile Position Modeの設定項目(オブジェクト)のパラメタを読み出しました。
たくさんの項目があるので、どういう手順で設定すべきか迷います。前回紹介した二つの設定手順を具体的に説明します。
|
<1> の中に、Profile Position Mode (PPM)のSET POSITIONの手順が説明されています。しかし、最初に見たPDOの情報には触れられていません。 ベクター社の下記の資料に、PDOを含めた一連の設定、運用手順が書かれています。PDOのマッピングの変更は、同社のツールを使っています。EPOSを販売しているMaxonのツール・ソフトStudio 3.7で、可能です。 <2> EPOS と CANsetter で学ぶ CANopen Version 1.2 2010/03/15 Application Note AN-JON-1-701 |
<1> EPOS4資料によるProfile Position Mode設定手順
A~Eの順番で設定していきます。Eは、状況によって、どれかを選ぶことになるようです。
| 順序 | Object name | Object(subなし) | 設定する値 [デフォルト値] |
|---|---|---|---|
| A | Modes of operation | 0x6060 | 0x01 (Profile Position Mode) |
| B | Following error window | 0x6065 | ユーザ固有値 [2'000 inc] |
| Max profile velocity | 0x607F(*3) | モータの性能に依存 [50'000 rpm] | |
| Profile velocity | 0x6081 | 希望の速度 [1'000 rpm] | |
| Profile acceleration | 0x6083 | ユーザ固有値 [10'000 rpm/s] | |
| Profile deceleration | 0x6084 | ユーザ固有値 [10'000 rpm/s] | |
| Quick stop deceleration | 0x6085 | ユーザ固有値 [10'000 rpm/s] | |
| Motion profile type | 0x6086(*3) | ユーザ固有値 [0] | |
| C | Controlword (Shutdown) | 0x6040 | 0x0006 |
| Controlword (Switch on & Enable) | 0x6040 | 0x000F | |
| D | Target position | 0x607A | 希望する位置 [inc] |
| E (*1) |
Controlword (absolute position) or Controlword (absolute position, start immediately) or Controlword (relative position, start immediately) or Controlword (relative position) |
0x6040 |
0x001F or 0x003F or 0x007F or 0x005F |
| F (*2) |
Controlword (New Position) | 0x6040 | 0x000F (toggle “New Position”) |
(*1)Controlwordを更新した後、ドライブのステータスを確認すべき(ステータス・ワード (0x6041))。 ステータス・ワードをチェックする前に、少なくとも1msのdelayを置く
(*2)Controlwordの実行時には、少なくとも1msのdelayを置くこと
(*3)BLVD-KRDには存在しない。逆に、BLVD-KRDが「B」で設定すべきかもしれない項目。Max torque (6072h)、Positioning option code (60F2h)、End velocity (6082h)
<2>ベクター社資料による設定手順
作業は大きく分けて二つです。
- PDOマッピングをProfile Position Modeに合わせて変更する
- SDOでProfile Position Modeに必要な初期値を設定
EPOS Studio3.7ではPDOの設定には専用の画面があり、保存すると、コントローラのeepromに書き込まれ、以降、電源を入れるとその設定が有効になりました。
このオリエンタルモーターのBLVD-KRDでは、(p5)CANopen object通信初期値・設定 の設定画面で変更ができ、保存すればいいように思えます。保存して、次回から有効にならないなら、プログラムでPDOマッピングの設定を実行するようにすればよいように思えます。
2番目の初期値を設定するところは、<1>の説明を参考にしてPythonでプログラムを組んで書き込み、前回作った読み出しプログラムで確認するという流れを考えます。
●PDOマッピングの変更点
<記事に書かれていたデフォルト値>
- RPDO0 Velocity Mode Setting Value
- RPDO1 Controlword Target Velocity
- RPDO2 0x6040: Controlword Modes of Operation
- TPDO0 Velocity Actual Value
- TPDO1 Current Actual Value Analog Input -1 Analog Input -2
- TPDO2 0x6041: Status Word Modes of Operation Display
<記事で変更した後の値>
- RPDO0 0x607A: Target Position Position Actual Value
- RPDO2 0x6040: Controlword Modes of Operation
- TPDO0 0x6064: Velocity Actual Value Position Actual Value
- TPDO2 0x6041: Status Word Modes of Operation Display
ーーー
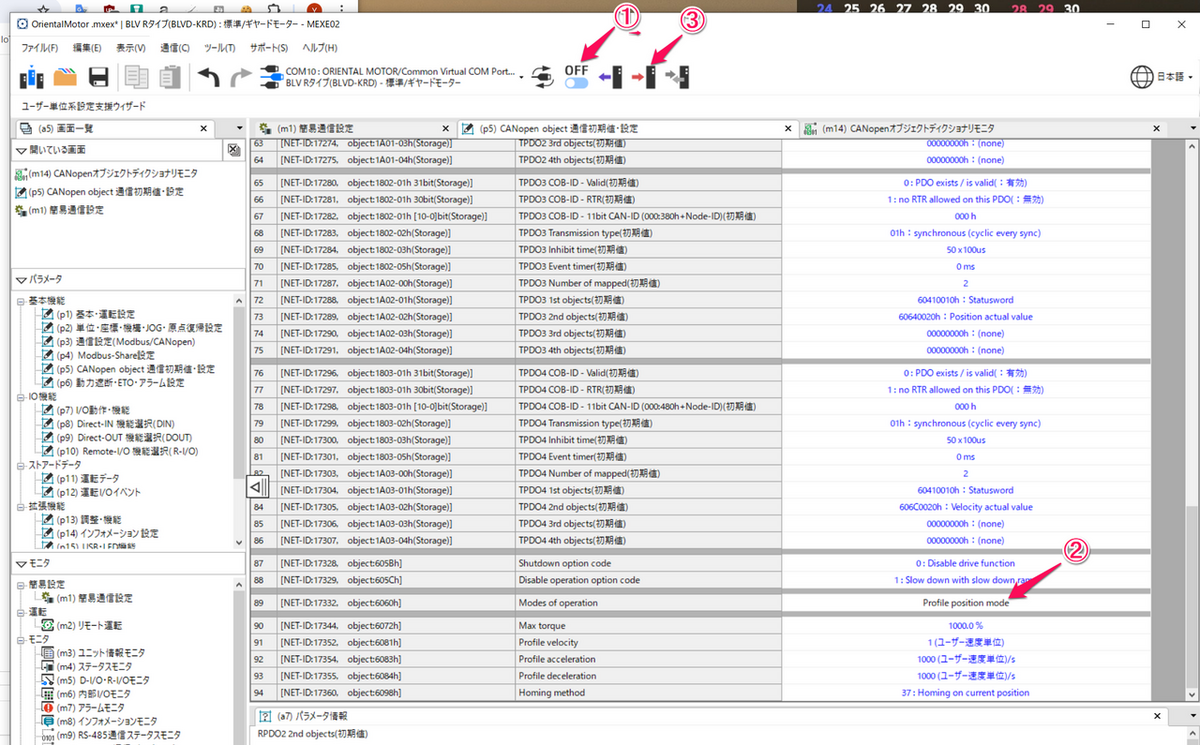
「(p5) CANopen object通信初期値・設定画面」のデータを読みます。
<BLVD-KRDデフォルト>
- RPDO1 60400010h: Controlword
- RPDO2 60400010h: Controlword 6060008h: Modes of Operation
- RPDO3 60400010h: Controlword 607A0020h: Target Position
- RPDO4 60400010h: Controlword 60ff0020h: Target Velocity
- TPDO1 60410010h: Status Word
- TPDO2 60410010h: Status Word 60610008h: Modes of Operation Display
- TPDO3 60410010h:Status Word 60640020h: Position actual value
- TPDO4 60410010h:Status Word 606c0020h: Velocity actual value
そのほかの初期化設定値
- Max torque (6072h) 1000.0%
- Profile velocity(6081h)1
- Profile acceleration(6083h) 1000
- Profile deceleration(6084h) 1000
読み出したPDOマッピングから、Profile Velocity ModeとProfile Position Modeのどちらも使えるようにマッピングがされていると想像できます。したがって、Profile Position Modeで使いたいのであれば、Modes of Operationを変更すればいいだけです。
|
<購入時> 6060h: Modes of Operation Profile Velocity Mode <BLVD-KRD変更後> 6060h: Modes of operation Profile Position Mode |
●MEXE02を使ってModes of Operationを更新する作業
①MEXE02の画面上部。OFF状態
(p5) CANopen object通信初期値・設定画面のデータの画面
②Modes of Operation Profile Position Modeへ変更
③MEXE02の画面上部。データの書き込み
④MEXE02の画面上部。 ON
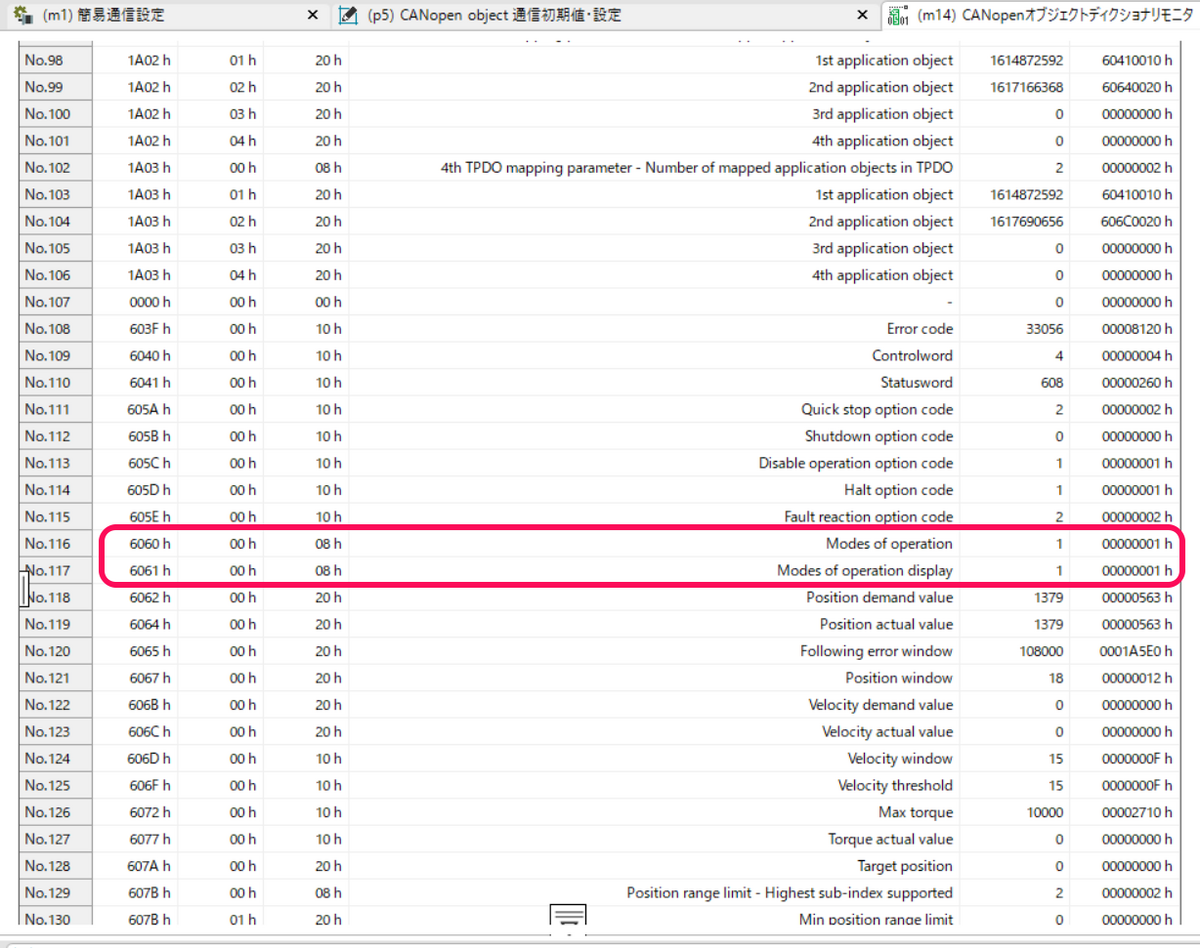
(m14) CANopenオブジェクトディクショナリ
Modes of Operation、Modes of Operation Displayが、'3'から'1'のProfile Position Modeに変更されていることを確認できました。
●プログラムでも確認
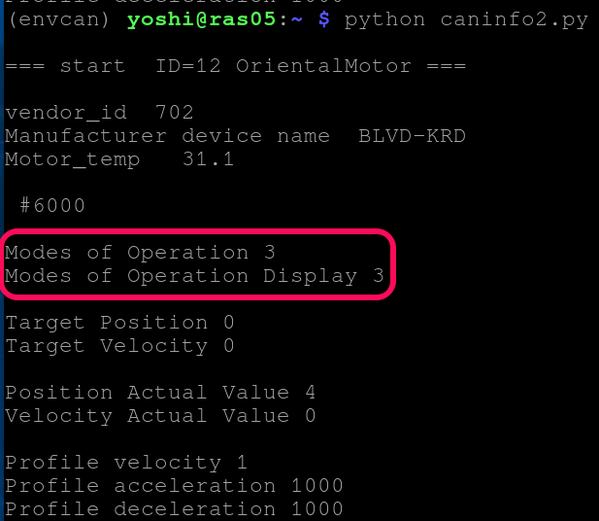
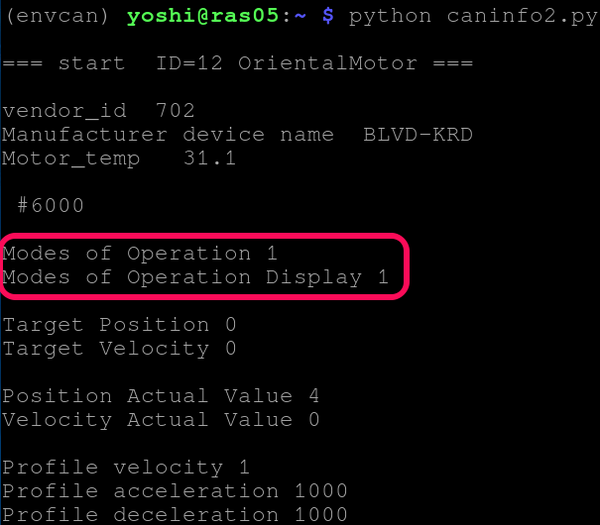
cnainf.pyを修正して、caninfo2.pyを作りました。
|
import canopen # Start with creating a network representing one CAN bus # Add some nodes with corresponding Object Dictionaries network.check() # Connect to the CAN bus print("\n=== start ID=12 OrientalMotor ===\n") print("\n #6000 \n") # Disconnect from CAN bus |
実行します。 上記のModes of Operation変更前;
Modes of Operation変更後;'3'のProfile Velocity Modeから、'1'のProfile Position Modeにかわっています。
●PDOマッピング
Profile Velocity ModeとProfile Position Modeで必要な項目が、最初から設定されているので、修正しないで進めます。
- RPDO3 60400010h: Controlword 607A0020h: Target Position
- RPDO4 60400010h: Controlword 60ff0020h: Target Velocity
- TPDO3 60410010h:Status Word 60640020h: Position Actual Value
- TPDO4 60410010h:Status Word 606c0020h: Velocity Actual Value
●テストPPMプログラム
下記のプログラムをcanppm.pyで保存します。Pythonの仮想環境で実行します。
tpdo[3]はPosition Actual Valueが入っているので読みだし、orgPositionに保存します。
node.tpdo[3].wait_for_reception()
print('Statusword {:0>16b}'.format(node.tpdo[3]['Statusword'].phys))
orgPosition = node.tpdo[3]['Position actual value'].phys
print('start position {:4d}'.format(orgPosition))
Modes of operationをProfile Position Modeに指定するのは、MEXE02で行っているので、コメントアウトします。orgPosition をSDOでTarget positionへ書き込みます。また、Profile velocityは、デフォルトで'1'が設定されていて、小さすぎてほとんどこれでは動かないので、5000をSDOで書き込みます。
#node.sdo[0x6060].raw = 0x0001 # Modes of operation <- Profile Position Mode
node.sdo[0x607a].raw = orgPosition # Target position
node.sdo[0x6081].raw = 5000 # Profile velocity
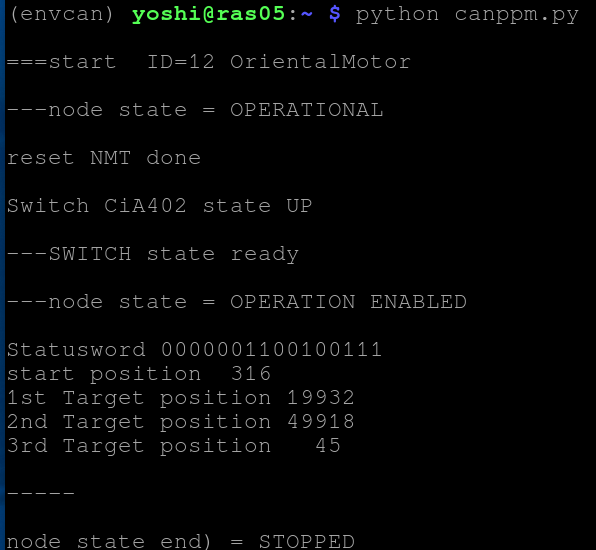
回転は、3回行いました。
最初のCWの移動です。Controlwordの0x005fはrelative positionの指定なので、現在位置からTarget position=20000ぶん回転します。rpdo[3]以外のRPDOは全部コメントアウトしても問題ないことを確認しました。
node.rpdo[3]['Controlword'].phys = 0x005f
node.rpdo[3]['Target position'].phys = 20000
node.rpdo[3].transmit()
time.sleep(0.02)
time.sleep(3)
node.tpdo[3].wait_for_reception()
print('1st Target position {:4d}'.format(node.tpdo[3]['Position actual value'].phys))
次のCWの移動です。ここでは、rpdo[1]の設定が必要でした。rpdo[3]で、現在位置からTarget position=30000ぶん回転します。
node.rpdo[1]['Controlword'].phys = 0x000f
node.rpdo[1].transmit()
time.sleep(0.02)
node.rpdo[3]['Controlword'].phys = 0x005f
node.rpdo[3]['Target position'].phys = 30000
node.rpdo[3].transmit()
time.sleep(0.02)
time.sleep(3)
node.tpdo[3].wait_for_reception()
print('2nd Target position {:4d}'.format(node.tpdo[3]['Position actual value'].phys))
三つめも移動です。相対移動をマイナス値としたので、CCW方向に回転します。Target position=-50000なので、最初の位置に戻るはずです。
node.rpdo[1]['Controlword'].phys = 0x000f
node.rpdo[1].transmit()
time.sleep(0.02)
node.rpdo[3]['Controlword'].phys = 0x005f
node.rpdo[3]['Target position'].phys = -50000
node.rpdo[3].transmit()
time.sleep(0.02)
time.sleep(3)
node.tpdo[3].wait_for_reception()
print('3rd Target position {:4d}'.format(node.tpdo[3]['Position actual value'].phys))
実行の様子です。指定した位置とは少しずれてますが、誤差なのか、ほかに原因があるのかは不明です。
プログラムcanppm.pyです。
|
import canopen # Start with creating a network representing one CAN bus # Connect to the CAN bus # Add some nodes with corresponding Object Dictionaries def resetNmt(): # Reset this node def startState_machine(): #----main---------------- resetNmt()
#node.sdo[0x6060].raw = 0x0001 # Modes of operation <- Profile Position Mode #node.nmt.state = 'OPERATIONAL' #node.rpdo[1]['Controlword'].phys = 0x000f node.tpdo[3].wait_for_reception()
node.tpdo[3].wait_for_reception() node.rpdo[1]['Controlword'].phys = 0x000f node.tpdo[3].wait_for_reception() #------------------- print("\n-----") |
次回、一部関数化し、読みやすくします。
